Pages

Showing posts with label JOY SA Inc.. Show all posts

Tuesday, December 3, 2019

Cheers! Bottle Bag

Hi Everyone!

Need a quick hostess gift?  Just pop your favorite beverage into this easy bottle bag decorated with Joy embroidered iron-on letters.

I painted these letters with two kinds of DecoArt paint - a red acrylic and a glitter paint.  For all the instructions, see the Creating with Joy blog.

Of course, there are lots of options for making this in your own style - use your favorite word for a toast - and paint with your favorite colors.  This would be great for New Year's or any festive occasion.

Cheers!  All the best in your holiday festivities!
Bottle Bag

Thursday, June 6, 2019

Joy-ful ideas

Hi Everyone!

Thanks for stopping by!

Over on the Creating with Joy blog, there are always great ideas on how to embellish your projects with Joy letters and embroideries.

Here's a few that I have created recently as a member of the design team.  (I receive compensation for these projects and a lot of letters!)

I like to create games for the grandkids.  Here's a Bowling Game that I designed using chocolate milk bottles.  I love when you can reuse things.  This uses some multi-surface paint from Plaid.


And, for the graduate, I made a Mortarboard Gift Box, which can hold a gift card, or your graduate's favorite gift - cash!


Here I've use some Kunin stiff felt and a recycled box.  Add your favorite saying and personalize it with the school colors of your grad.

And, back in April, I created a sign for the yard to point the way to the Easter egg hunt!  Joy letters make it so easy to create a sign!

There are so many ways to use JOY letters - games, signs, gifts.  Stop by the Creating with Joy blog and see more ideas from the design team!


Friday, August 3, 2018

Summertime Projects with Joy Iron-on Letters

Hi Everyone!

Hope you are having a great summer!

Here are my projects for the last three months using the iron-on letters from Joy.  All the instructions can be found on the Creating with Joy blog , where you will find my projects and those from the rest of the fabulous design team.

We spend a lot of time outside around the barbecue during the summer, so I created projects for the patio.  This is a quick and easy burlap pillow that is great for any of the patriotic holidays or just everyday.  It's so easy even the kids will enjoy it.  Make it patriotic or use their names or any short word.


This silverware caddy uses chalk paint on the canning jars as well as distressing over the letters and the caddy and tags.  I love the distressed look on the letters.

Upcycled Gift Box
This last project is an upcycled cheese box that I did for May, but you could use it for any occasion.  It would be a great box for a small gift such as jewelry.  Joy letters are great for any occasion, and you can color them in so many ways.  Here, I used ColoriQue inks to color them.

Drop by the Creating with Joy blog and see all the other wonderful creations from our design team!

Wednesday, May 2, 2018

Creating with Joy April Roundup

Hi Everyone!

We've had a busy month on the Creating with Joy blog.  Here's what we created in April.

We decorated everything from a spring frame for your special photos and pots for your herbs:


Some very cute kitty slippers-

A bag and a shirt--


A journal for your gardening ideas--


A beautiful sign for spring--

A plaque to commemorate a wedding--


A cowboy hat--


And, a tropical birthday banner--


How's that for a variety of ideas!  What will you create with Joy letters?  Head on over to the Creating with Joy blog for more inspiration!

Monday, December 4, 2017

Word Christmas Tree

Hi Crafty Folk!

I hope you are all enjoying the Advent of Christmas.  Here's a craft I created for JOY Iron-on letters that I want to share with you.

Word Christmas Tree
You can find the easy instructions on the Creating with Joy blog.  This word tree is so much easier and quicker than painting the words!  And, you can use any fonts you like.  Or, change the words to use your favorites.

Have fun decorating!  And, come back soon!  I have a few more Christmas crafts up my crafty sleeves!

Tuesday, September 26, 2017

Upcycled Mixed Media Wall Art

Hi all,

Today I'm sharing a piece I did for the Creating With Joy blog, where we use Joy iron-on letters in our artwork and crafts.  Take a look there for my materials and instructions on how to create your own canvas.

Upcycled Sunflowers
I collect and re-use materials like cardboard coffee sleeves and the foil that seals coffee cans.  (And, a lot of other stuff!)  I like the coffee sleeves as they come in a lot of different textures.  I used three different textures here.  And, the foil is really fun.  It usually has a texture, too; and, it can be cut and bent easily.  The Joy Iron-on letters can be painted or dyed as you like and add a nice dimension to the piece.  So, save some of these fun materials and create your own fall art.  These materials are easy enough for kids to use, too.

(I am a member of the design team for Joy iron-on letters and receive their product with which to create my art.  Check out the Creating with Joy blog for more great ideas from our design team.)


Tuesday, July 11, 2017

Dish Towel Apron

Hi there,

Let's face it - life can be messy.  Well, here's a quick and easy apron that helps with that problem.  I made it from a gingham dish towel.  And, I personalized it with JOY Iron-on letters.
Dish Towel Apron

These letters were white, but are easy to dye or color.  I used some pens for this project.  As you can see, I left the letters on the sheet while I colored them.  This holds them in place and makes them much easier to color.
Coloring your letters

All the kids will want their own, and you'll want one for each child.  I'll be creating four more for the rest of my granddaughters!  When they are done with watercolors or eating their peanut butter and jelly, you can just toss the apron in the wash.

For this one, I sewed the bias tape to the dish towel, but you can use fabric glue for a no-sew version.  Either way it's very quick.  And, if you need to shorten the dish towel, simply fold it up and glue or sew it down to create a pocket across the front.  You can also use the pieces you cut out for the armholes to create some patch pockets.

You can find the materials you'll need and the tutorial over on the Creating with Joy blog.

(I am a design team member for JOY SA Inc. and have been provided their product with which to create my product.  I am happy to recommend them.)


Tuesday, May 16, 2017

Monogrammed Wreath

Hi Crafty Friends!

Today, I want to show you something I created for JOY Iron-on letters.  They have a lot of new items out now, and one of them are these nice large monograms.  These are 5" high.  I used it to make a monogrammed spring wreath:


The monograms come in white, but for this wreath, I wanted a softer tone.  Since the iron-on letters are dye-able, I used some RIT Dye to add a soft tan color.

The dye I used is Ecru, but that particular color is not available anymore.  You can use Tan or Taupe.  Leaving it in the dye bath for a shorter period of time will give you a lighter color. While you have your dye bath, consider dying some ribbon to match.

If you want a little more structure to your letter, you can iron it onto some heavy fabric like canvas or denim and trim the fabric to make a border for your monogram.  Or, you can iron it onto some lightweight wood or tag board, depending on how you want to display your monogram.

A note on the materials used:  The wonderful script wired ribbon is from Offray (purchased at JoAnn's).  The little foam eggs are available from Smoothfoam.

For all the instructions and materials on how to make the wreath, go to the Creating with Joy blog.  If you need more ideas, check out Pinterest under Monogrammed Wreaths!  There are so many ways to Create with Joy!

Have fun!

Thursday, May 11, 2017

"Bloom" Bottle Hangers

Hi all,

Here's a quick and easy craft for springtime -  Flower bottle hangers!  It's so easy and quick that you could make a set in time for Mother's Day.  Cut out your own flowers or use die cuts like I did here.  Joy Iron-on letters add just the right touch!  Don't have a matching set of bottles or vases?  No problem!  A mixed set of recycled vases or bottles looks even cuter!

"Bloom" Bottle Hangers
And, you can recycle even more by using whatever papers you might have.  Here I used scrapbook paper and some leftover tissue and gift wrap.  You could try any number of papers from paper bags to shiny foils.  If you don't have the letters in the color you want, just dye them or color them with pens!

I designed this craft for the Creating with Joy blog.  All the details on how to create this project are on the blog here.  You can find these iron-on letters in major craft stores like Michaels and Hobby Lobby.  They have just come out with some new large letter sizes, fashionable monograms and, now, emojis!

I hope you'll have fun making your own version of this craft, because being creative is what it's all about! 


Wednesday, March 8, 2017

National Craft Month

Hi Crafty Friends!

March is National Craft Month and I'm going to celebrate this month with some ideas and inspiration for you. 

Here's a few ideas from the Creating With Joy blog.  It's almost St. Patrick's Day, so here is a cute banner from Julie McGuffee:  St. Patrick's Day Banner

St. Patrick's Day Banner
Also from the Creating with Joy blog, my Children's Felt Bulletin Board.  It's simple to make with that wonderful felt from Kunin, some Duck Tape and Joy Iron-on Letters.
Children's Felt Bulletin Board
Joy Iron-on letters can be ironed onto most surfaces with a craft iron or glued onto those surfaces where you can't use an iron.

Here's a craft that I did in February for the Creating with Joy blog.  We're expecting a granddaughter this month, so I created a small garland for the baby's room.  This time I used stiffened felt, some tulle ribbon and, of course, Joy letters!

Baby Onesie Garland
And, in January, I was thinking snow!  Maybe I thought a little too hard!  There is a lot of it around this year!

Here's the easy garland I created for January:
Let It Snow Garland
These letters are adhered to sparkling foam snowflakes.  It's easy to adapt for any occasion by cutting or buying die cuts and adding Joy letters.  You can find them in craft stores like Michaels or Hobby Lobby or on their website.

Hope you are inspired to create! 

Monday, October 24, 2016

Harvest Plaque

Hi friends!

Ready for some quick and easy fall decorating?  JOY Iron-on letters make it easy to create memorable designs for any occasion!
Harvest Plaque
Go to the Creating with Joy blog for all the details on what you'll need to create this plaque.

Basically, you paint a canvas with a wash of orange.  I went around the edges with full-strength orange paint (Jack-O'-Lantern Orange from DecoArt.)  Cut out a nice fall napkin and decoupage it to the canvas.  I tore the napkin edges and inked them (Ann Butler's ColorBox(R) Crafter's craft ink in Canyon).  Then, I glued burlap ribbon to the canvas.  I pulled threads from the edges of the burlap ribbon and inked the edges with Canyon.

I added JOY letters across the napkin.  To paint the letters easily, stretch a piece of tape across a box sticky side up.  Adhere the letters to the tape and paint!  It's so easy when they don't move around!  Here's another word that I thought about using.  You can use your favorite fall word or saying.


Here's how the plaque looks after the word and the ribbon.
Before adding the leaves
I die cut some leaves from scrapbook and amate papesr, inked the edges and added splotches here and there.  I also folded and wrinkled the leaves a bit.  I arranged them and glued them down, then added a twine bow.

So easy - you can make one for any season!

Happy Crafting!
Terry

(Disclaimer:  As a member of the design team for JOY letters, I received monetary compensation and iron-on letter samples to use in my designs.)


Saturday, September 17, 2016

Fall Doorhanger

Hi Crafty Friends!

It's almost fall, and one of my favorite seasons for decorating the house.  You can't beat the array of colors - rich reds, brilliant yellows and warm oranges along the comfy shades of brown.

Here's a project that I created for JOY using their iron-on letters.  For all the instructions, head on over to the Creating With Joy blog.  These particular letters come with an adhesive backing so that they stay in place when you iron them onto fabric.  But, for this craft, I used the adhesive without ironing.  It's really quick and easy!

Fall Doorhanger
I want to mention one of the techniques that I used for this sign.  I used a watercolor look, but the watercolors that I used are Rit dyes!  I painted the canvases with Rit® dye in Tan.  Then, I added some color in the middle and around the edges with Cocoa Brown.  I dipped the letters in Tangerine and dabbed some of the brown here and there on the letters.

This is a great way to color your JOY letters - just dip and dry.  And, Rit® dyes come in just about every color imaginable!  And, you can mix them to create more shades!

Have fun creating with fall colors, JOY letters and Rit® dye!


Saturday, April 9, 2016

Spring Craft Ideas

Hi crafty people!

Spring brings a lot of fun occasions for decorating and family get-togethers.  Here's a few ideas that you can adapt to fit any festivity!

First of all is a little Bitty Bunny that I created for Smoothfoam.  Although I created it as an Easter craft, it would  make a fun kid's craft anytime.  You could also use it as a decoration in a flower pot or a child's room. 
Bitty Bunny for Smoothfoam

Here's another spring-y idea for you.  It uses JOY Iron-on letters to create an easy Spring Banner.  I tied it to the Welcome sign that's in my entry.  I like this idea so much that I want to create one for each season!  It's so easy with these letters.  Another possibility is to create them for a special occasion like a baby shower and welcome the new mom or baby.

Spring Banner for JOY letters
You can find Smoothfoam and JOY Iron-on letters at many of the larger craft stores now or you can order through their websites.  (I am happy to promote these fine companies as I am on their design teams.  As a member of the design teams, I occasionally receive free product with which to create.)
One of my favorite things about spring is buying flowers and starting new plants for the garden.  JOY letters are perfect for labeling your pots and tags when you start your seeds.  Or, use them as a gift tag when you give a gift from your garden.  Follow this link for instructions for these gardening labels.
Herb Garden Labels for JOY Letters
There are lots of great projects on these two blogs.  Stop by and see for yourself at the Smoothfoam blog and on the Creating With Joy blog.

Happy Creating!
Terry

Saturday, February 6, 2016

Faith, Family, Friends Signpost

Hi all,

Today I'm sharing my latest project for Smoothfoam™.  It's a signpost that reflects what is important to me.   It's very simple to make. I used a sheet of Smoothfoam™ and cut the signs, notched the edges and painted them.  Looks like painted wood, doesn't it?  But, it's so much easier to work with than wood.

Signpost
For this project I've add some JOY letters in two different fonts, and it was painted with DecoArt® Chalky Finish Paints.  Both of these products work so well with Smoothfoam™.  The Chalky Finish paint covers with one coat since it's nice and thick.  And, lettering signs with JOY letters is a breeze - simply glue them on to the foam surface.  If you like, you can color them with inks or paint to get the color you desire.  You can find all these products at a large craft store near you. 

For all the details, head to the Smoothfoam™ blog and create a signpost that reflects your favorite phrases.

Happy Crafting,
Terry

Tuesday, January 19, 2016

Live, Laugh, Love Wall Hanging

Hi Crafty Friends!

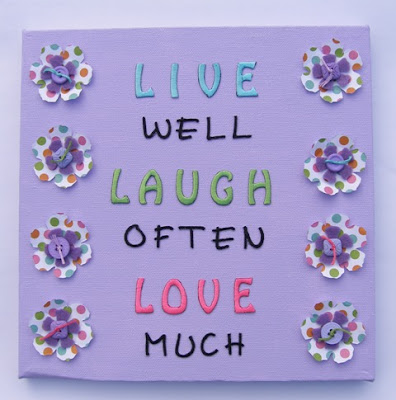
Today I'm sharing my latest project with JOY Iron-on letters.  In this design, I used some of the funky neon letters with black letters in another font.  Then, I cut some flowers with my Sizzix Big Kick and added buttons and floss.  It's so easy with these letters to create your favorite motto or saying.
Live, Laugh, Love Wall Hanging
You can find all the instructions on the Creating with JOY blog.

You can find these letters in Hobby Lobby or Michaels, or on the website if you don't have a store in your area. 

Happy Crafting!
Terry

Sunday, November 15, 2015

Leaf Place Card

Hi Friends!

It's fun to decorate the table for harvest, Thanksgiving or other fall celebrations.  Here's the perfect easy place card to add that touch of fall to your table.
Leaf Place Card with JOY iron-on letters
You can place these on the plate as shown here, or attach them to a pumpkin or other holder.  Scatter a few more leaves around the centerpiece for a lovely fall accent.

Close-Up of Leaf Place Card


I used JOY Iron-on letters to add a name to the leaf.  Short names work best for this or you can use initials.  You can iron on the letters or use tacky glue.  You can find all the details on how I made this Leaf Place Card on the Creating with Joy blog.

Wishing you family gatherings filled with joy and warmth!
Terry

Sunday, October 25, 2015

Halloween Wreath

Hi Crafters!

It's not too late to make this Halloween wreath.  It's simple and easy and you probably have some of the materials around your house. 
Halloween Wreath
Head over to the Creating with JOY blog for more information about how to put this wreath together.  The little banner has orange letters from JOY SA Inc.  You can find the JOY Iron-On Letters at your local Michaels. 

Another special item on the wreath that I want to mention are the flags used in the banner.  These little recycled, tagboard flags are from Eye Connect Crafts.  They're the perfect size for a small wreath, a card or a scrapbook page.  I also up-cycled a paper bag and made a twisted tree for the wreath.  A few small wood items, some gauze, wiggle eyes and paint complete the wreath.  

Have fun creating your own spooky wreath!
Terry

Friday, October 2, 2015

Welcome Banner

Hi Crafty Friends!

Welcome your friends and family for fall occasions with this easy banner!  It's made with JOY Iron-On letters, burlap ribbon, felt leaves and a little glue, pen and paint.  You can whip one up in a jiffy!
Welcome Banner for Fall
I used a dowel and a couple of spools to hang the banner, but wouldn't it be fun to use a piece of a branch for a natural look?  Or, add a few leaf veins with dimensional paint or embroidery!  Personalize it to suit your taste - that's what creativity is all about!

Here's the link for all the instructions: http://creatingwithjoy.blogspot.com/2015/09/fall-welcome-banner.html

Stop by the Creating with JOY blog for more projects that the design team creates with these fun letters!
Happy Fall Y'all!
Terry
(I received materials and compensation for this project as a member of the JOY design team.)

Tuesday, September 1, 2015

Do Not Disturb Sign for the Nursery

Hi Creative People!

Have you discovered JOY Iron-on letters yet?  You can find them at Michaels or on the JOY website.  There are so many things that you can decorate with them and they are so easy to use! 

Here's what I created with them last month -
Do Not Disturb Sign
You can find the instructions on the Creating with Joy blog.

Stop by the blog and see all the other projects that the Creativity Team has designed.  There are more projects for baby, fall decorations, monogrammed items, art ideas and lots more.

JOY-fully yours,
Terry

Tuesday, June 30, 2015

Patriotic Banner

Hi Crafters!

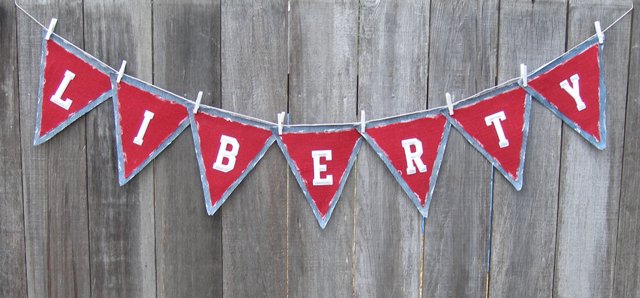
July is here and, with it, one of my favorite holidays - the Fourth of July!  Here's a quick and easy banner that you can make for decorating for the holiday.  It's a banner made with old jeans, red burlap and white iron-on letters from JOY SA Inc.  JOY makes all sorts of iron-on letters and appliques.  You can find them in Michaels now or order through the website.  I'm now on their Creativity Team, so you'll be seeing more projects using their letters.  They are so easy to add to any project.  Stop by the Creating with Joy blog to see more designs from the team.

Patriotic Pennant Banner
You can find all the instructions on the blog here.  You can personalize this banner with your favorite patriotic phrase or word.  This banner is no-sew and is only attached to the twine with clothespins, so it is super fast to make.  In the above photo, the pennants are spaced apart, but I like the way it looks overlapped also.
Patriotic Banner with pennants overlapped
The clothespins make it easy to change the spacing and fit the space you have to hang it.  You'll want to use this technique for other occasions and events, too - birthdays, baby showers, yard sales - wherever you need a quick and easy sign, create it with JOY!

Happy Fourth of July!
and, 
God Bless the USA!
Terry