Pages

Showing posts with label fall craft. Show all posts

Monday, September 25, 2023

Woven Ribbon Coasters

 Happy Fall!

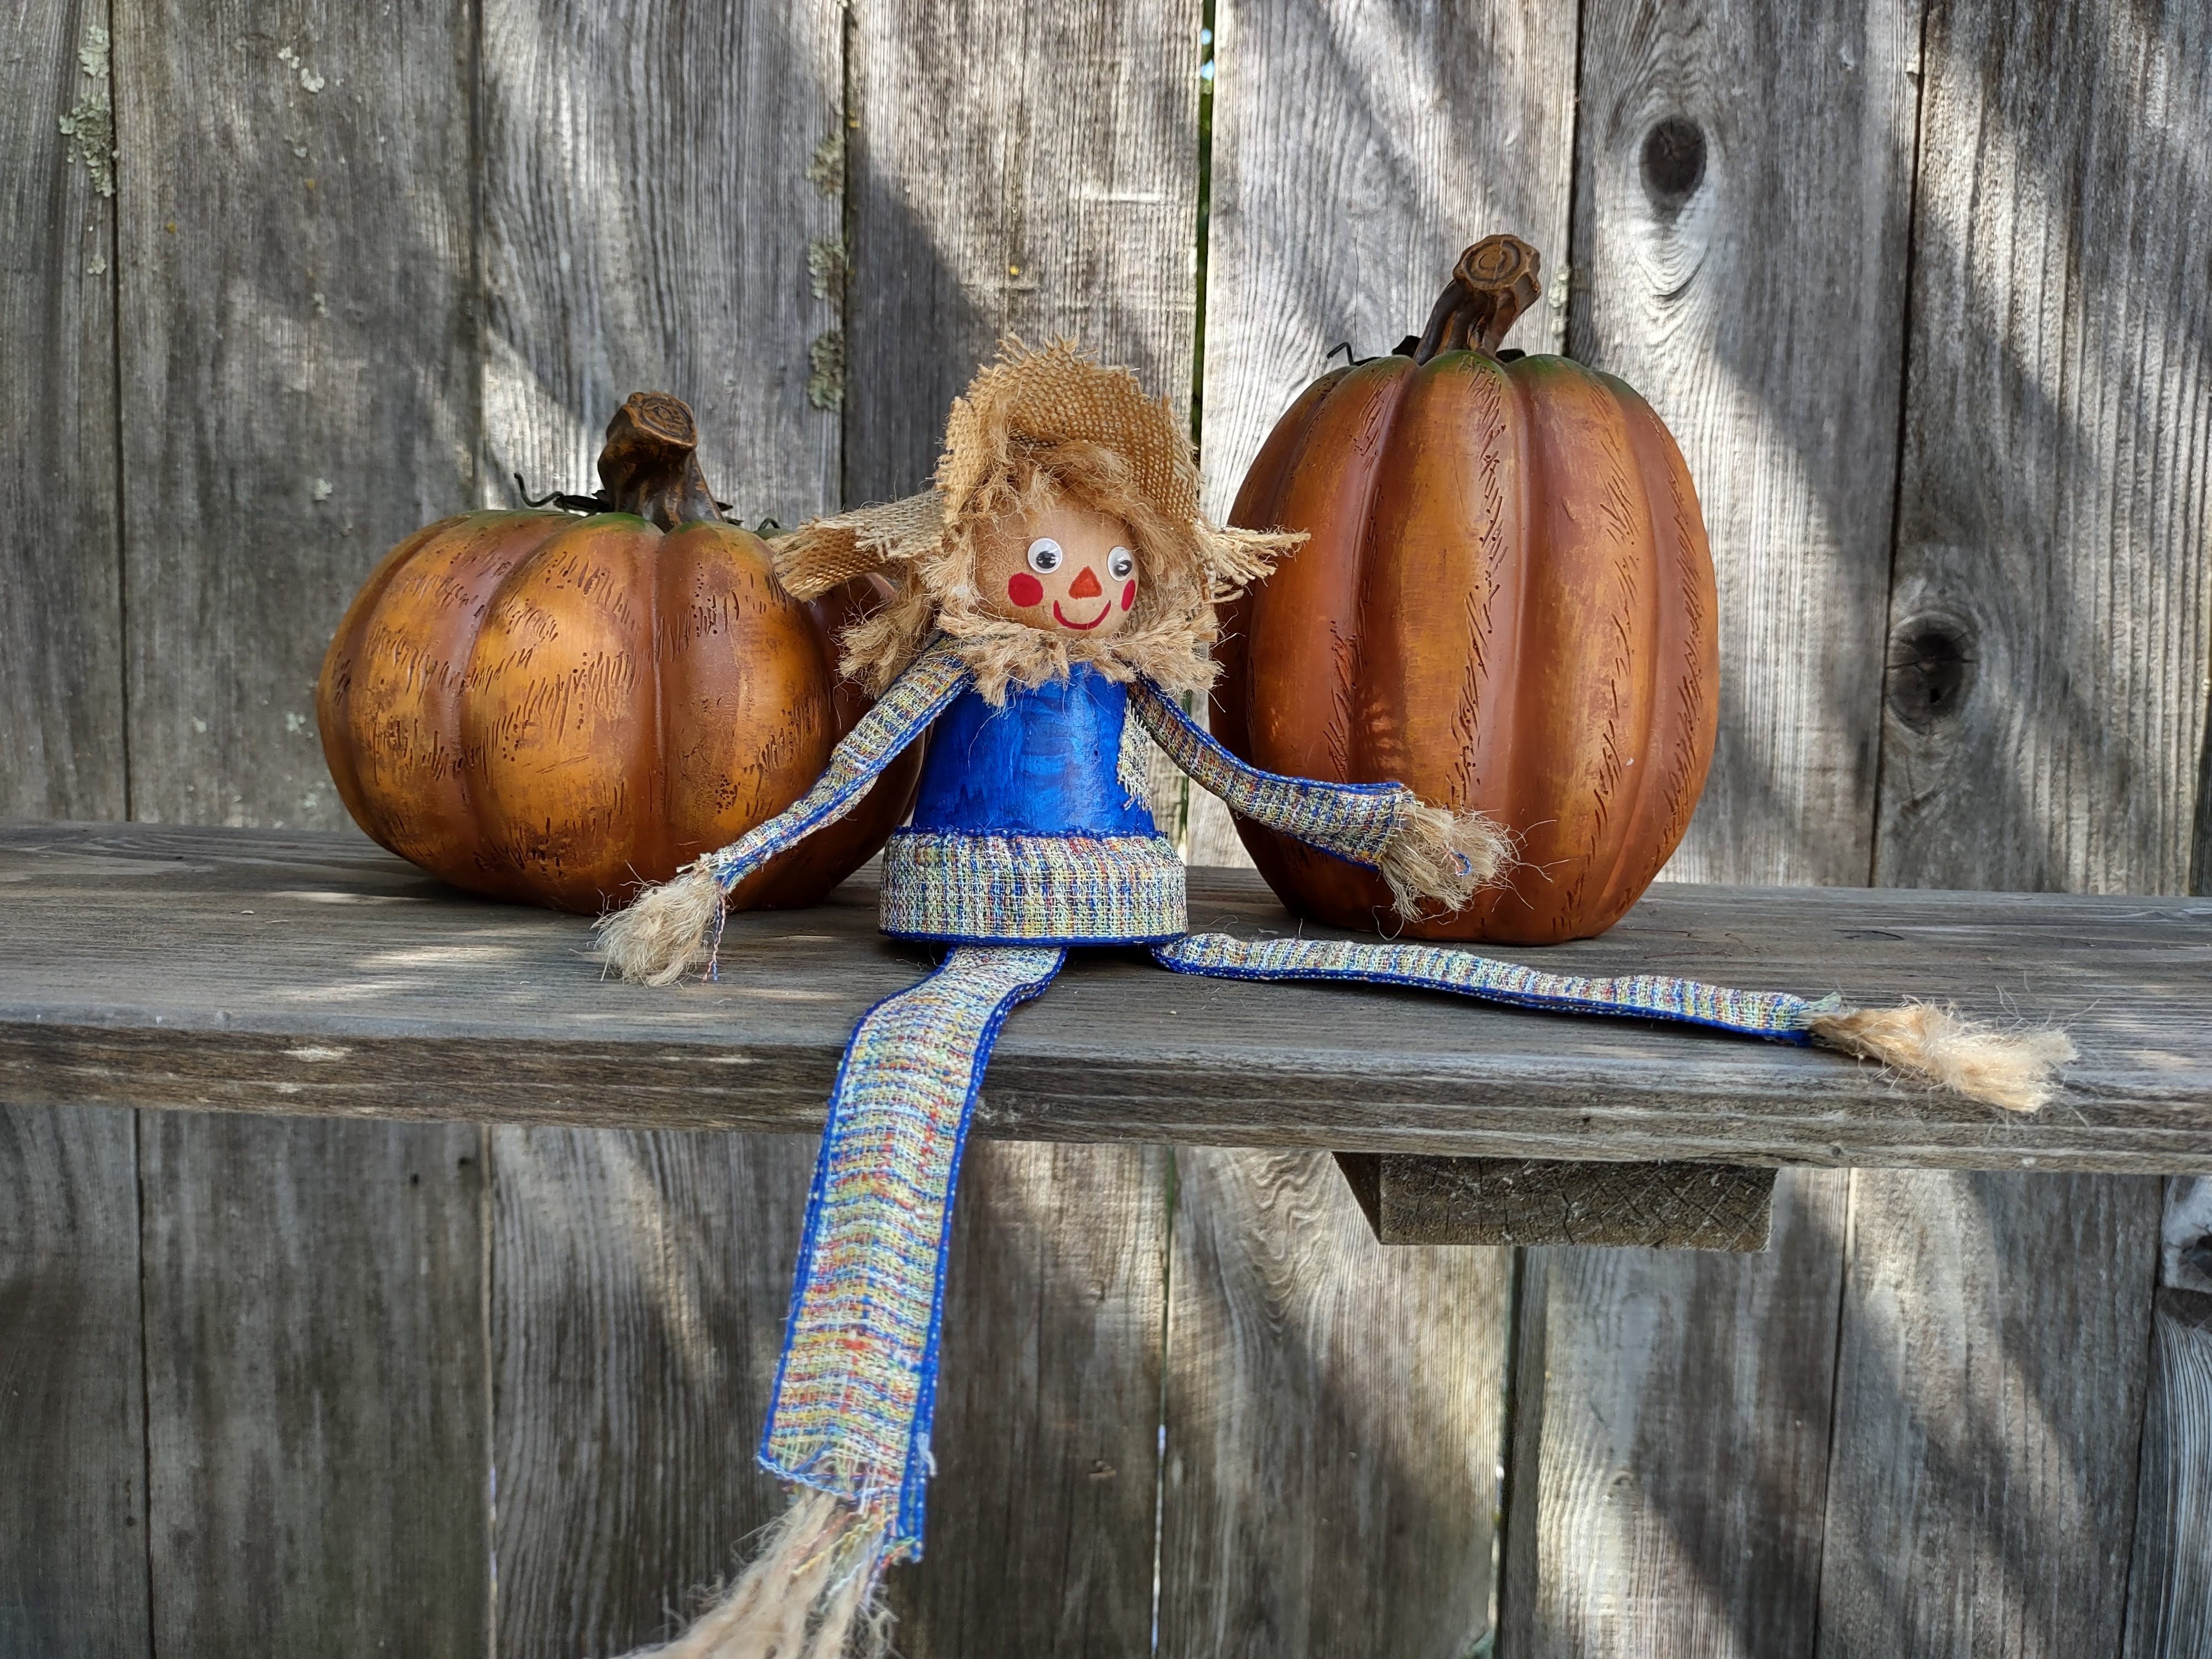
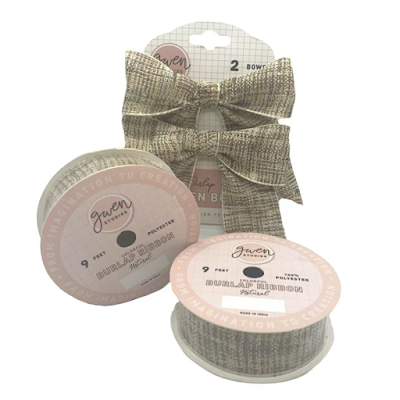
Today I have a fun fall craft for you using Gwen Studios ribbons.  They have a great assortment of types, colors and sizes from which to choose at all the major craft chains. These woven ribbon coasters or mug mats are quick to make and you can choose the colors you like.  I love designing with fall colors, so I chose a selection of those. They'll add bright color to your morning cup of coffee.

Woven Ribbon Coasters

For this coaster I used the burlap ribbon as a base and wove the colored grosgrain ribbon through the burlap ribbon.  

To create the base, I laid five 5" pieces of burlap ribbon next to each other.  To hold these in place while weaving, I cut two strips of adhesive-backed felt and laid them across the ends of the burlap ribbons.


Lengths of grosgrain ribbon were woven through the burlap base ribbons.  Go around the coaster and lift and glue all the free ends of ribbon, front and back.  Then you can remove the sticky felt.  You can also back the coaster with felt.

You can also use masking tape to hold the base ribbons in place. In the photo below, the tops of the base ribbons are taped down making it easier to lift and weave.


Trim the ends as you like.  I left mine long, but you could also trim them close to the burlap ribbon. To make the fringe on the burlap ribbon, clip with scissors and pull out some strands.

Here's another version of the coaster:


I like this one for all the bright fall colors, but one problem is noticeable if you look closely. On this one, the glue I used was too liquid and I used too much which caused it to bleed through the ribbon.  So, a note on the glue you use - use a heavy tacky glue and don't use too much to avoid this problem.  You can also use glue dots or small squares of double-sided tape.

On this coaster, I cut the ends closer and straight across.  Add a no-fray liquid to the ends of the ribbon if you wish.  

And, here's one last version.  It's a little smaller and the ends are trimmed diagonally at different lengths.


Find these great ribbons at Walmart.com. Joann.com or Michaels.com. Here are some links to get you started.

Burlap ribbon

5/8" grosgrain

3/8" grosgrain

For more fall ribbon fun, head to the Designer Crafts Connection blog. Have fun creating with Gwen Studios ribbon!


(As a member of the Gwen Studios design team, I receive samples of their fine ribbon for use in my designs.  I find it to be of excellent quality.)


Thursday, August 24, 2023

Scarecrow Shelf Sitter

 Hi Crafty Friends!

I love fall and I love to create items to decorate my house for the season.  This month I created a little scarecrow shelf sitter. This easy scarecrow can sit among the pumpkins and other fall decorations. He's easy enough for any age to make with adult supervision on the glue gun.


Scarecrow Shelf Sitter


This scarecrow uses a plaid burlap ribbon from Gwen Studios, which is perfect for fall designs.


Here are the materials I used:

3" terra cotta pot

1 3/4" wood ball knob (this has a flat side)

Gwen Studios 1" burlap ribbon

4" circle of burlap for the hat

Twine

Sewing needle and tan thread

Hot glue, white glue

Wiggle eyes

Acrylic paint for the pot and features (or permanent pens for face), paintbrush

Craft wire (optional)


Instructions:

Paint the pot and let dry. 

Cut lengths of ribbon for legs and arms (4 - 6" pieces and 4 - 3" pieces).  Cut twine to be glued between the ribbon lengths (12 - 7" pieces for the legs and 12 - 4" pieces for the arms.)

Lay 6 pieces of twine on a ribbon and glue the other ribbon on top sandwiching the twine between the ribbons.  If desired, add a matching length of craft wire for more poseability.


Glue a length of ribbon around the lip of the pot.  Pull up the top wire of the ribbon to gather and fit the lip and glue.  Glue a patch to the front.

For the head, glue wiggle eyes in the center of the ball.  Glue short pieces of twine on for the hair.  Trim and fringe hair. Add more features with pens or paint.

For the hat, loosely sew a 1 12" circle with the tan thread in the center of the burlap circle.  Pull up the ends of the thread to create a crown for the hat.  Tie off and trim. Glue a patch to the brim of the hat.

Hot glue the head to the bottom of the pot.  Hot glue the arm edge next to the head.  Hot glue the legs inside the pot.

Here's the scarecrow with the arms and legs, hair and hat.


Cut small lengths of twine and fray one end.  Glue the unfrayed ends under the head.


The burlap ribbon comes in several colors.  Here is a link:

Burlap ribbon from WalMart


For more fall designs with Gwen Studios ribbon, head over to the Designer Crafts Connection site.

Disclaimer:  I am on the Gwen Studios design team and receive their beautiful ribbons for use in my design work.

Friday, September 23, 2022

Shabby Sunflowers with Gwen Studios Ribbon

 Happy Fall!

Besides pumpkins, sunflowers are my favorite fall decoration.  Here are some Shabby Sunflowers made with Gwen Studios ribbon.  

Shabby Sunflowers

I like the look of raveled edges, so I thought I'd try that with the Gwen Studios grosgrain ribbon.  It worked!

To make a sunflower, you'll need:

Print cotton fabric for the center (5"square)

Sewing thread and needle

Small amount of stuffing

12" of 1 1/2" grosgrain ribbon in yellow or orange; 9" of 3/8" ribbon to match from Gwen Studios

Bamboo skewer

Green paint

2 1/2" terra cotta pot

Moss

Twine for bow

Buttons (your choice)

Felt in green or brown to cover back of flower

Hot glue and glue gun, scissors, paintbrush


Instructions:

Trace and cut a 4 1/2" circle from print fabric.  Sew a running stitch around the edge and gather.  Add a small amount of stuffing, pull up your threads and tie them in a knot.  Trim.


From 1 1/2" wide grosgrain ribbon, cut twelve 1" pieces.  Trim to a petal shape and fray the edges with your fingernail.  Make 12.

Paint the bamboo skewer green. Trim the skewers to the height you like.  I like to make them different heights.

Glue petals around back edge of fabric center.  Glue stick to back of flower.  Layer and glue buttons to center of flower.  Glue a circle of felt to cover back.  

Here are the sunflowers without the buttons, which I also like. Other options:  sew a button in the center to give it more dimension; add small buttons in a ring or randomly.

Glue narrow ribbon around top of pot.  Add stuffing to pot.  Push stick into the center and glue.  Glue moss over the stuffing.  

Tie a twine bow to the stem.

You can find Gwen Studios ribbon at Michaels and Walmart.


Friday, September 16, 2022

Fall Gingham Set in Plastic Canvas

 Hi everyone,

I'm ready for fall.  The weather has cooled and it might rain next week!  That will be very welcome here in dry California.

Here's a set that has just come out on the Herrschners website.  It's perfect to decorate your home for fall.


 Happy (almost) fall!

Thursday, August 25, 2022

Easy Fabric-Wrapped Pumpkins

 Happy Harvest!

Harvest is starting here in our neck of the woods.  For us in this county that means apples, grapes and vegetables.  I love this time of year and it's always fun to decorate for fall with its bright, warm colors.  One of my favorite decorations is pumpkins.

This year, I'm making fabric covered pumpkins decorated with Gwen Studios ribbon.  These were such fun to make, and they are so easy, that I made a bunch!

I started out making large ones (4-6") and made three in different fabrics.


Then, I found the cutest tin pickup truck perfect for fall decorating, so I had to make pumpkins to fit it.


Here's how I made them:

You'll need:  foam balls, fabric, hot glue or thick tacky glue, grosgrain ribbon, pieces of sticks, ball-head pins, sequin pins (optional), scissors

1.  Flatten the foam ball on opposite sides.


2.  On one side, scoop out a cone-shaped piece with a kitchen knife.  This will be the top.
3.  Place the ball bottom down in the center of a circle of fabric (wrong side up). Your circle needs to be big enough to wrap the sides to the center.  (The diameter of your fabric circle is the circumference of your ball.)

4. Bring one side of the fabric to the center of the ball.  Then, pick up the edge close to the center and overlap in a pleat.


Use a pin to hold the fabric in place.  Trim away the center fabric if you have too much.  Lift up the fabric and add glue to the center hole.  Press in and around the hole using the end of a paint brush or other implement.

5.  Make a ribbon leaf using grosgrain ribbon like I did or another type of ribbon you like.  Cut a length of ribbon (3-4") and cross the ends.  Stitch or glue to hold.  

Glue the cut end of the ribbon leaf into the center pressing it into the hole.  Glue a short stick in for a stem.
Here are the larger pumpkins before I added the leaves. After doing it this way, I decided that it's easier to glue the leaves on first, but it works either way.

Here are the finished pumpkins.  Add one, two or three leaves in the color you like.

For the smaller pumpkins, I used sequin pins to hold the fabric and pushed them into the center to hold.  Then, I glued in the leaf and stem.

For the grosgrain ribbon, I used Gwen Studios ribbon available at Walmart and Michaels. I am a Design Team member for Gwen Studios and receive ribbon samples with which to design.  

Happy Harvest!

Need more ideas?  Check out these fall decorating ideas:

Friday, September 14, 2018

Happy Fall!

Happy Fall Y'all!

I love fall!  It adds a lot more color to the world - yellow and red leaves among the green, orange pumpkins, and ripe apples and tomatoes in shades of red.  The fragrances of fall add to the rich ambience - damp earth from an early shower, homemade jams and pies, and the rich odors of ripening grapes.

And, I love creating things to celebrate the season -

Here's a little sign for fall that I created for JOY Iron-on letters.


You can find all the details to make your own sign on the Creating with Joy blog.  Want to add a little more to this sign?  Add two more pumpkins - one with an "I" and one with a heart - to make "I heart fall".

These are small wood slices, so they will fit anywhere among the fall décor you already have on a windowsill or shelf.   And, the tiny leaves are die cuts made with a die from Spellbinders.

These leaves were part of the Wreath Elements in the Four Seasons set and were the perfect size for my pumpkins.  I love that die cuts work for so many crafts besides cardmaking!

Stop by the Creating with Joy blog for more fun fall and Halloween ideas.  Happy fall creating and decorating!

Sunday, November 15, 2015

Leaf Place Card

Hi Friends!

It's fun to decorate the table for harvest, Thanksgiving or other fall celebrations.  Here's the perfect easy place card to add that touch of fall to your table.
Leaf Place Card with JOY iron-on letters
You can place these on the plate as shown here, or attach them to a pumpkin or other holder.  Scatter a few more leaves around the centerpiece for a lovely fall accent.

Close-Up of Leaf Place Card


I used JOY Iron-on letters to add a name to the leaf.  Short names work best for this or you can use initials.  You can iron on the letters or use tacky glue.  You can find all the details on how I made this Leaf Place Card on the Creating with Joy blog.

Wishing you family gatherings filled with joy and warmth!
Terry

Friday, October 2, 2015

Welcome Banner

Hi Crafty Friends!

Welcome your friends and family for fall occasions with this easy banner!  It's made with JOY Iron-On letters, burlap ribbon, felt leaves and a little glue, pen and paint.  You can whip one up in a jiffy!
Welcome Banner for Fall
I used a dowel and a couple of spools to hang the banner, but wouldn't it be fun to use a piece of a branch for a natural look?  Or, add a few leaf veins with dimensional paint or embroidery!  Personalize it to suit your taste - that's what creativity is all about!

Here's the link for all the instructions: http://creatingwithjoy.blogspot.com/2015/09/fall-welcome-banner.html

Stop by the Creating with JOY blog for more projects that the design team creates with these fun letters!
Happy Fall Y'all!
Terry
(I received materials and compensation for this project as a member of the JOY design team.)

Monday, September 29, 2014

Scarecrow

Hi Crafty Friends!

Fall leaves, bright pumpkins, garden harvests...there are so many reasons to enjoy this time of year.  And, it's so much fun to use all these things to decorate your porch or table.  

I created this little scarecrow to go with my fall decorations this year.  He was created for Smoothfoam™ and the instructions are on their blog.                                          


Scarecrow Decoration for Smoothfoam

He's very easy to make with Smoothfoam™ and upcycled fabric.  I used an old shirt and a pair of jeans.  Add some burlap and a few buttons and you'll have a decoration you'll set out every fall! 

I'd like to make more of these since I really like scarecrows.  I think a few in different sizes and fabric would be fun!  Maybe a whole scarecrow family!


Happy crafting and fall decorating!
Terry

Saturday, October 26, 2013

Little Owl

Hi Crafters!

Here's a cute little owl that you can make for your fall decorating whether it's for harvest or Halloween.  You can put him in a wreath like I did or perched in a flower arrangement.  He's easy and quick to make and WHO wouldn't like him hanging around the house!

You can find the instructions over on the Smoothfoam blog.

Happy Autumn crafting!
Terry

Monday, October 7, 2013

Scarecrow - Designer Crafts Connection Blog Hop

Hi Everyone!

Welcome to the Designer Crafts Connection blog hop!  This month we're creating projects for fall, harvest or Halloween.  I've been wanting to make a scarecrow for years.  We always have the materials around the house - worn out jeans, an old shirt, boots, and old hat and work gloves.  So it was easy to collect a pile of scarecrow makin's.

Scarecrow makin's

For the head, I used a burlap sack that I've been saving for just this purpose.  I also had some fabric scraps with sticky backing left over from a previous project.  I cut the eyes, nose and cheeks from the fabric and stitched a mouth with embroidery floss.  Then, I stuffed him using a pillow for the main part of the body and newspaper for the rest.  I stuck a few pieces of grass here and there and found a rusty garden rake for him to hold.

I'm glad I finally took the time to put him together.  He's a fine addition to the back porch!  He looks happy there, don't you think?
Happy Fall Crafting!
Terry
Scarecrow
by
Terry Ricioli