Pages

Wednesday, December 31, 2014

Ring in the New Year!

Happy New Year!

I'm awaiting the New Year with bells on....a wreath, a garland or a tree! 

Smoothfoam™ makes bells that are perfect for Christmas, New Year's, wedding or anniversary decorating!


Here's the ornament and wreath I made with the bells in a country Christmas theme:


You can find the instructions for these on the Smoothfoam™ blog.

Happy New Year!
Terry

Saturday, December 20, 2014

Tag Ornament

Hi Everyone!
It's pretty close to the last minute for gifts for Christmas!  I'm still shopping, card-making and prepping myself, so I thought I'd send out a quick and easy Tag Ornament.  This ornament is made using a small, arched Tag Lace-Up from Eye Connect Crafts.  This little tag has so many possibilities!

I recycled some Christmas card images for this tag, which is also made from recycled tagboard.
Lace-Up Tag and image
I painted the tag with acrylic paint from DecoArt in Antique Gold and added Worn Penny around the holes. 

I decoupaged the image to the tag.  I did the same thing on the other side.  If you wanted to use it as a gift tag, write a message on the back instead.
Then, lace up the ornament with trim or ribbon leaving an end at the top.  Tie the ends and you're done!
 
It's ready to hang on your tree or give as a gift!
Best Wishes for a very Merry Christmas and all the best in the New Year!
Terry
 

Thursday, December 11, 2014

Satin Ball Ornament with Wire

Hi Everyone!  
It's so much fun to see how everyone is decorating their foam balls over at the Holiday Ball on the Smoothfoam blog.  Check it out here! And, if you've created your own ornament using a foam ball, share your creativity by adding a link!


Here's my ornament.  This ornament is easy to decorate and uses a material that you might not think to use to decorate an ornament – craft wire! 

Satin Ball with Wire
Satin Ball on a Stand

Materials:
Satin Ball    (www.smoothfoam.com)
Fun Wire™    (www.tonercrafts.com)
Pins:  pearl head pins or pearls and sequin pins
Acrylic beads:  clear rondelles, antique gold rondelles

Instructions:

Cut gold wire into 3” pieces.  Measure and divide ball into 4 quarters.  Mark with pins or a pen. 

To create “S” shape, use toothpick to start curl and curl ends in opposite directions.  Curl up ends so that shape is 1” long. To create the flat “U” shape, curl both ends in the same direction.  Shape should be about 1” long.  To create “V” shape, fold 3” piece in half and curl ends outward.  You can use a pair of round-nose pliers to begin your curls, or you can use a toothpick.  Craft wire if very easy to curl.

Here are the shapes I made:
Wire Shapes


Arrange pieces of wire on the ball and pin to ball through the swirl and at points.  Use ball head pins or sequin pins with small pearl beads.  
You can see the arrangements that I used from the photos.  I put "S" shapes down two sides.
Side View

On the top and bottom, I arranged "V" shapes.
Top View

And, on the front and back, I arranged "U" and "V" shapes.
Front and Back
Of course, there are lots of other shapes that you can make with the wire.  Try hearts, stars or swirls!  You could even make letters or write a word or name to personalize your ornament!

See all the other ornaments on the Holiday Ball!  There's an ornament using just about every craft material including yarn, paint, paper, cord and fabric.  


Happy Decorating!
Terry

Monday, December 1, 2014

Designer Crafts Connection: Etched Slate Heart Ornament

Hi Everyone!

It's the first Monday of December!  And, that means another round of the Designer Crafts Connection.  This month we're decorating for the holidays!

This month I'll show you how to etch a slate ornament.  Ever since I heard that etchall® etching creme would work on slate, I have wanted to try it.  So, I ordered some slate pieces including the heart shape I used here.  If you have trouble finding slate, I ordered mine from Factory Direct Crafts, and I must say that the order arrived promptly and in good order.

Here's the slate ornament I designed:
Etched Slate Heart Ornament
I found when working with the slate that some of my stencils would not stick to the surface of the slate.  Since it is a natural material and not smooth like glass, I had to find another material for the stencil.  I had some stencil vinyl in my stash and drew a stencil and cut it out with scissors. 
Stencil
I removed the string from the slate and applied the stencil to the slate. I burnished the edges of the letters several times until I could see the stencil was stuck to the slate.
Stencil applied to slate
After masking the edges of the stencil, I applied a thick layer of etchall® etching creme and timed it for 15 minutes. 
Apply etchall® etching creme
Then, I scraped off and returned the creme to its container and rinsed the stencil area.  Then, I removed the tape and stencil and rinsed the slate again.

Here it is hanging in a wreath:
Etched Slate Heart
I liked the way it looked, but I thought it needed a little more etching.  So, I created another stencil with holly leaves and berries.  I used punches to create the images on this one.
Holly Stencil
Then, I applied the stencil and followed the same procedure as above.
Apply second stencil
I love the rustic look of etching on slate and I can't wait to try the rest of the pieces I ordered.  If you'd like to try it, click on the little bee on the left side of my blog to order your own etchall® etching creme.

And, be sure to check out all the other designers on the Designer Crafts Connection circuit.  Use the big blue DCC button on my sidebar or go to our facebook page.

Have fun crafting and decorating!
Terry


Sunday, November 23, 2014

Craft Foam Turkey

Hi Everyone!

Almost every month, a group of kids come over to craft with me in my kitchen.  I'm lucky I have a big kitchen/dining room!  Sometimes there are over fifteen of us and sometimes a smaller group but we always have a great time crafting.

Here's what we made this month:
Craft Foam Turkey
Here's what you need to make the turkey:
The brown craft foam is half a regular-sized sheet and the other pieces are a quarter of a sheet.  The chenille stems are one stem cut in half.

Here's the pattern for the back of the turkey:
This is half a sheet of computer paper folded in half.  Draw your pattern on the fold.  Cut it out and unfold it.  Lay it on the brown foam along one edge.  You'll use the extra for the body, head and wings.


If you don't want to draw a pattern, use a bowl or lid to draw a half-circle on your foam like this:
For the red and orange layers, trim down the pattern and trace onto the foam.  Cut these layers with deeper feathers.  If you are using a bowl for a pattern, try cutting the foam with edging scissors.

These are all the parts of the turkey.  Cut the head, body and wings from the scraps of the brown foam.  Cut the wattle from a scrap of red and the beak from the scrap of yellow.  Cut notches in the tan for the sign and write your message on it with a permanent marker.  Bend the chenille stems back and forth for the feet, then bend it up.  Then, you are ready to stack the layers and glue it together.  Glue the legs between the feathers and the body.

You can bend the legs up into a sitting position, or with longer legs (use a whole stem for each leg), you can bend the legs at the knees.  Glue a craft stick onto the back and it makes a cute puppet or you can put it into the centerpiece on your Thanksgiving table!

Hope you have fun making these!  
Happy Thanksgiving to you and yours!  
Terry


Friday, November 14, 2014

Burlap Turkey Decoration

Hi Everyone!

It's time to talk turkey!  So, here's a cute little turkey that you can use to decorate your Thanksgiving table. 

Here's the link for the instructions on the Smoothfoam blog.  (The foam balls were provided by Smoothfoam, where I am a member of the Creativity Team.)


Burlap Turkey Decoration for Smoothfoam
Get the whole family involved making these, because they are easy enough for all to create.  Personalize him with name tags and put one at each place setting.  Or, give him a little sign that reminds all to give thanks. 

And, don't be afraid to add your own creative touches and substitutions!  Use felt for the wings and feet, chenille stems for the legs or make this little turkey into a bigger version with larger Smoothfoam balls.  That's what crafting is all about!


Happy Crafting!
And, a very Happy Thanksgiving!
Terry


Monday, November 3, 2014

Thank You Card

Hi Crafters!

It's the first Monday of the month and time for the Designer Crafts Connection blog hop.  We're a group of designers that designs crafts with a different theme every month.  This month we're designing thank you cards and gifts.  So hop along and see what everyone has made!  Just hop forward or back by clicking on the Big Blue Button on my sidebar.

I have designed a card for you.  I wanted something quick and easy (always!).  And, from a previous design assignment, I received iron-on letters from JOY® S. A. Inc.

Here are the ones I used.  They are about 5/8" high.
Iron-on letters from JOY S. A. Inc.

I thought I'd try them on paper although they are meant to be ironed onto fabric.  I'm an experimental crafter! And...it worked!  Yay!

I arranged the letters on a piece of cardstock and followed the directions on the packaging to iron them onto the paper.  I tore the edges and inked them with a stamp pad.  Then, I tore a fall piece of scrapbook paper for an accent and glued them both pre-made card.  It needed some embellishment, which I added with some fall buttons and twine.

Thank you Card

Very quick, very easy!  It made a nice card with the dimensional iron-on letters but it would also make a cute place card for your Thanksgiving table!  And, if you want to do it with the kids, simply use some glue instead of ironing them to the paper or have an adult do the ironing!
Happy Crafting!
And, thanks, for stopping by!
Terry

Saturday, November 1, 2014

Grape Garland


Happy November!  

It's the month of thankfulness and we have much for which to be thankful!  I'm thankful for a wonderful grape harvest this year and here is a craft to celebrate the harvest.
Grape Garland for Smoothfoam


You can hang this Grape Garland on your door or arrange it on a table runner with other fruits of the harvest.  Or, arrange the bunches of grapes around a grapevine wreath with a burlap bow.  These would make great decorations for any harvest dinner or wine tasting!

I designed this garland for the Smoothfoam blog where I am on a wonderfully creative team of designers.   Smoothfoam is a great product and such a great base for all your creative projects, whether it is painting, decoupage, wrapping with paper or fabric, or carving.

Happy Crafting!
Terry


Monday, October 27, 2014

Poppet Puppets

Hi Crafters!
This week I'm working with Totem Poppets that I received from Eye Connect Crafts.  These animal totems are so versatile.  You can use them in mixed media, cards or scrapbooking.  Here I'm using them in one more way - as puppets.

This is the Totem Rabbit and the Totem Turtle.  At the links, you can read about the totem animal and see what they look like unpainted.

Here are my Poppet Puppets.  They are painted with acrylics and detail is added with pens.  Then, I glued thin wood sticks to the back.  What fun it would be to create a whole menagerie of these and make a puppet theater for them!  Create them to tell and act out your favorite story.

Poppet Puppets

I'll be working with Eye Connect Crafts at the Craft and Hobby Show.  If you are in the craft industry, stop by and see all the amazing Totem Poppets and Lace-Ups that creator and owner, Erin Sparler, has designed!  We'll be in Booth #1902!

Happy Crafting!
Terry


Thursday, October 16, 2014

Fringe Earrings with Hebe Cord

Hi Crafters!

Today some of us on the Designer Crafts Connection are working with a new product that we received from Sullivans USA called Hebe Cord.  This new cord comes in 31 beautiful colors and can be used for knitting, crocheting, knotting and tatting.

I received two shades of purple.  Here is one of the projects that I created.  It's a simple project that anyone can make.  You'll love wearing these fun and trendy Fringe Earrings.


Fringe Earrings with Hebe Cord


To make these earrings, you'll need:

Hebe Cord, medium purple
Bullet style bead caps
22-gauge wire to match
Earring wires to match
66 2/0 E beads (I used Beader's Paradise 2/0 Czech Glass E-Beads in Lavender Mix)

Cut 32 nine-inch pieces of cord.  Fold 16 in half and slide 6" length of wire through the fold. Fold wire and wrap one around the other. Trim wrapping wire and slip on bead cap.  Add one bead and make a wrapped loop.  Open earring wire and connect to wrapped loop.  Repeat for the other earring.

Slide a bead on each strand and knot beneath the bead.  Add a small dot of glue to hold knot. These earrings are about 4-1/2 inches long.  

And, here's another project that I created with Hebe Cord.  (I couldn't stop creating with this cord!)  This bracelet is done with a French Knitter and I'll provide the details on my next post.  So, here's a sneak peek!
Hebe Cord French Knit Bracelet
  I hope you'll take a few minutes to see all the other projects designed with this cord.  There are projects in crochet, knitting, macrame and more!  Just click on the big blue Designer Crafts Connection button in my sidebar.


Happy Crafting!
Terry


Wednesday, October 8, 2014

Sea Life Mobile

Hi All!

Today I want to show you another craft that I have designed using the Totem Poppets from Eye Connect Crafts.  I am having fun trying different ideas with these.  Today, I'm working with Starfish and Crab Poppets.

Here's the packaged Poppets:
Totem Poppets
These are made from recycled chipboard and are easily removed from the square of chipboard from which they are laser cut.  They were designed to be put together with 1/16" eyelets, but they can also be put together with brads, small screws or fibers.  Each Poppet comes with a statement on its totem representation, which you can incorporate into your artwork if you wish.  

For my version of these Poppets, I popped them out and painted them with acrylic paint.  I painted them with a main color, then dry brushed and dabbed other colors on top.  For the crab, I added bead eyes.  To hold them together, I used hemp twine.  I think it adds a nice natural feel.  It's very easy to work with also.

Here's the crab:
Crab Poppet
And, here's the starfish:
I arranged the poppets on a mobile constructed of driftwood, a piece of net and some shells that I had in my stash.
Ocean Life Mobile by Terry Ricioli
If you want to start playing with Poppets, head over to the website:  Eye Connect Crafts 
While you're there, check out the blog and see what Erin Sparler, the owner and creator or Eye Connect Crafts is up to with her amazing Poppets and with the other chipboard line, Lace-Ups.

Come back soon for more fun with Totem Poppets and Lace-ups!
Happy Crafting!
Terry

Monday, October 6, 2014

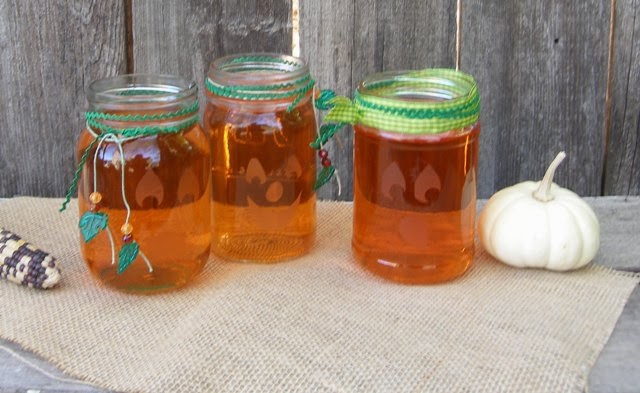
Jack O'Lantern Jars

Hi Crafty Friends!

I love to decorate for the fall holidays and Jack O' Lanterns are one of my favorite decorations.  I made these Jack O' Lanterns with canning jars.  It's so easy to do with etchall® etching creme!  These jars look great sitting on my window sill filled with tinted water. 


They also make great party glasses with orange punch or soda.  You can make different faces on each one so your guests will remember which one is theirs!

Or, fill them up with candy corn or other treats and give them to your neighbors!  Add tea lights and set them on your porch (use the battery-powered ones for safety).  You can even darken the etched area with permanent marker for another look. 

To make these jars, you'll need some etchall® etching creme.  Then, you'll need some sticky paper to mask your jar so it will only be etched where you want it to be.

I didn't have any etchmask with which to create the design, so I tried a few other sticky papers that I had around the house like masking tape, address label stickers and shelf liner. Shelf liner worked the best.  The grid on the back of the liner helps in drawing the design.  But, for jack o' lantern faces, you don't have to be too symmetrical!

I cut or punched out the features for my jack o' lanterns and stuck the paper on the jar making sure it was sealed down to the jar around the cut-outs.  Then, I masked off the area around the design and applied the etchall® etching creme.

Fifteen minutes later, I scraped off the creme and put it back in the jar (it's re-usable!!).  I rinsed the jar, removed the mask and - voila! - it's ready to go!  Add some ribbon, rick rack or twine with beads or charms for jaunty jack o' lantern jars!

If you are excited about etching your own jars, follow the etchall® link on my sidebar and tell them that I referred you!  (Since I'm an ambassador, I get a small percentage of the sale.)

Hope you will #cre8time for crafting!
Terry


Monday, September 29, 2014

Scarecrow

Hi Crafty Friends!

Fall leaves, bright pumpkins, garden harvests...there are so many reasons to enjoy this time of year.  And, it's so much fun to use all these things to decorate your porch or table.  

I created this little scarecrow to go with my fall decorations this year.  He was created for Smoothfoam™ and the instructions are on their blog.                                          


Scarecrow Decoration for Smoothfoam

He's very easy to make with Smoothfoam™ and upcycled fabric.  I used an old shirt and a pair of jeans.  Add some burlap and a few buttons and you'll have a decoration you'll set out every fall! 

I'd like to make more of these since I really like scarecrows.  I think a few in different sizes and fabric would be fun!  Maybe a whole scarecrow family!


Happy crafting and fall decorating!
Terry

Monday, September 8, 2014

Owl Poppet


Hi Crafty Friends!

Recently I was introduced to a new craft product. You know how I like that!  And, it's a craft material just full of possibilities - even better!  The company is Eye Connect Crafts and they produce chipboard animal shapes called Totem Poppets that can be connected with eyelets or buttons or string.  Since the animal is jointed, you can position the limbs and head as you like. 

Below is what one looks like pulled from the package.  It is laser cut with the holes punched in the pieces.  This is the Totem Owl Poppet and it comes with a moon also.
Totem Owl Poppet
Totem Owl Poppet pieces
You carefully remove the pieces from the sheet and paint or stamp or collage them.  You can use whatever art style or medium you like.  I painted mine and added some pieces of burlap.  Then, I glued them into a wreath.  But, you could put them in a card, in a scrapbook or journal, or grouped with other fall or holiday decorations.  They are so versatile!

After you have added paint or other media, you connect them together.  These are connected with eyelets, but you could use any number of different connectors.  Or, you could glue the pieces together.

Owl Poppet
Here's how I created this owl.  He's a perfect addition for your fall decorating!

Materials:
Totem Owl Poppet, 1/16” eyelets and eyelet setter (www.eyeconnectcrafts.com)
Acrylic Paint:  Khaki Tan, Buttermilk, Jack-O’-Lantern Orange, Bright Yellow, Milk Chocolate (Americana® by DecoArt®)
Grapevine wreath, 6” (Darice®)
Two buttons, gold or yellow, 3/8”
Black embroidery floss
Small scraps of tan burlap
Tools:  paintbrush, scissors

1.  Basecoat body with Milk Chocolate, wings and head with Khaki Tan and feet and moon with Buttermilk.  Cut two small triangles for beak from extra board and basecoat with Buttermilk.
2.  Cut semicircle of burlap for breast of owl and shape to fit around neck and wing.  Dab and edge with Milk Chocolate and lightly with a mix of Khaki and Orange.  Cut two ½” circles of burlap for eyes.  Dab in center and around edges with Milk Chocolate.
3.  Use a scrap of burlap as a stamp and add Milk Chocolate to wings.  Layer other colors over this.  Do the same in a triangle on the head. 
4.  Layer Yellow and Orange over feet and beak.  Add Khaki and Yellow to moon.  Edge the moon with Milk Chocolate.
5.  Sew black embroidery thread on buttons.
6.  Use the eyelet setter and eyelets to construct the owl following the setter instructions.  Place the right wing under the body. 
7.  Glue the burlap pieces in place.  Glue the buttons over the burlap.
8.  Position the owl wings and head as desired.  Glue owl and moon onto the wreath.

I'm sure you'll want to add these Totem Poppets to your craft projects and I hope you'll take a look at the great variety of animals and shapes available at Eye Connect Crafts.

Happy Crafting!
Terry