Pages

Showing posts with label iron-on letters. Show all posts

Saturday, September 17, 2016

Fall Doorhanger

Hi Crafty Friends!

It's almost fall, and one of my favorite seasons for decorating the house.  You can't beat the array of colors - rich reds, brilliant yellows and warm oranges along the comfy shades of brown.

Here's a project that I created for JOY using their iron-on letters.  For all the instructions, head on over to the Creating With Joy blog.  These particular letters come with an adhesive backing so that they stay in place when you iron them onto fabric.  But, for this craft, I used the adhesive without ironing.  It's really quick and easy!

Fall Doorhanger
I want to mention one of the techniques that I used for this sign.  I used a watercolor look, but the watercolors that I used are Rit dyes!  I painted the canvases with Rit® dye in Tan.  Then, I added some color in the middle and around the edges with Cocoa Brown.  I dipped the letters in Tangerine and dabbed some of the brown here and there on the letters.

This is a great way to color your JOY letters - just dip and dry.  And, Rit® dyes come in just about every color imaginable!  And, you can mix them to create more shades!

Have fun creating with fall colors, JOY letters and Rit® dye!


Tuesday, January 19, 2016

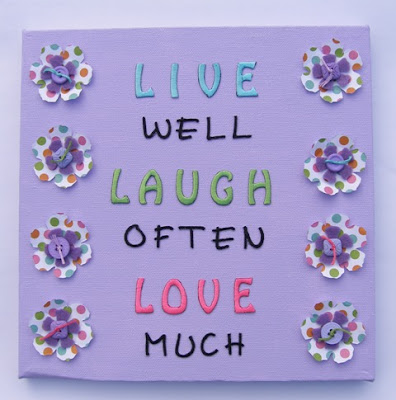
Live, Laugh, Love Wall Hanging

Hi Crafty Friends!

Today I'm sharing my latest project with JOY Iron-on letters.  In this design, I used some of the funky neon letters with black letters in another font.  Then, I cut some flowers with my Sizzix Big Kick and added buttons and floss.  It's so easy with these letters to create your favorite motto or saying.
Live, Laugh, Love Wall Hanging
You can find all the instructions on the Creating with JOY blog.

You can find these letters in Hobby Lobby or Michaels, or on the website if you don't have a store in your area. 

Happy Crafting!
Terry

Sunday, November 15, 2015

Leaf Place Card

Hi Friends!

It's fun to decorate the table for harvest, Thanksgiving or other fall celebrations.  Here's the perfect easy place card to add that touch of fall to your table.
Leaf Place Card with JOY iron-on letters
You can place these on the plate as shown here, or attach them to a pumpkin or other holder.  Scatter a few more leaves around the centerpiece for a lovely fall accent.

Close-Up of Leaf Place Card


I used JOY Iron-on letters to add a name to the leaf.  Short names work best for this or you can use initials.  You can iron on the letters or use tacky glue.  You can find all the details on how I made this Leaf Place Card on the Creating with Joy blog.

Wishing you family gatherings filled with joy and warmth!
Terry

Sunday, October 25, 2015

Halloween Wreath

Hi Crafters!

It's not too late to make this Halloween wreath.  It's simple and easy and you probably have some of the materials around your house. 
Halloween Wreath
Head over to the Creating with JOY blog for more information about how to put this wreath together.  The little banner has orange letters from JOY SA Inc.  You can find the JOY Iron-On Letters at your local Michaels. 

Another special item on the wreath that I want to mention are the flags used in the banner.  These little recycled, tagboard flags are from Eye Connect Crafts.  They're the perfect size for a small wreath, a card or a scrapbook page.  I also up-cycled a paper bag and made a twisted tree for the wreath.  A few small wood items, some gauze, wiggle eyes and paint complete the wreath.  

Have fun creating your own spooky wreath!
Terry

Friday, October 2, 2015

Welcome Banner

Hi Crafty Friends!

Welcome your friends and family for fall occasions with this easy banner!  It's made with JOY Iron-On letters, burlap ribbon, felt leaves and a little glue, pen and paint.  You can whip one up in a jiffy!
Welcome Banner for Fall
I used a dowel and a couple of spools to hang the banner, but wouldn't it be fun to use a piece of a branch for a natural look?  Or, add a few leaf veins with dimensional paint or embroidery!  Personalize it to suit your taste - that's what creativity is all about!

Here's the link for all the instructions: http://creatingwithjoy.blogspot.com/2015/09/fall-welcome-banner.html

Stop by the Creating with JOY blog for more projects that the design team creates with these fun letters!
Happy Fall Y'all!
Terry
(I received materials and compensation for this project as a member of the JOY design team.)

Tuesday, September 1, 2015

Do Not Disturb Sign for the Nursery

Hi Creative People!

Have you discovered JOY Iron-on letters yet?  You can find them at Michaels or on the JOY website.  There are so many things that you can decorate with them and they are so easy to use! 

Here's what I created with them last month -
Do Not Disturb Sign
You can find the instructions on the Creating with Joy blog.

Stop by the blog and see all the other projects that the Creativity Team has designed.  There are more projects for baby, fall decorations, monogrammed items, art ideas and lots more.

JOY-fully yours,
Terry

Tuesday, June 30, 2015

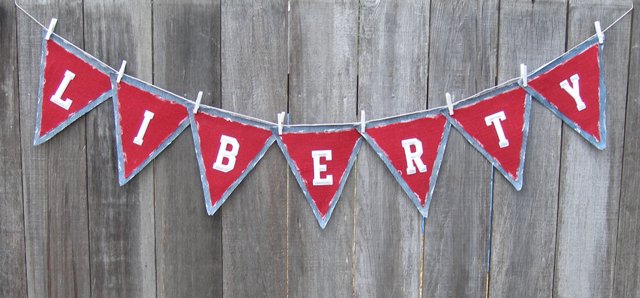
Patriotic Banner

Hi Crafters!

July is here and, with it, one of my favorite holidays - the Fourth of July!  Here's a quick and easy banner that you can make for decorating for the holiday.  It's a banner made with old jeans, red burlap and white iron-on letters from JOY SA Inc.  JOY makes all sorts of iron-on letters and appliques.  You can find them in Michaels now or order through the website.  I'm now on their Creativity Team, so you'll be seeing more projects using their letters.  They are so easy to add to any project.  Stop by the Creating with Joy blog to see more designs from the team.

Patriotic Pennant Banner
You can find all the instructions on the blog here.  You can personalize this banner with your favorite patriotic phrase or word.  This banner is no-sew and is only attached to the twine with clothespins, so it is super fast to make.  In the above photo, the pennants are spaced apart, but I like the way it looks overlapped also.
Patriotic Banner with pennants overlapped
The clothespins make it easy to change the spacing and fit the space you have to hang it.  You'll want to use this technique for other occasions and events, too - birthdays, baby showers, yard sales - wherever you need a quick and easy sign, create it with JOY!

Happy Fourth of July!
and, 
God Bless the USA!
Terry

Wednesday, May 20, 2015

Initial Pendant with JOY Iron-on Letters

Hi Crafters!

Here's another easy way to make the popular initial pendant.  This one is made with JOY Iron-On letters, which is the manufacturer that we are promoting this month in our Designer Crafts Connection challenge.

This is a quick and easy project that you can personalize with any fabric and beads that you like.  You can even change the color of the letter with a permanent pen or fabric dye.

Initial Pendant with JOY Iron-on letters

Here's how I made this one:

l.  Gather your materials.  You'll need fabric, a JOY Iron-on letter (the 1/2" size), a bezel, a scrap of cardboard, a scrap of quilt batting, tacky glue, seed beads, thread and a chain or ribbon.  You'll also need scissors, a needle and an iron and ironing board.
Materials
2.  Press the bezel into the scrap of cardboard to impress the outline.  You can also ink the edge of the bezel.  Cut out the circle and trim to fit into the bezel.  Cut one or two pieces of quilt batting the same size.

3.  Iron the letter to the fabric following the instructions.  See here for an online instructional video.
Iron letter to fabric
4.  Trim the fabric to a circle about 1/2" larger than your bezel.  Glue the batting to the cardboard and center on the wrong side of the fabric.  Clip the fabric and wrap the fabric to the back.  Glue or tape it to the back of the cardboard.
Clip fabric and wrap to back
5.  Here's the finished assembly.

6.  Glue assembly into the bezel.

6.  String seed beads on thread to fit edge of bezel.  Make a ring and go through beads again.  Tie ends in a square knot, run thread ends through beads and trim.  Glue ring around edge of bezel and hang bezel on a chain or ribbon.
Circle of seed beads
Finished pendant

Wasn't that easy?  You can see what other designers created by using the Designer Crafts Connection button to see those participating in this manufacturer's challenge.  And, visit the manufacturer's website to see more of the fabulous letters and other appliques available. 

Happy crafting with JOY!
Terry