Pages

Showing posts with label burlap ribbon. Show all posts

Sunday, September 29, 2024

Falling Leaves

Hi Folks!

 The feel of fall in the air - cooler nights, leaves turning color and flocks of birds preparing to fly to warmer climes.

It's one of my favorite times of year for decorating. I love the mix of colors! This year I'm making a fall leaf spray to hang on a door. 

I'm using stiff felt (Kunin Friendly Felt) and Gwen Studios ribbons. I'm cutting the leaves using my Sizzix Big Kick and a leaf die from Tim Holtz. If you don't have a leaf die, head outside and pick up a few leaves for patterns and cut them out freehand.


In order to make the flat leaves more dimensional, I folded them in half and sewed a line down the back.  If you don't have a sewing machine, hand stitching will work, too.

I used hot glue to tack the leaves together.  I cut a total of 24 leaves for this spray.


Then, I cut off the tails on one of the pre-made bows.  I undid the second one and added the length to make longer tails.  I also added lengths of grosgrain ribbon in red, yellow and brown and hot glued them to the back.


I added a hangar at the back of the bow.  I used a paper clip, but you can use a loop of narrow ribbon or string. Although I made a spray to hang, these look great as a centerpiece for your holiday table.  Intertwine the leaves with colorful ribbons.


You can find Gwen Studios ribbon at your local craft and hobby store (Joann's) or at Walmart or on Amazon.

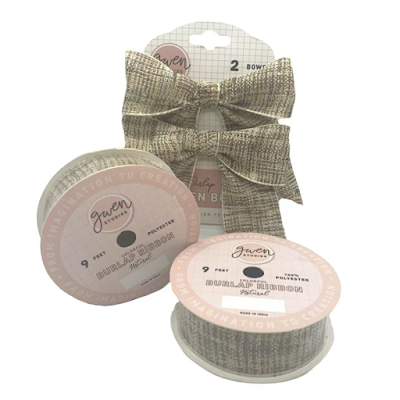
Look for these ribbons:


Look for more fun ribbon ideas using Gwen Studios ribbons on the Designer Crafts Connection.

(I receive the Gwen Studios ribbons as part of the perks of being a member of the design team.  They have a wide variety of high-quality ribbons, which I am very pleased to use and recommend.)


Wednesday, October 25, 2023

Rustic Harvest Cones

 Hi Everyone,

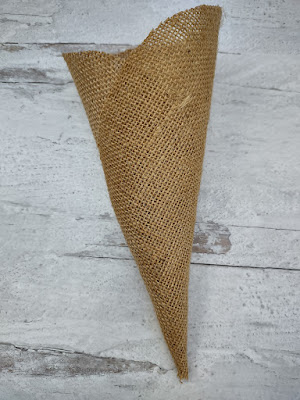
This month's ribbon project for Gwen Studios is a burlap cone that you can use to decorate for harvest, Thanksgiving or even the Christmas season.


These versatile cones are quick and easy to make.  You can hang them up or lay them at each place setting.  You can fill them with candy, nuts, dried or artificial flowers, leaves, herbs like lavender and rosemary or even your napkin and silverware.

To start, cut a circle from burlap.  I made mine from a 9" circle, but any size will work.  Use a lid or plate for a template, trace around and cut.


Then, roll up the circle into a cone.  Glue under the edge. I used hot glue on these, but double-sided tape would work as well.


Using the Plaid Burlap Ribbon from Gwen Studios, glue a piece around the edge of the cone and overlap in the front.  Add a bow of your choice.  I added 3/8" brown grosgrain ribbon to the bow.  Add more ribbon to hang the cone and fill with festive fall leaves or flowers.


Here's another more elegant version. For this one, I used some Gwen Studios trim.


Isn't that pretty?  I love lace and burlap. For the bow, fold ribbon in half for the tails and glue at the center. Layer two loops of ribbon and wrap with twine around the center of the loops. Glue over the tails.

Here are some links for the Gwen Studios ribbon:


Plaid Burlap ribbon and bows

Trims, trims and more trims

Grosgrain ribbon

Gwen Studios ribbons and trims are available at Michaels.com, Joann.com, Walmart.com and Amazon. 

As you can see, this cone is adaptable to a variety of colors and occasions.  Use different colors of burlap, different fabrics and, of course, your choice of trims and ribbons.  Check out the other Thanksgiving ribbon ideas at the Designer Crafts Connection blog!


Thursday, August 24, 2023

Scarecrow Shelf Sitter

 Hi Crafty Friends!

I love fall and I love to create items to decorate my house for the season.  This month I created a little scarecrow shelf sitter. This easy scarecrow can sit among the pumpkins and other fall decorations. He's easy enough for any age to make with adult supervision on the glue gun.


Scarecrow Shelf Sitter


This scarecrow uses a plaid burlap ribbon from Gwen Studios, which is perfect for fall designs.


Here are the materials I used:

3" terra cotta pot

1 3/4" wood ball knob (this has a flat side)

Gwen Studios 1" burlap ribbon

4" circle of burlap for the hat

Twine

Sewing needle and tan thread

Hot glue, white glue

Wiggle eyes

Acrylic paint for the pot and features (or permanent pens for face), paintbrush

Craft wire (optional)


Instructions:

Paint the pot and let dry. 

Cut lengths of ribbon for legs and arms (4 - 6" pieces and 4 - 3" pieces).  Cut twine to be glued between the ribbon lengths (12 - 7" pieces for the legs and 12 - 4" pieces for the arms.)

Lay 6 pieces of twine on a ribbon and glue the other ribbon on top sandwiching the twine between the ribbons.  If desired, add a matching length of craft wire for more poseability.


Glue a length of ribbon around the lip of the pot.  Pull up the top wire of the ribbon to gather and fit the lip and glue.  Glue a patch to the front.

For the head, glue wiggle eyes in the center of the ball.  Glue short pieces of twine on for the hair.  Trim and fringe hair. Add more features with pens or paint.

For the hat, loosely sew a 1 12" circle with the tan thread in the center of the burlap circle.  Pull up the ends of the thread to create a crown for the hat.  Tie off and trim. Glue a patch to the brim of the hat.

Hot glue the head to the bottom of the pot.  Hot glue the arm edge next to the head.  Hot glue the legs inside the pot.

Here's the scarecrow with the arms and legs, hair and hat.


Cut small lengths of twine and fray one end.  Glue the unfrayed ends under the head.


The burlap ribbon comes in several colors.  Here is a link:

Burlap ribbon from WalMart


For more fall designs with Gwen Studios ribbon, head over to the Designer Crafts Connection site.

Disclaimer:  I am on the Gwen Studios design team and receive their beautiful ribbons for use in my design work.