Pages

Showing posts with label Kunin® felt. Show all posts

Thursday, January 9, 2025

Valentine's Day Garland

 Hello Everyone!

This month I'm creating a Valentine's Garland for Gwen Studios using their ribbon and their new buttons.  It's a fun project that will brighten up your Valentine's Day. It's easy enough that everyone can make it.


You'll need:

A large sheet of stiff felt in red (Kunin Friendly Felt)

Gwen Studios Button Favorites in red and white

Tacky glue

Gwen Studios red and white Taffy Stripe ribbon


Cut the large sheet of felt (12" by 16") into 4 pieces (each 6" by 9").

On each piece, outline the letters for "LOVE" in white buttons.  I did this freehand, but you can make a pattern by writing out the letters to get the sizing as you like it.  I made the "O" in the shape of a heart.  My letters are about 3 1/2" high, but there's room to make them larger if you wish.

Glue down the first set of buttons along the letter.  After outlining the letters with white buttons, add a second layer with red and white buttons.  When you are satisfied with the look, glue these to the first layer.  


Cut eight 3" pieces of ribbon.  Fold each in half and glue the ends together.  Glue these loops on the top of the flags even with the sides and 1/2" down.

Cut a strip of ribbon about 8" long for each flag.  Glue this across the top and even with the top edge.  Fold the ends to the back and glue.

Cut two more 6"pieces of ribbon for each flag.  These will be crossed on the end of the flag as shown.  Mark the center of the bottom of the flag and cross the ribbons on that point.  Place the ribbons 2" above the corner and crossing at the center point.  Glue down and fold the ends to the back and glue.


Here are all the flags.  I was going to trim off the corners on the bottom to create a more pointed flag, but I decided I liked the look.  There are a long of possibilities for finishing the bottom edge.

Glue buttons in the top corners.


Here's the garland strung on a red bead strand.  You could use ribbon also.


Here are some links where you can find the materials I used. The buttons can be found at Walmart and the ribbon at Michaels.


For more Valentine designs using Gwen Studios ribbon and buttons check out the Designer Crafts Connection blog.


I'm a member of the Gwen Studios design team and receive product (which I love and recommend) as part of my compensation.


Monday, December 2, 2024

Decorate with Ribbon Scraps

Hi Everyone!

It's less than a month until Christmas and time to decorate, send greetings and wrap some gifts!

It's a good time to use up some of my leftover ribbon scraps from the projects that I created this year, too! I can never throw them away. I put them in a baggie and save them for projects like this. 


 I started with some simple shapes that I cut from felt. This is stiff felt (Friendly Felt from Kunin), but you can use regular felt, too. Shapes like a stocking, a tree, an ornament or a gift are simple to cut out and decorate. If you need more shapes, use cookie cutters.

Besides felt shapes, you'll need:

Thick tacky glue or hot glue and glue gun

Ribbon scraps (Gwen Studios)

Tags, bags or blank cards

Backing fabric or paper

Glue the ribbon scraps onto the felt.  Use binder clips or clothespins to hold while they dry if using tacky glue.  Glue to your surface. or create a fun garland by tying them onto more ribbon.

Here's a gift bag that I created with a green square of felt, ribbon scraps, a chipboard word and a rectangle of cardstock.

Ribbon Scraps Gift Bag

Here's a card with felt trees, sparkly Gwen Studios trim, cardstock and a chipboard word. I cut strips from the wide trim at the bottom of the Gwen Studios trim and glued it on the trees.

Trim Scraps Card

It's easy to make ornaments or gift tags.  Here's a circle with three rows of ribbons across the red felt circle.  For this tag, I used double-sided tape, pressed on the silver ribbon and then the red/silver ribbon.  Press the ends down on the back and add a loop for hanging.  Cover the ends with another circle of felt.

Ribbon Scraps Tag


Don't have ribbon scraps? Look for Gwen Studios ribbon at your favorite craft retailer:  Joann's, Walmart, Michaels or Amazon.

Looking for more holiday ribbon ideas?  Go to the Designer Crafts Connection blog.

Happy Holidays!


Breaking News!!  Gwen Studios now has Buttons!


I can't wait to design some projects with these!  Of course, you can add them to any of the designs above.  As a member of the design team for Gwen Studios, I'll be receiving some soon.


Sunday, September 29, 2024

Falling Leaves

Hi Folks!

 The feel of fall in the air - cooler nights, leaves turning color and flocks of birds preparing to fly to warmer climes.

It's one of my favorite times of year for decorating. I love the mix of colors! This year I'm making a fall leaf spray to hang on a door. 

I'm using stiff felt (Kunin Friendly Felt) and Gwen Studios ribbons. I'm cutting the leaves using my Sizzix Big Kick and a leaf die from Tim Holtz. If you don't have a leaf die, head outside and pick up a few leaves for patterns and cut them out freehand.


In order to make the flat leaves more dimensional, I folded them in half and sewed a line down the back.  If you don't have a sewing machine, hand stitching will work, too.

I used hot glue to tack the leaves together.  I cut a total of 24 leaves for this spray.


Then, I cut off the tails on one of the pre-made bows.  I undid the second one and added the length to make longer tails.  I also added lengths of grosgrain ribbon in red, yellow and brown and hot glued them to the back.


I added a hangar at the back of the bow.  I used a paper clip, but you can use a loop of narrow ribbon or string. Although I made a spray to hang, these look great as a centerpiece for your holiday table.  Intertwine the leaves with colorful ribbons.


You can find Gwen Studios ribbon at your local craft and hobby store (Joann's) or at Walmart or on Amazon.

Look for these ribbons:


Look for more fun ribbon ideas using Gwen Studios ribbons on the Designer Crafts Connection.

(I receive the Gwen Studios ribbons as part of the perks of being a member of the design team.  They have a wide variety of high-quality ribbons, which I am very pleased to use and recommend.)


Monday, March 20, 2023

Ribbon Tulips

Hi all!

California is getting a very wet winter this year and I am ready for spring.  But, if it's not spring yet outdoors, at least you can brighten your house with some spring-y ribbon flowers.

I'm working (again) with Gwen Studios 3/8" grosgrain in bright colors, but any of their ribbons would work as well.

Gwen Studios


You'll need (per flower):

a wood ball (3/4")

a bamboo skewer

green paint and your choice of bright colors like these from DecoArt

scraps of green stiff felt (Friendly Felt from Kunin)

Gwen Studios ribbon


hot glue and glue gun

scissors, paint brush

Optional:  bead caps, fabric scrap


To make a flower:

Paint the stick green.  Glue the ball onto the stick and paint the ball the bright color of your choice.  

Cut 12 - 3"-4" pieces of 3/8" wide grosgrain ribbon.  Form a loop and glue cut ends wrong sides together. Trim ends to a point.

Here's a flower in progress.  In this one, I wrapped the ball with a small circle of fabric instead of painting it.

Glue six loops around the ball and then glue the next six over the spaces in between the first row.

Die cut or freehand a small flower from green felt and punch a hole in the center.  Slide on the stick up under the flower and glue.

Cut leaves from felt and glue to the stick.

When you glue the stick into the ball, you can still see the stick.  To cover the end, I painted a bead cap and glued it over the hole in the ball. You can see that in the photo below along with the finished purple flower with the cloth-covered ball.


Happy Spring!

For more Spring inspired ribbon designs, check out the Designer Crafts Connection!


Thursday, June 6, 2019

Joy-ful ideas

Hi Everyone!

Thanks for stopping by!

Over on the Creating with Joy blog, there are always great ideas on how to embellish your projects with Joy letters and embroideries.

Here's a few that I have created recently as a member of the design team.  (I receive compensation for these projects and a lot of letters!)

I like to create games for the grandkids.  Here's a Bowling Game that I designed using chocolate milk bottles.  I love when you can reuse things.  This uses some multi-surface paint from Plaid.


And, for the graduate, I made a Mortarboard Gift Box, which can hold a gift card, or your graduate's favorite gift - cash!


Here I've use some Kunin stiff felt and a recycled box.  Add your favorite saying and personalize it with the school colors of your grad.

And, back in April, I created a sign for the yard to point the way to the Easter egg hunt!  Joy letters make it so easy to create a sign!

There are so many ways to use JOY letters - games, signs, gifts.  Stop by the Creating with Joy blog and see more ideas from the design team!


Wednesday, September 20, 2017

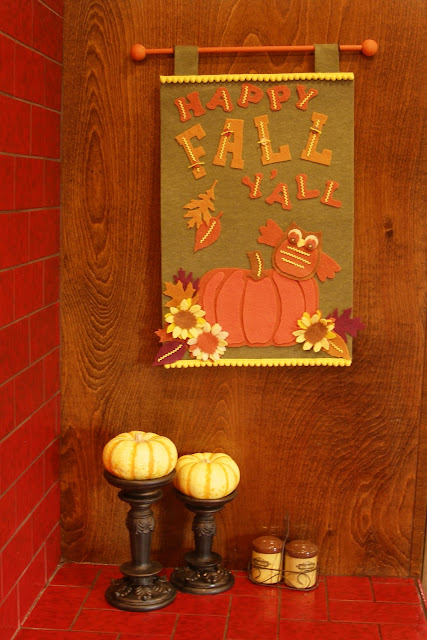
Happy Fall Y'All


Fall Banner
I love creating projects for fall.  Although I will miss summer, I love the fresh coolness of rain, bright warm harvest colors and the rich spicy smell of pumpkin pies or bread baking in the oven.

Today on the Designer Crafts Connection, we're creating designs with Kunin® felt.  Participating designers received a package of felt and trim to use in their design.


Here's what I received - Olive, White, Prickly Purple, Lemon Frost, Ocean Blue and Pumpkin Spice felt along with some fun pom pom trim.

To this, I added a few more pieces of felt - Yellow, Light Yellow, Orange and a nice rusty brown called Copper Canyon.  I also bought a few more pieces - Olive and more Pumpkin Spice (never enough Pumpkin Spice!).  They were 4 for $1 on sale at JoAnn's!  There were so many wonderful colors, I wanted to bring them all home!


The Olive piece that I received is a larger craft cut (12" x 18") that is also heavier (Kunin® Premiumfelt).  It's the perfect size and weight for a banner.  All the rest of the felt I used were the 9"x12" craft cuts of Kunin® Classicfelt.

Here's a list of what I used and where I used it:

Olive - banner (Premiumfelt) and loops (Classicfelt)
Pumpkin Spice - pumpkin back, leaves, small letters, owl eyes, owl front and wings, sunflower center
Goldenrod - large letters, leaves
Lemon Frost - owl eyes, sunflowers
Light Yellow - sunflowers
Yellow - sunflowers
Prickly Purple - leaves
Copper Canyon - owl back, pumpkin stem, sunflower centers
Orange - pumpkin front divisions

To create this banner, I used JOY letters as patterns, traced and cut out the letters.  The owl and pumpkin are simple shapes that I cut out freehand.  And, the leaves and flowers were cut on a Big Kick with dies.  The sunflowers are two or three different colors layered together.  I assembled the pieces and glued them onto the banner with tacky glue.  Then, I added highlights with yellow baby rick rack, buttons and yellow floss.  I glued loops of olive felt to the top with hot glue and made a dowel hanger with large wooden beads on the ends.

I found out a few interesting facts about Kunin® felt that I didn't know.  Did you know that you can use it outdoors?  So, I can hang my banner among my flowers or in my entry as well as in my kitchen!
In my kitchen
And, Kunin® felt is made from used plastic bottles.  It only takes 12 bottles to make one pound of fabric.  I love that something so beautiful comes from recycled bottles!  Here's a graphic from their website that shows the process:Slide3
Visit the website for more information on the manufacture of  Kunin® felt.  And, be sure to visit our Designer Crafts Connection blog for all the fun felt designs.  We always have loads of great ideas to inspire your diy projects.

I hope you feel inspired to create with Kunin® felt; it's such a family-friendly craft product so you can get everyone involved from kids to grandparents!