Pages

Tuesday, June 30, 2015

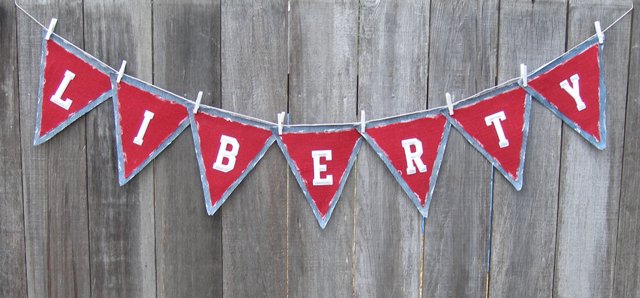
Patriotic Banner

Hi Crafters!

July is here and, with it, one of my favorite holidays - the Fourth of July!  Here's a quick and easy banner that you can make for decorating for the holiday.  It's a banner made with old jeans, red burlap and white iron-on letters from JOY SA Inc.  JOY makes all sorts of iron-on letters and appliques.  You can find them in Michaels now or order through the website.  I'm now on their Creativity Team, so you'll be seeing more projects using their letters.  They are so easy to add to any project.  Stop by the Creating with Joy blog to see more designs from the team.

Patriotic Pennant Banner
You can find all the instructions on the blog here.  You can personalize this banner with your favorite patriotic phrase or word.  This banner is no-sew and is only attached to the twine with clothespins, so it is super fast to make.  In the above photo, the pennants are spaced apart, but I like the way it looks overlapped also.
Patriotic Banner with pennants overlapped
The clothespins make it easy to change the spacing and fit the space you have to hang it.  You'll want to use this technique for other occasions and events, too - birthdays, baby showers, yard sales - wherever you need a quick and easy sign, create it with JOY!

Happy Fourth of July!
and, 
God Bless the USA!
Terry

Wednesday, June 24, 2015

Pretty Palettes :: June Reveal


Hi Everyone!

It's time for the Pretty Palettes Reveal for the month of June!  I was so excited to be asked to partner with the very talented Erin Prais-Hintz for this month's challenge!

Erin's inspiration for this month is the beach, ocean and bright summertime colors as epitomized by the signs and surfboards from Pottery Barn's Teen catalog.  See her inspiration post for all the fun surfboards.  Here are some of the colorful signs. 
Cute hand painted wood signs by the artist Katie Daisy.

As Erin's partner this month, I received all these yummy beads from Halcraft, which are available at Michaels.  
Pretty Palettes Beads - June 2015 The one in the center is aptly named "Surfboard Print Shell"!
Pretty Palettes Bead Selection for June 2015

I'm a California girl and born in July, so this month's beads and inspiration suit me to a T!  I live in flip flops pretty much year 'round and most of my vacation time is spent at the ocean.  I am a northern Californian though, so I've never surfed.  I did study marine biology, so if I'm at the ocean, I'm usually poking around the tide pools and looking under rocks to see what kind of critters I can find!

I wanted to create jewelry that would be fun to wear and represent the sparkle of the water and the colors of summertime like beach balls and bathing suits, sun umbrellas and carnivals.  So, with one of my favorite summertime places in mind (the Santa Cruz Beach Boardwalk) and humming a Beach Boys tune, here's the Fun in the Sun set I created:

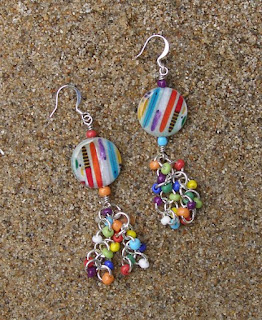
Fun in the Sun Earrings
 
Fun in the Sun Bracelet

Fun in the Sun Necklace
All of these pieces are easy to make, so you'll have more time to play on the beach or explore the tide pools!  They are made with links connected with beaded jump rings with more beaded jump rings in double strands.  The earrings have a few extra jump rings added to the ends of the chains for more movement.  The necklace has no clasp so you can slip it over your head and wear it in any position you like!

Thanks so much, Erin, for asking me to play with you on this design challenge.  Here's the link for the Pretty Palettes :: June Reveal!  Head on over and see what everyone else has created!
Happy summer crafting!
Terry

Monday, June 22, 2015

Decoupaged Necklace Stand

Hi Crafty People!

Today I want to show you a project that I did for Smoothfoam™.  If you make your own jewelry, I think you will find it useful.  (I'm on the Smoothfoam™ Creativity Team, so I receive product from this company and create a project for their blog each month and receive compensation for the project.)  It's a great product and can be used in so many different ways.  

Here's what I created for the month of May.  I design jewelry and I'm always looking for another place to hang the designs I create.  So, I thought I'd see what I could make with Smoothfoam™.  It was perfect and I'll be using it for other jewelry display ideas.  You can cover it with decoupage like I did for this one, but you could also paint it or wrap it with fabric.  The foam will hold pins or earring wires, which makes it perfect for a display board for earrings or necklaces.  

Here's the necklace stand that I created:
Necklace Stand
I used brown paper bags for the decoupage, but you could use other papers.  I like a neutral tone that will not compete with the necklace but you could personalize it depending on what type and colors of the necklace you want to hang on it.

For the how-to of the pattern and construction, see the Smoothfoam™ blog for all the details.  Be sure to scroll through the blog and see all the wonderful designs that the other members of the team have created.

Thanks for stopping by!
Terry

Wednesday, June 10, 2015

Stamped Scarf

Hi Crafters:

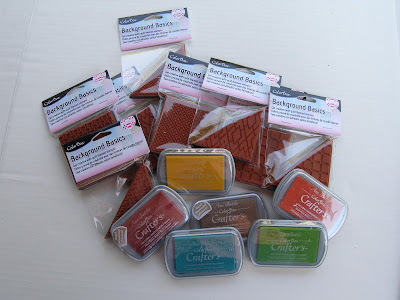
For this month's manufacturer's challenge, we're creating with ink pads and quilt-themed stamps from ColorBox™ Crafters by Ann Butler.

This is the generous sample that I received to create my design.  Thanks, Ann!


Ann Butler Designs

Stamps and Ink Pads
I've seen some wonderful designer scarves for summer, but I can't bring myself to pay those prices, so I decided to use the stamps and ink pads to create my own designer scarf!

I wanted a lightweight summer scarf so I used a white cotton gauze fabric. I cut the fabric about two yards long and 18" wide.  I straightened the edges and fringed the short edges to finish the scarf ends. The long edges curled under nicely so I didn't hem them, but you could hemstitch the edge.  Then, the stamping fun began!  I chose the Aquamarine stamp pad and the Picnic stamp.

I practiced on scraps of cotton gauze and found I had "problems" with stamping.  First, gauze fabric has wrinkles and nice, clean outlines that you get from stamping on paper or even a smoother fabric are not happening.  Second, lining up stamps takes time and precision and patience, and I was running short on all of those.  And, third, getting the stamp evenly covered with ink turned out also to be a problem.  So, I turned my "problems" into opportunities!  So, what I created here is a randomly stamped scarf with a watercolor edge.  


Stamped Scarf
Here's a couple of close-ups of the edge and the body of the scarf.

Personally, I like the look of the uneven blocks with faded spots and extra ink here and there; I think it suits the fabric and style of a casual summer scarf.  The watercolor edge was a lot of fun and adds to the uneven look.  To make this edge, stamp the edge with the ink pad and take a damp brush to the ink to spread it.

I learned a lot from this challenge and I'll definitely be trying these stamps and inks on on other surfaces in my crafting.  I'm looking forward to using it on some polymer clay for jewelry and on backgrounds in a mixed media piece I'm working on as well as more scarves!

Designer Crafts Connection
Join us on the blog hop and see the wonderful variety of projects that the designers have created.


Happy Crafting!
Terry


Monday, June 8, 2015

Mobiles, Sun Catchers and Wind Socks

Hi Crafty Friends!

Sometimes it's only in looking back at your work that you discover a theme or a direction in your creative journey.  I realized lately when trying to find a place to hang one more mobile that I create a lot of wind chimes, sun catchers, mobiles and the like.  I like the light catching bright colors floating in a breeze and the sounds of wood or metals resonating in the airAnd, I have a lot of fun creating them.  So, here are a few of the many I have created for your inspiration.

Here's my latest mobile. I created it with Smoothfoam™ hollow half balls so it's nice and light and perfect for a child's room or a party decoration.  You could use this for lots of different parties such as retirement, a baby shower or a wedding. 

Hot Air Balloon


Here's another mobile that I created for Smoothfoam™.  Here I used a disc as a base and added bright Rowlux® Illusion Film flowers on the base and hanging from it.  You can't beat Rowlux® film for vibrant color!  And, the Smoothfoam™ base holds the pins without glue.
Flower Mobile
Links under the photos take you to the Smoothfoam™ blog where you can find the instructions for these projects and many other wonderful projects created by the Smoothfoam™ design team.

Some of the other materials that I've used to create wind chimes, sun catchers, wind socks and mobiles are plastic canvas, bamboo, old felt pens and beaded wire.  Here's just a few! 
April Showers Mobile


Felt Pen Wind Chime
Here's an easy plastic canvas windsock that I did with a kids' group.  It's plastic canvas, twine and plastic beads. Just roll a rectangle of colored canvas into a tube and use twine to lace it together.  To hold it into a tube while you stitch, use clothespins or binder clips.  Cut out butterflies and use more twine and beads to stitch them to the canvas.  Add twine fringe and twine strands to hang.  This is great for the kids because you don't even need a needle!
Plastic Canvas Wind Sock
In fact, I've got so many different hanging designs that I decided to collect them all on a Pinterest page! 
Have fun creating! 
Terry

Monday, June 1, 2015

Designer Crafts Connection: Let's Party

Hi Crafters!

Summer is coming and, with it, a lot of outdoor parties!  Generally, we have sunshine and warm weather that make the patio an inviting place.  We'll see about this year as May was one of our coldest.  Here's hoping June gives us a good start to summer. 

This month, I'm featuring projects that were on my blog in the last few years that suit outdoor decorating for a summer party.  The Fourth of July is one of my favorite holidays and these designs are perfect for decorations for the barbecue.  To start off, here's a Denim Wreath.  You can find the tutorial for the process of making the wreath at the link.
Denim Wreath

I love to recycle worn denim jeans to make fun, country-style designs.  Here's another one: a Denim Wall Pocket.  Fill this pocket with some Queen Anne's Lace or some dried flowers and hang it on the fence or gate.

Denim Wall Pocket

And, here's a Denim Flower to wear as a pin or add to a jar, napkin ring, a wreath, banner - anywhere and everywhere!
I hope you'll try these designs for decorating your next barbecue.  Add a few hay bales, more bandanas and some mason jars for quick and easy country decorating!

Now, hop around the Designer Crafts Connection blogs with the big, blue button over in my sidebar.  You'll find lots of cute ideas for your next party!  You can also go to the Designer Crafts Connection blog where you can find the links to all the blogs.

Whatever your party plans, have a great time creating your own decorations and celebrating with family and friends!

Update:  Since I love to create with denim and have more designs with it coming up in the future, I created a Pinterest board exclusively for these designs here