Pages

Showing posts with label etchall® dip 'n etch. Show all posts

Friday, April 26, 2019

Beachcombing Necklace

Hi everyone!

Thanks for stopping by.  I am pleased to be able to share one of my necklace designs with you today.  This one is published in the June/July issue of Beadwork in the Fast and Fabulous section.

I love the ocean and visit as often as I can.  But, when I can't visit, I like reminders of it - a shell, a piece of driftwood, a shiny rock or sea glass.  With this necklace, I've created a collection of elements you might find on the beach - a piece of driftwood, different types of shells and sea glass beads.  But, the matte beads in the necklace weren't churned by the ocean.  I used etchall® dip 'n etch to create the soft, matte surface on shiny, glass beads.  It's so easy and quick to do this (15 minutes!) and I love the look.  Go to this post to see the easy process or search my blog for etched jewelry.

Beachcombing Necklace
Close-up showing etched beads
Close-up of the bottom of the necklace
I really had a lot of fun making this one.  It's a freeform style that's open to whatever you have around as far as shells, wood chips and beads. And it's all knotted making it easy and quick to do.

Here it is hanging on a wooden stand:


The editors and photographers at Beadwork did a fabulous job of photographing and showing the details of this necklace, so I hope you'll check out the magazine.  You can get it in print and digital.

Happy Creating!


Saturday, July 21, 2018

Faux Sea Glass Mobile

Hi all!

I'm here today for etchall® to show you another way to use their amazing products.  Today I'm using etchall® dip 'n etch.  It's one of my favorites because it's so easy to use.

I'm etching some interesting glass beads that I found at JoAnn's.
Such interesting shapes and sizes, aren't they?

I put them in a plastic cup and covered them with etchall® dip 'n etch.
I swirled the cup a couple of times to make sure the beads were exposed to the solution evenly and waited for 15 minutes.  Then, I poured the excess back into the bottle to use next time.  I rinsed the beads, then washed them is dish soap, rinsed again and dried them on a paper towel.

Now, these beads have the softened look of sea glass.

These would make some fun jewelry, but I love the look of a sea glass mobile, so that is what I decided to create.

I didn't have a piece of driftwood, but I did have some commercial driftwood pieces.  You can find them in the floral section of your favorite craft store.

I tied on lengths of C-lon cord to the wood piece with overhand knots and ladder-stitched the pieces of glass down the lengths of cord.  Ladder stitching is just putting the cords into the bead from opposite directions.  In between the glass beads, make overhand knots.  Then, on the ends, I tied on silver fish beads.

Here's my mobile hanging in my herb garden:
Faux Sea Glass Mobile
And, here against a fence:

So, if you have a yearning for a bit of the sea in your life, but can't make it to the beach to gather some sea glass, make your own with etchall® dip 'n etch.  It's so easy!


(As a member of the Etchall Design Team, I received product with which to work.  But, I wouldn't be a part of it, if I didn't love the product.  Hope you'll try it!)


Monday, March 19, 2018

Etched Wind Chime

Hello!

It's almost spring and time for some new yard décor.  Today, I'm going to etch a wind chime with etchall® dip 'n etch.

I bought a small glass lampshade at my local hardware store.  You might be able to find one in a re-use store or in your own stash from a remodel.  This is the size you might find on a fan or bathroom vanity light.


Since I'm going to dip it into the etching solution, I found a plastic container that would fit the shade.
I put the shade into the container and poured the etchall® dip 'n etch over it.  I let it sit 15 minutes and poured the remaining etching solution back in the bottle.  (It's reusable!)

Here's how it turned out:
I like it just like that, but a little color would be nice in the garden.  I used a diluted solution of alcohol ink to paint the inside and out.  I've had good results with this before on other projects like this teacup votive and this angel.  The color holds up very well.
Now, I need to hang this in order to make a wind chime out of it.  I used a canning ring and  a metal flange from the plumbing department to create the cap.  
I glued the flange inside the canning ring and to the top of the glass shade.  I dabbed alcohol ink on the cap to match the shade.  When it was dry, I knotted beads on both sides of the cap with cotton cord to create the clapper and to hang it.  When the wind blows, the wooden bead hits the side of the bell to chime.

Here it is hanging among the rosemary in my herb garden.
I love to make decorations for the garden.  Next, I'd like to try one of those big dish flowers!  I hope you'll try it.  It's so easy with etchall® dip 'n etch!

Thursday, February 22, 2018

Etch a St. Patrick's Day Necklace

Hi all,
It's almost time to wear some green, so I thought I'd create a new necklace in time for St. Patrick's Day.  I'm using etchall® dip 'n etch to create some soft, muted green beads to mix in with the others that I have.

Here are the beads that I will etch.  I have strung them to make them easier to get in and out of the etchall® dip 'n etch.

I found a small plastic container in my stash and taped the bead strands to the sides.
Add the etchall® dip 'n etch to cover the beads and time for 15 minutes.  Lift the beads out and rinse. Pour the dip 'n etch back in the bottle.  You can use it over and over!
I rinsed them off and noticed that only half the beads etched.
The top beads have a nice muted etched surface, but the harder dark green crystals did not etch.  There is some hard glass that will not etch with dip 'n etch.  But, I like a mix of etched and unetched glass beads in my designs.  (See this necklace where I combined etched and unetched glass beads.)

Here's the necklace I created:
Wearing 'o the Green


Etching the beads adds another dimension to this necklace with the contrast of the etched beads against the sparkling facets of the originals.  And, it's so easy with etchall® dip 'n etch!

Friday, November 10, 2017

"Gather" Slate Sign

Hi folks!

I look forward to this time of year - the colors of the leaves, warm sweaters, family gathering together to share meals and memories.  It's the time of year when our family parties move inside to the kitchen and dining room from the patio and barbecue of summertime.  So, I take a little more time to decorate the house.

Signage is so popular now whether it is a phrase, a word or more.  One of the most popular words this year is "gather", so I thought it would be a great word to etch on slate.  I love the rustic look of slate and it's easy to etch.  Previously, I have cut stencils and etched inside the stencil.  This time, I'll show you how to etch the background, leaving the letters un-etched.  To do this, I'm using two of my favorite etchall® products:  etchall® dip 'n etch and etchall® resist gel.
etchall dip n etch all sizesRESIST-silo


Here's the slate sign I started with:

I traced the sign on a piece of scratch paper and wrote out the word to figure out the placement of the letters.  Then, I went over the letters with the resist gel.  I took a toothpick and went through the gel to spread it and added more where I wanted the letters thicker.  Then, I let it dry.

 Here's the sign with the dried resist gel.  Now, I'll put the sign in a bath of etchall® dip 'n etch.

To set up, I found a shallow plastic lid that fit my sign.

I poured the etchall® dip 'n etch over the sign to cover and waited for 15 minutes.

After etching, I pulled the sign from the etchall® dip 'n etch and rinsed under running water.  I let it dry and pulled the resist off the slate.  I poured the etching liquid back into the jar to use again later.

Here it is after etching:

I added a wire hanger.
"Gather" Etched Slate Sign
Quick and easy, right?  This rustic sign will be great in my kitchen or even hanging outside in the entryway.  Tie or wire on a few fall leaves or sprigs of evergreen for an added flair.
"Gather" Etched Slate Sign

Disclaimer:  I am on the Design Team for etchall and receive their products to use in my designs.  I have enjoyed using their products and highly recommend them.

Friday, October 20, 2017

Etched Mini Pumpkins

Welcome!

Today I'm working with etchall® dip 'n etch to create some etched mini pumpkins.  I am a member of the Etchall Design Ambassadors and receive product as part of that team.  It's one of my favorite products from etchall®, because it is so easy to use.

I saw these cute little glass vases at Michaels.  Their small size and variety of shapes intrigued me and I though I could turn them into pumpkins.

Glass vases
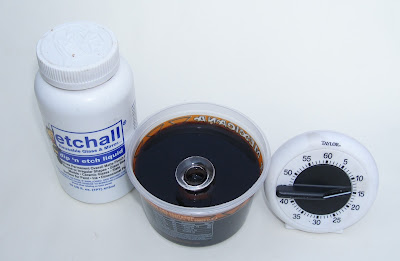
First, I washed and dried the vases and set up my work station.  I have a plastic container, etchall® dip 'n etch, a timer and a vase.
I filled the vase with water to keep it from floating in the etching liquid and poured the etchall® dip 'n etch around it.
I set the timer for 15 minutes.  You can see that my etchall® dip 'n etch is turning brown.  No problem, it still works fine.  Some of my vases were a little taller than this container, so I put them in plastic cups.  After the etching was finished, I poured the remaining etchall® dip 'n etch back into the container to use again.
 Here are the vases after they have been etched.
To color them, I used an Orange Zest stamp pad from StazOn by Tsukineko.  I really like the warm glow that this ink created.  Then, I wrapped the necks of the vases with some twine.
I wanted to add a little more embellishment so I wrapped over the twine with some wire and added some beads and copper leaves.  The copper sheet is embossed with the end of a paintbrush and a little green patina is added in the veins. I hand cut these with a pair of scissors, but you could die cut them, too.

I like to decorate with pumpkins for fall and harvest, but I also wanted to see how they would look with a jack-o-lantern face.  To make the face, I cut small pieces of black chalkboard labels and adhered it to one side of the pumpkin.  These faces can easily be removed.  On one pumpkin, I added some white paint pen and black pen to create the eyes.

Here are my finished pumpkins.  It's fun to create the different faces; each one has it's own personality!  I hope you'll try etching your own mini pumpkins with etchall® dip 'n etch.  It's so quick and easy to use!  I can't wait to try something for the upcoming holidays.
Etched Mini Pumpkins (or, Jack-o-Lanterns)
Update:
After a year, the stickers had curled off the pumpkins, so I replaced them with features drawn with a permanent pen.


Happy Creating with etchall®!
And, check out all the other fall projects on the etchall Autumn Pinterest page.

Friday, August 4, 2017

Grape Cluster Pendant

Hi Crafty Friends,

As fall approaches, our family's thoughts turn to harvest.  We are grape growers, and this is the time of year when our crop ripens and is picked.  We watch the weather reports and the sky with increasing frequency as all farmers do.  We check the leaves for molds and test the grapes for ripeness.

So, with grapes on my mind and picking fast approaching, I decided to make a grape cluster pendant. 
Grape Cluster Pendant

To create this pendant, I am using etchall® dip 'n etch and some clear beads that I purchased at my local craft store.

I bought a variety of sizes in clear glass.  They are strung on plastic line, so I just removed the labels and taped them to the sides of a plastic container.  The tape is for me to use to lift them out of the solution.
Now, I can add the etchall® dip 'n etch to the container covering the beads. 
As you see, my etchall® dip 'n etch has darkened with time and use.  But, it still works perfectly.  After etching my beads for 15 minutes, I pulled them out and rinsed them off in running water.  Then, I returned the dip 'n etch liquid to the jar for another use.

Here are my beads after etching:
Etched Beads
They have a matte finish now with a "tooth" that makes them easy to color with paint or ink.  Today, I'm using some of Lisa Maria Jimenez' new line of inks from Clearsnap - ColoriQue.  She recently sent me some samples that I am happy to be able to use for this, especially since she sent me the perfect color for this project - Grape Vine.
I put the etched beads in a small plastic recycled container and added a few drops of the ColoriQue.
Using the paintbrush, I rolled the beads around in the ink to coat them.  Then, I took them out of the dye, patted off the excess and heat set them according to the instructions.
Here are those clear glass beads now - wonderfully purple - and ready to turn into a bunch of grapes!

To start the pendant, I created bead dangles by sliding the beads onto brass headpins and making simple loops.  Here they are arranged along the piece of chain to which I will attach them.
You can add more or less depending on how full you want your pendant.  Generally, attach the smallest beads at the lower end of the pendant and larger near the top, but mix it up a bit to create a more realistic bunch of grapes.  Make sure your chain is large enough to attach two dangles in a link.  After arranging, open a loop on a dangle, slide it into a link and close the loop. 

Here's my pendant after attaching my dangles:
Grape Cluster Pendant
I thought it needed a couple of leaves and found some acrylic grape leaves in my beads.  They needed some definition, so I added a little ColoriQue to them with a brush.  Then I attached them with jump rings to the top of the bunch.

Grape Cluster Pendant


Etching is so easy with etchall® dip 'n etch.  Check the etchall website for the latest specials and all the supplies needed for etching.

(I am a proud member of the etchall Ambassador design team and receive compensation and product for my design use.)