Pages

Showing posts with label Designer Crafts Blog Connection. Show all posts

Monday, December 5, 2011

Sock Monkey Blog Hop

Hi Crafters!

This month we're monkey-ing around on the Designer Crafts Blog Connection!  When Creativity Knocks is our sponsor and kindly donated their fun video, Sock Monkeys Go BanAnas, that teaches how to make your very own sock monkey.  Ana and Megan Araujo are a great team and you'll be chuckling as you watch the video and learn new tips and tricks to construct a monkey and dress it in cute outfits.  I haven't made a soft sculpture animal since my kids were little, so I appreciated the tips. 

I decided to embroider the eyes instead of using buttons since this monkey will be going home with my almost two-year old granddaughter.  I made her a very simple dress (two squares gathered on ribbon) that ties at the shoulders and constructed a bow of the same fabric.  Later, I hope to make that cute little sweater that is found on the video.

Here she is:
I'm quite fond of her already and I'm having a hard time letting her go.  I hope my granddaughter will let me visit!
Our other sponsors for this hop are Fox River who donated the socks we used,


Judikins who donated a very cute Sock Money Rubber Stamp that some of us used,

and Rit who donated dye for us to use.

Thanks to all our sponsors, but especially


who is also sponsoring a contest on their website where you'll find instructions on how to enter their giveaway.
Happy Crafting and Happy Holidays!
All the best,
Terry

Tuesday, November 15, 2011

Flip-Pal Mobile Scanner

Hi Crafters!

Wait until you see my new crafty toy!  It's the Flip-Pal Mobile Scanner, and it's so much fun!  I have only begun to explore the possibilities of this new gadget, but, so far, I am very impressed.  It's a very versatile product and I am looking forward to using it to create lots of different kinds of craft projects.

One of the things that it can do is scan in your old photos for preservation, sharing with other members of the family, or for use in projects.  Even if you don't want to remove them from old albums or you can't because they have been glued to the page or the photo is too fragile, the Flip-Pal can scan them.  It has a removable lid that makes it easy to scan the photos in place in the album.

The photo that I'm using today is a picture of my grandmother as a young woman.  I'm just enchanted with the sweetness of her leaning her chin on her glove.  It's a photo that I've wanted to memorialize in some way, and this is the perfect oppurtunity.

The process is very simple.  First, I scanned the photo and uploaded it to my computer.
  

Then, I printed it out.  I am using a watch body from Stanislaus Imports to hold the photo.

This watch was a very shiny silver, so I antiqued it with some Rub 'n Buff(R).  The color is Autumn Gold, and it gave the silver a pinkish, coppery sheen. 

Next, I used the back of the watch body to cut a circle around the head in the photo and sized it to fit in the back.  To protect the photo from glue discoloration, I wrapped the photo circle front and back in packing tape.  Then, I trimmed it to fit.

I glued the photo in the back and glued the back to the front using jewelry glue.  I attached a large lobster clasp, chain and some dangles that pick up the color of the watch.
Here's the finished project:
Here's the watch with the lid open:

This will be the first of many projects in which I will use the Flip-Pal™ mobile scanner .  I can't wait to take it on Thanksgiving vacation with me so I can pick up a few more photos at my Mom's house.  It will be so easy to scan them into the Flip-Pal.

Note:  I received the Flip-Pal™ mobile scanner in return for making a project and blogging about the project and all opinions are my own. 

**************************BREAKING CRAFTY NEWS*****************************

Flip-Pal™ mobile scanner presents the “Scan & Share” Blog Hop Challenge!


Flip-Pal™ mobile scanner has partnered with the Designer Crafts Connection Blog Hop to offer the “Scan & Share” Blog Hop Challenge!

Designers created projects with the Flip-Pal™ mobile scanner and now you have a chance to join in and share your creative ideas.

To follow the “Scan & Share” Blog Hop and see our ideas and projects, click on The Designers Craft Connection Blog Hop blue button. To submit your “Scan & Share” ideas, click here.

The blog hop follower and participating “Scan & Share” Blog Hop designer who creates the most creative and productive ideas using a Flip-Pal™ mobile scanner will each win a Flip-Pal™ mobile scanner.

Or, if you've already decided that you want to own your own Flip-Pal™ mobile scanner, order through their website and use this coupon code for 10% off:  SSBH2011.

Happy crafting!
Terry

Monday, October 3, 2011

Feather Mask

Hi Everyone!
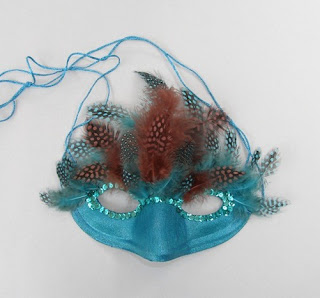
It's time for our first Monday of the month blog hop, and this month the theme is Halloween.  As a kid, I loved dressing up for Halloween, so I decided to make a mask this month. 

I started with a fabric-covered mask, some feathers and sequins.  You'll also need some tacky glue and fabric paint.
I removed the elastic cord from the mask and painted the mask.

Then, I started to glue the feathers onto the mask starting in the center.  I glued longer ones in the center and shorter ones along the sides. 


Along the way, I decided to make a change.  This happens frequently when I design!  I thought the paint color wasn't bright and sparkly enough, so I painted over the first color.  Much better!  Then, I glued on some sequins and added some cord for ties.

Now, I'm ready for the ball.  And, I've got lots of feathers left for earrings!

Take a look around the Designer Craft Connection Blog Hop this month; there's a lot going on!  Several designers are participating in a Westcott(R) challenge and creating crafts with Velcro(R) and Duck Brand(R) tape.  There's a giveaway from Westcott(R), so be sure to keep your eyes open for that!
Happy Crafting,
Terry

Monday, September 5, 2011

Baby Buggy

Hi everyone!
Today is the first Monday of the month, and it's time for the Designer Crafts Blog Connection.  Our theme this month is "Party!", so you'll find crafts and designs for baby showers, birthdays and other kinds of celebrations.  Just click on the Designer Crafts button to travel from blog to blog and load up with design inspiration!

Next week, I'm helping with the craft at a baby shower.  We're going to be stamping designs on burp cloths.  So, I thought I'd design a motif that I could use for that.  This little Baby Buggy pattern is very easy to make and is very versatile.  Everything you like in a pattern, right!

First:  Draw a circle on a piece of paper to use for your pattern.  Your circle size will depend on where you want to put the Baby Buggy.  Will it be on a shirt, a burp cloth, a card, a banner, the tablecloth or a gift bag? 

                                                   Here's my circle.  It's about 4" in diameter.

Now, fold the circle in half and cut it along the fold line.  Do the same for one of the halves of the circle.  It should look like this.

                                 You'll use the half and one quarter for your Baby Buggy pattern. 


                                   Then, I used the pattern to cut pieces of compressed sponge.

You can cut circles of sponge or use any round object to stamp the wheels.  I found a spool in my sewing supplies that had just the look I wanted, so I used that for my wheels.  For the handle, I cut a small piece of sponge freehand.

Here it is stamped on fabric.


But, as I said, it's a very versatile pattern, so I thought I'd try it with paper.  I was going to use a dainty print from my scrapbooking paper, but I happened on my stash of recycled papers and decided to go with a more natural look.  So, I cut the same pattern pieces from cardboard hot drink sleeves.  Then, I cut circles for the wheels from a different sleeve.  I glued them to a piece of parchment paper and added buttons with thread ties.  I think I'll glue the parchment to a brown paper bag and add a raffia tie. 

I can't wait to try a few more ideas with this pattern.  I've got some scraps of adhesive-backed print fabric that would make an easy iron-on applique for a diaper bag.  I'll add some lace and buttons for the wheels.  Or, maybe I'll make a gift card with a smaller buggy.  What would you make?  I'd love to hear your ideas!

Hope you enjoy the pattern,
Happy Crafting,
Terry


Sunday, June 5, 2011

Denim Wall Pocket

Hi Crafters!
Welcome to another round in the Craft Designer Blog Connection.  This month we are showcasing patriotic designs.  My Denim Wall Pocket is a great design for the Fourth of July or any patriotic celebration.  It's easy to make and uses recyclable materials. 

First, cut a pocket from an old pair of denim jeans.  Leave about 1/2-inch all around the pocket.  With a sharp pair of scissors poke and cut holes in the pocket if it doesn't have them.  Use the point of the scissors to ravel the holes and the edges around the pocket.

Next, cut an 18-inch or longer piece of steel wire.  I bought mine at the hardware store.  It comes with an oily coating that you'll want to clean off with sandpaper and a damp paper towel before you work with it.  After you clean it, make a few curls and wraps in it.  Dab on some white acrylic paint.  Poke a hole in each corner of the pocket and insert the wire ends.  Curl the ends up with pliers to hold it in place.

Stamp a few stars on the pocket in white paint.  I used a sponge star.  Tie a piece of a handkerchief on the wire and add a raffia bow.

Easy, right!  Of course, you can add more embellishing if you like.  I think some spatter painting across the pocket would look nice.  And, you can fill it with just about any decoration.  I'm going to put a handful of daisies and a small flag in mine.

Happy crafting!

Monday, May 2, 2011

Silver Leaves Necklace

Hi Crafters!

Today is the posting day for the Designer Crafts Blog Connection, so I hope you'll travel around the blog-o-sphere and view all the new blog posts(no spacesuit needed!). There will be new ideas for Mother's Day, Father's Day and other celebrations. With over 60 designers participating, I'm sure you'll find something you'll want to try!

This month I'm sharing a necklace that I designed using paper bags. I've found that paper bags are very versatile, and lately, I've been making jewelry with them. Here's one that you can find in the pages of the June issue of Crafts 'n things.


The instructions are found on pages 76 and 77 of the June issue. Yes, you'll have to buy the magazine, but it is a treasure trove of great ideas in all sorts of craft areas. And, I hope to post more paper bag ideas with instructions in the future.

Continue the blog hop by clicking on the blue Designer Crafts button along the side of my blog.

Happy crafting!