Pages

Thursday, October 26, 2017

Pretty Palettes October Reveal

Hi Everyone!

This month the inspiration for the Pretty Palettes challenge is a campfire with glowing oranges, black and gray embers with shades of brown and tan.

Here's the inspiration photo from Molly Schaller - a harvest party where they drank fresh cider and fried donuts over the fire!  Sounds wonderful!


And, here's the palette:


Here are the beads I chose from Michaels:
Beads from Michaels
I don't know if I'll use all of them in this set, but there were a couple of strands that were so interesting, I just had to bring them home - those black lava sticks, for instance.  They look so versatile; there are at least three different ways I want to use them.

This is the necklace I designed.  I used the black lava sticks, the fire agate rounds, some brown shell rondelles from a previous Pretty Palettes challenge and some 16-gauge copper wiggles that I hammered.  It's strung on necklace memory wire.  To cover the ends, I painted the silver with some Antique Copper patina.
Tribal Fire Choker


Now, for some earrings and a bracelet.
For the bracelet, I wrapped the black lava stick with copper wire to create a toggle.  The bracelet is strung on black waxed cord.

For the earrings, I wrapped the waxed cord around a lava stick and a jump ring.

I didn't use the white shell discs in this set, but I did use them in my Harvest Moon Earrings in my previous post.

See all the other designs in the Pretty Palettes Reveal.

Saturday, October 21, 2017

Harvest Moon Earrings

Hello!  Thanks for stopping by!

Today I'm participating in the Earrings Everyday monthly challenge.  The inspiration this month is the harvest moon.  I love moon watching.  My husband and I usually head out to our ranch to watch the harvest moon come up as the sun sets into the ocean.  We didn't make it out this year, but we have many special memories.

Here's what I cam up with for the harvest moon challenge.  I had some shell discs that I thought would be perfect.  I wanted to show the moon through the branches of a tree.  I tried wire, but that wasn't looking quite right.  Then, I discovered some copper branch components in the drawer.  Those and a little chain to tie it together did the trick.  The branch can swing across the moon as it would in the wind and the chain can go over or in back of the moon.

Harvest Moon Earrings

I ended up taking a lot of shots of these earrings to try and show the features of the shell discs.  I like to try different backgrounds, too.  The above was on a rusty pot.  It usually takes about ten shots to get a good one for me!
On paper bag collage

On plane tree bark
I think I like the tree bark the best.  It shows the gold and black in the chain and one moon is showing the shell surface well.

And, here's one with the earrings on a piece of cardstock.
Thanks for the inspiration, Erin!  Go here to see all the other designs.  Happy Harvest everyone!

Friday, October 20, 2017

Etched Mini Pumpkins

Welcome!

Today I'm working with etchall® dip 'n etch to create some etched mini pumpkins.  I am a member of the Etchall Design Ambassadors and receive product as part of that team.  It's one of my favorite products from etchall®, because it is so easy to use.

I saw these cute little glass vases at Michaels.  Their small size and variety of shapes intrigued me and I though I could turn them into pumpkins.

Glass vases
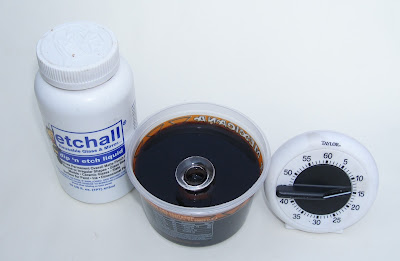
First, I washed and dried the vases and set up my work station.  I have a plastic container, etchall® dip 'n etch, a timer and a vase.
I filled the vase with water to keep it from floating in the etching liquid and poured the etchall® dip 'n etch around it.
I set the timer for 15 minutes.  You can see that my etchall® dip 'n etch is turning brown.  No problem, it still works fine.  Some of my vases were a little taller than this container, so I put them in plastic cups.  After the etching was finished, I poured the remaining etchall® dip 'n etch back into the container to use again.
 Here are the vases after they have been etched.
To color them, I used an Orange Zest stamp pad from StazOn by Tsukineko.  I really like the warm glow that this ink created.  Then, I wrapped the necks of the vases with some twine.
I wanted to add a little more embellishment so I wrapped over the twine with some wire and added some beads and copper leaves.  The copper sheet is embossed with the end of a paintbrush and a little green patina is added in the veins. I hand cut these with a pair of scissors, but you could die cut them, too.

I like to decorate with pumpkins for fall and harvest, but I also wanted to see how they would look with a jack-o-lantern face.  To make the face, I cut small pieces of black chalkboard labels and adhered it to one side of the pumpkin.  These faces can easily be removed.  On one pumpkin, I added some white paint pen and black pen to create the eyes.

Here are my finished pumpkins.  It's fun to create the different faces; each one has it's own personality!  I hope you'll try etching your own mini pumpkins with etchall® dip 'n etch.  It's so quick and easy to use!  I can't wait to try something for the upcoming holidays.
Etched Mini Pumpkins (or, Jack-o-Lanterns)
Update:
After a year, the stickers had curled off the pumpkins, so I replaced them with features drawn with a permanent pen.


Happy Creating with etchall®!
And, check out all the other fall projects on the etchall Autumn Pinterest page.

Monday, October 16, 2017

Corrugated Metal Pumpkin


Hi and welcome to further adventures in metalworking...

Today, I'm working with more of the galvanized metal.  I cut out a pumpkin shape, washed and dried it and hammered the edges.  Hammering the edges will smooth them, but you may want to file any burrs also.  I hammered the surface, too, for a little texture, but it doesn't end up showing much.

This pumpkin is about 3" wide.  The metal I'm using is 22 gauge in thickness.   I found that the galvanized flashing that my hubby had in his shop was a thicker gauge (20) and wouldn't go through easily the tube wringer.  If you're looking for an easy metal to use, I would try a thick aluminum pan or aluminum sheet. 

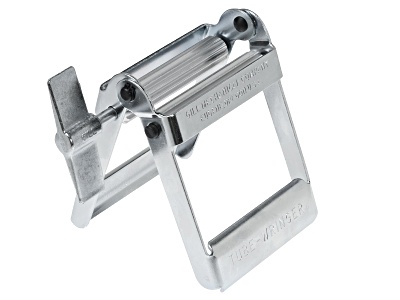
I put the pumpkin through my tube wringer a couple of times.  Initially, it is a little difficult to hold the tube wringer closed and turn the handle, but it gets easier as the metal softens and corrugates.  If you're not sure what I'm talking about as far as a tube wringer, here's a photo:
Tube Wringer Use This Tool To Corrugate Uncoated Wire
You can find them at jewelry suppliers, on Amazon and in art stores as they are used for squeezing tubes of paint.

Here's the pumpkin and a leaf that I put through the tube wringer and then painted with some Ranger patinas (Moss and Rust).
Corrugated and Painted
They needed a little antiquing, so I sanded them a bit with a sanding block.  Then, I had a little fun splatter painting them with some Ginger alcohol ink.

Sanded and Splattered
To attach the leaf to the pumpkin, I punched a hole in each and threaded some 20-gauge wire through.  I coiled the wire with round nose pliers and wrapped it around itself to hold.

Here's the finished pumpkin:
Corrugated Pumpkin

Now, what to do with it.  It would make a cute magnet or a pin.  Or you could tie it to a basket or add it to a ribbon for a napkin holder.  What would you do with it?

I finally decided to tie it onto a candle holder...well, pumpkin holder...
Now, I want more of these!  Off to get more metal...

Have fun creating!


Saturday, October 7, 2017

Adventures in Metalworking

Hi there!

Thanks for stopping by.  Today I'm sharing a work in progress in the area of metalworking.  It's an area that I've used a little in my designs, and this year I've made a commitment to learning some new techniques.

Here's a heart and wings that I was working on yesterday:

Heart with Wings
I used some textured "tin" that I had and cut out the pieces with metal snips.  Then I put them through a cool device to create the ripples - a tube wringer.  (This idea came from a class I took from Susan Lenart Kazmer.)  You can see more of what I made in her class here.

I added some color to the heart with ColoriqQue by Lisa Marie Jimenez in Ruby Slippers.  Then, I added some white acrylic paint dabs on the heart and wings with a paper towel.

Now, to put it together and decide what it's going to be!  Since I'm not up to soldering yet, I will probably rivet the heart to the wings.

On to the next stage!  What creative adventure are you on today?

Sunday, October 1, 2017

Mixed Blues

Hi everyone!

This month for the Pretty Palettes inspiration, Molly picked an ombre selection of yarn for our inspiration.  This yarn fades from soft green to purple.


Here is the palette created from the yarn:


These are the beads she selected from the palette.

Since I am designing last minute (again!),  I decided to pull out beads from the piles and bins around the room.  Here's what I found - some sodalite, blue shell beads, turquoise howlite, blue quartzite and purple amethyst chips and a few blue ceramic rounds.


I didn't use the turquoise or the sodalite, but I did add some amethyst rounds and a few multi luster hematite spacers (also from the Halcraft lines).  It seemed natural to add some fiber since the inspiration was yarn, so I created a wrapped bead focal with some recycled sari ribbon and yarn and a wooden bead.

Mixed Blues

I don't often make multi-strand necklaces, but with a large focal and small chips, I needed more than one strand.  At the top of the strands, I needed a way to bring them all together.  I had some large silver cone bead caps, but they were too bright and shiny.  So, I marbled them with a two colors of some new ink samples sent to me from ColoriQue.  It's easy to create any color cap to go with your beading.

Stop over at the Pretty Palettes Reveal and see the gorgeous work from the designers that participated.  Amazing!

Thanks for stopping by!
Terry