Pages

Wednesday, December 30, 2015

Pretty Palettes Reveal for December

Hi Creative Folks!
This month on the Pretty Palettes challenge, Erin has challenged us with intricate Nordic knitting designs.  These wonderful patterns can be found in gloves, socks, sweaters and hats.  Here's one of her examples:
mittenswhite_web
Selbuvotter – Nordic mittens – image from the NordicMuseum.org
I have used designs like this when I stitch needlepoint designs, but I have never used these in my jewelry designs, so this should be fun!  In fact, one of my favorite winter sweaters is an example of this style of design.  And, with the chilly weather we've been having here in California, I have it right on hand for inspiration!

My sweater inspiration
Below are the beads that Erin chose for this challenge.  I wasn't able to find all of these at my local Michaels, so I made some substitutions.

dec2015_beads_collage

Here are the beads I chose:

I didn't use the AB crackle beads, and I added some jet donut beads from Bliss Beads.  I couldn't find the suggested red beads but I found some in the same color that were faceted.  I also couldn't find the silver filigree beads but I found something similar.  Here are the earrings:
Winter Earrings

And, here is my necklace with the earrings:
Winter Set
Maybe I'll think of a better name later.  The white crackle beads remind me of snowballs and the rich red faceted beads are like berries.  Not sure how to combine that!

Head to the Halcraft blog for the designs inspired by these patterns and colors.

As usual, Erin, the inspiration was great - wonderful colors and patterns and an educational and informative experience (which I love!).  Thanks for the challenge!

Happy Creating and a very Happy and Heatlthy New Year to all!
Terry


Thursday, December 24, 2015

We're All Ears Challenge


Hi Everyone!

Today, I'm playing along with the We're All Ears challenge on the Earrings Everyday blog.  


This month our challenge is to make earrings from the "craftermath" left on our tables from previous designing.  You know, the areas that never get cleaned up where layers and layers of beads and findings have built up, been pushed aside or worked over the top of--I understand this concept very well.  In fact, that seems to be the way I work.  My favorite method is to use divided paper plates to hold a project.  They are stackable and there aren't too many accidents that way!  Of course, when I look for something on my table, it becomes a bit of a frustration because I have to remember where I happened to use that particular bead or finding or fiber last!

We are to take a photo of our work surface to show our starting point.  No problem!  I'm just deciding which surface to show - they are all a hot mess! 

I decided on the work bench.  I recently order a bag of mixed brass stampings from a new-to-me vendor.  So, of course, I dumped that on the bench to see what it contained.  It's still there along with beads and findings leftover from previous designing.  Then, there are some things that I have purchased recently that I haven't had a chance to use yet - waxed linen, sea glass and hammered aluminum rounds. 
Leftovers
I have to admit that the above photo is staged.  Lots of other stuff was shoved to the side.  I tend to use a lot of plastic baggies to organize beads so there are a lot of those lying around, but they don't look very good in a photo.  Here's the other table that I work on.  Maybe looking at these will inspire me to clean up!

More leftovers
I liked the idea of the muffin pan for sorting, so I went from bench to table and it felt like I was shopping in my own "studio".  

I did use some of these combinations and beads from my tray, but I had others lying around that I used also.  After a week or so of hesitation, I finally put some together.
Earrings from Leftovers
This was my last pair.  I really like the combination of colors and textures here and the tribal/jungle/rustic feel.  And, I made my own ear wires from head pins.
New Paths Earrings
Thanks, Erin, for the fun times exploring my leftovers and coming up with new combinations and ways to create.  And, it's a good thing you left the challenge open for a week, because it's been a BUSY week!

Merry Christmas to all!  And, wishing you peace in the New Year!
Terry


Thursday, December 17, 2015

Etched Table Top

Hi Everyone!

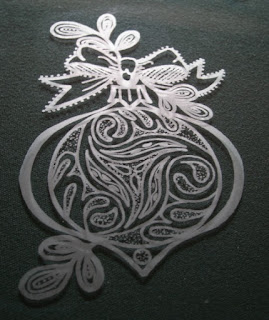
Today I'm etching a small glass table top with etchall® etching creme.  I'm using one of the new stencils produced by etchall®, an ETCHNET™ re-usable stencil.  This one is a beautiful and very ornate ornament design.

To start, I cleaned my glass table top a few times.  I washed it with soap and water, then went over it again with rubbing alcohol.  Then, I polished it with a coffee filter, which is recommended in the instructions.  It leaves no lint unlike a paper towel or cloth.

Here's my set up:
Set up


Once it was cleaned, I applied the stencil.  I applied masking tape around the edges and pressed all the air bubbles out with the etchall® squeegee.  Then, I applied the etchall® etching creme very thickly with the edge of a plastic knife.  Make sure the stencil area is covered completely.  If you see the pink of the stencil showing through, add more creme.  There's no reason not to apply it thickly, because it's re-usable and you're going to return most of it to the jar when it's done etching.


Let it sit for 15 minutes, scrape the creme back into the jar and rinse the stencil area thoroughly under running water.  Remove the stencil and rinse the etched area completely.  Then, rinse and dry the stencil.  Throw away the masking tape and start over.

I etched four of the same designs around this table top using the same stencil. It showed no signs of wear.

Here's a close-up of one motif:
Close-up of Etched design

You can see how detailed the ETCHNET™ stencil is.

And, here's the etched table top:
Etched Table Top
It's even prettier in person and will make a nice addition to my Christmas decor.

Ready to try etchall® etching creme?  Head to etchall® and use my code TERRYR for 10% off your purchase!

Happy Etching!
Terry


Friday, December 11, 2015

75 Years of Creativity!

Hi Everyone!

Welcome to the CHA blog for the Mega Show of 2016!

 This year the Craft and Hobby Association is celebrating  75 years! That is certainly a record of which to be proud!

Every year I look forward to this show.  It's the Disneyland of craft trade shows, and I spend all the time I can ooh-ing and ah-ing at all the wonderful displays filled with new products, innovative designs and people like me who love crafts!  For the past few years, it has been set in the Anaheim Convention Center, which is always a plus in January.


Come along with me as I remember a few past shows.  There are certain booths I have to see at the show.  I design jewelry, so I always have to see the Beadalon booth.  Last year they had four new trend displays.  The trend on this one was tassels.  Yep, they were right - tassels are everywhere in jewelry right now! What will they think of this year?  I can't wait to see!

Beadalon - CHA 2015
I love yarn and all kinds of stitchery, so I have to check out the yarn companies.  Here are some adorable beavers that were part of a large display called Yarnia that was created by the Spinrite yarn group.  The whole scene was created out of different types of yarn and was quite imaginative.  Aren't these beavers the cutest things!


Beavers from Yarnia
Another yarn company that goes all out for the show is the Lion Brand Yarn company.  They always put on a fashion show highlighting innovative designs from new designers and emceed by Vanna White (who has her own line of yarn).  Celebrities are crafters, too, so you never know who you will see!
Lion Brand Fashion Show - 2013
Here's part of the Lion Brand Yarns display from 2014 - a replica of Stonehenge!

Lion Brand display - 2014

These are just a small sample of all the crafty goodness going on at the show.  With beads, ribbon, wood, wire and paper to view, it takes a few days to see it all!

Besides walking the show, I often work in one of the booths demonstrating the products.  Here's one at the Smoothfoam™ booth from 2014.  I had a great time creating with crafters who stopped by to see all the things you can do with Smoothfoam™.  I won't be in that booth this year, but I will have a few designs there.  I've been a member of the design team for three years now and it still amazes me what you can do with Smoothfoam™!

Last year I did something a little different.  I worked in one booth for the entire show and saw the show from the vendor's side of the show - from set-up to teardown!  It was an amazing experience, and one I decided to do again.  I'll be in the Eye Connect Crafts booth this year, so do stop by and chat about crafts and see all the new products that Erin Sparler has designed for this year.  Erin's chipboard creations are great fun for all ages - from kids making puppets with them to artists using them in everything from cards and scrapbooking to mixed media and jewelry.  Here's a project that I made last year using her adorable crab poppet.  The crab, like all the totem poppets, has movable parts that you can hold together with eyelets, mini brads or other connectors.  Here, I used twine knots. 
Crab Totem Poppet


Thanks for stopping by and letting me reminisce about past shows.  I can't wait for January and the 75th Anniversary show!  It's sure to be spectacular.

Be sure to enter the giveaway - at last count it was up to $650!! Stop by and see all the participating designers and manufacturers on the CHA blog, too, and get a taste of what the show will hold.  And, if you come to the show, stop by and say howdy!

Enter the raffle here on the Rafflecopter below.  If you don't tweet, leave a comment or answer a short craft survey.  Good luck!

  a Rafflecopter giveaway

Monday, December 7, 2015

Designer Crafts Connection - Handmade Holiday Decorations

Hi folks!

It's the first Monday of the month of December and the designers on the DCC are bringing you some extra-crafty decorations for the holidays!

Here's a few of my holiday ideas to inspire your creativity!

Create a snowman ornament using etched beads:
Etched Snowman
 Or, etch a dome with snowflakes and snow and put your favorite ornaments underneath it:
Etched Snow Dome

 Or, create some country-style decor with burlap, fabric and buttons:
Country Style Christmas Set
 

And, here's an ornament for the kids to make:

Beaded Star Ornament
These ornaments are up-cycled from plastic lids.  To make them, trace a star on a large plastic lid (coffee can size).  I used a star cookie cutter for the pattern.  Punch holes in the points, mid-center at the star junctions and an inch toward center.  Then, thread craft wire through the points, twist the wire together, add beads and curl the ends.  In the center, pass the wire through the holes and add beads to make a star.  Twist the wire around itself at the back.  These are inexpensive and fun to make.  You can also use thread or cord instead of wire, or use other shapes instead of stars.

I can't wait to get my tree now and start decorating!  I hope you were inspired to begin yours with something new!  Take a look at all the other great ideas from my fellow craft designers here on the blog.

Happy Holidays!
Terry