Pages

Thursday, October 28, 2021

Faux Tin Pumpkins

 Hi!

Thanks for stopping by.  

I love the times when I can just play in my craft room and try things that I've had on my list forever.  And, when those things go together easily without a lot of frustration - even better.

Here's a quick and easy project that is still on time for Halloween or harvest decorating.

First, grab some galvanized flashing.  We recently had some painting done, so there was some extra lying around my house. Yay, free craft material!

I used a dry erase marker to draw a pumpkin on a piece of the flashing.

Since it comes in a roll, it will be curved, but you can flatten it with your hands.  I cut it out with metal snips, then pounded it with a ball peen hammer to give it some texture.

Then, I used patinas to paint the large pumpkin and metal paint to paint the smaller one. I wanted to try a couple of paints to see what I liked.  Both worked well.  I punched holes in the top and added steel wire.


This was so much fun and very quick and easy (always a plus!).  I can't wait to try some autumn leaves and then primitive Christmas trees!  Maybe a garland of tin shapes... what about a snowman?  


Happy Fall, Happy Harvest, Happy Halloween, Happy All Hallows Eve, Happy All Saints Day, Happy All Souls Day.....that should cover it for awhile!

Monday, October 25, 2021

Gift Bags with Gwen Studios

 Hi Everyone!

Today I'm decorating gift bags and boxes with Gwen Studios new holiday trims and ribbons.  I've never seen anything like the new die cut trims that they produced and I think you will be excited to see them, too.

Here's some of what I received from Gwen Studios.  Since I am on their design team, I receive a generous supply of trims and ribbons to use in my designs.

When I saw these, I immediately wanted to create a little winter scene with them.  


I started with a silver gift bag and added some blue cardstock to fit the bag.  Then, I cut pieces of the trim to create a little scene and adhered them to the bag.  I used some metallic ribbon for the road.  To finish, I add some dimensional pearl paint for snow.

Winter Scene Gift Bag

Next, I upcycled a bag from my collection.  Here it is:

Not very pretty and a bit worse for wear.  And, I didn't like the handle at all!  But, no worries - we can transform this bag!  First I replaced the ugly handles with some beautiful new emerald ribbon.  Much better!


I cut a triangular tree to fit the bag from cardstock. The height of your tree will vary depending on the bag.  Mine is about 12" high by 6" wide.  I glued trims across the tree varying the angles and colors.  Then, I trimmed the edge of the trims even with the tree and glued it to the bag along with a trunk for the tree and some gold paper to cover the bottom edge of the bag.  With a snowflake trim, I snipped individual snowflakes for a tree topper and for the background snowflakes.


Trim the Tree Gift Bag

This is a fun and easy idea that you can do in any size.  Here are the trims that I used:

So much fun and so many possibilities!

For my last idea, I decorated the lid of a white gift box.  For this box, I used a turquoise grosgrain ribbon and a coordinating snowflake trim.  I attached the ribbon first with double-sided tape, then attached the trim over it.  Since the tape would show through the die cut ribbon, I attached it only on the ends on the inside of the box.  I created an easy bow with pieces of ribbon and trim, which I wrapped with a piece of wire in the center.  Then, I wrapped a short piece of ribbon around it.  Quick and easy and so pretty!
Snowflake Trim over Grosgrain Ribbon

Look for these ribbons and trims on WalMart.com under Gwen Studios.  Here are a few links for these and more!


Die Cut Ribbons are available now at your local WalMart and at walmart.com at the following links:
1.5" Red Die Cut Christmas Ribbon, Holiday Lights, 12 Yards
620926592
1.5" Die Cut Holiday Ribbon, Cute Green Christmas Trees, 12 Yards
516501896
1.5" Die Cut Winter Holiday Ribbon, Metallic Blue Snowflake, 12 Yards
473009021
1.5" Christmas Die cut Ribbon, Silver 'Fa La La' Words, 12 Yards
911048747
1.5" Christmas Die cut Ribbon, Red 'Ho Ho Ho' Words, 12 Yards
174030677
1.5" Die Cut Christmas Ribbon, Red 'Merry' Words, 12 Yards
894114735
1.5" Die Cut Winter Holiday Ribbon, Blue Snowman, 12 Yards
515833722
1.5" Die Cut Christmas Ribbon, Metallic Gold Reindeer, 12 Yards
368062383
1.5" Die Cut Holiday Ribbon, Traditional Green Christmas Trees, 12 Yards
325982460
1.5" Die Cut Cute Christmas Ribbon, Red Christmas Car, 12 Yards
354380797
1.5" Die Cut Cute Christmas Ribbon, Brown Gingerbread Man, 12 Yards
986089866
1.5" Die Cut Winter Holiday Ribbon, Navy Blue Snowflake, 12 Yards
573757228
1.5" Die Cut Holiday Ribbon, Metallic Silver Snowflakes, 12 Yards
Die Cut Winter Holiday Ribbon, Metallic Blue Snowflakes, 7/8" x 3 Yards
284835276
Die Cut Winter Holiday Ribbon, Navy Blue Snowflakes, 7/8" x 3 Yards
545655548
Die Cut Winter Holiday Ribbon, Silver Snowflakes, 7/8" x 3 Yards
423853873
Die Cut Christmas Ribbon, Red Holiday Lights, 7/8" x 3 Yards
235333178
Die Cut Holiday Ribbon, Cute Green Christmas Trees, 7/8" x 3 Yards
314244618
Silver Die Cut Christmas Ribbon, 'Fa La La' Words, 7/8" x 3 Yards
916081493
Red Die Cut Christmas Ribbon, 'Ho Ho Ho' Words, 7/8" x 3 Yards
189780053
Red Die Cut Christmas Ribbon, 'Merry' Words, 7/8" x 3 Yards
600422835
Metallic Gold Reindeer Die Cut Christmas Ribbon, 7/8" x 3 Yards
105639471
Die Cut Holiday Ribbon, Green Christmas Trees, 7/8" x 3 Yards
997963469
Red Die Cut Christmas Ribbon, Christmas Car, 7/8" x 3 Yards
466155057
Die Cut Christmas Ribbon, Brown Gingerbread Man, 7/8" x 3 Yards
520889865
Die Cut Winter Holiday Ribbon, Blue Snowman, 7/8" x 3 Yards


Stop by the Designer Crafts Connection blog for more holiday ideas using Gwen Studios.


Monday, October 11, 2021

Farmhouse Ornaments and Santa's Mailbox

 Hi everyone!

Thanks for stopping by!  You know it's less than 100 days to Christmas, so time for some stitching!  Here's some projects to get you started:

These are Farmhouse Charm Ornaments that I designed for Herrschners.


And, here's a cute mailbox to in which to put your letters for Santa!


You can find both of these kits on the Herrschners website under plastic canvas.

You can also find some of my designs for Herrschners on Walmart.com.  Here are the Farmhouse Charm Ornaments.

And, my Peppermint Train Set is there also.


Happy Stitching!


Tuesday, October 5, 2021

Wedding Accessories for Gwen Studios

 Hi Everyone!

I'm excited to announce that I have joined the Gwen Studios Design Team.  Now, you'll see new designs with Gwen Studios here on a regular basis.  This month we're all designing wedding items, so you'll find wearables, table decorations, albums, jewelry and other items suitable for a wedding on the blog hop.

For my designing, I received lovely coordinated fabrics, ribbons and trims.  I have always loved the combination of plum and pink.  It has a lovely old-fashioned look.

You can create accessories for your entire bridal party with these fabrics, ribbons and trims.  I have a few ideas for you here, and my fellow designers will have many more ideas to share on the blog hop.

First, I'm going to create a fascinator that would be suitable for a bridesmaid or the flower girl. To begin, I'm wrapping a headband with the 3/8" ribbon from the satin ribbon pack. 


Cut a small piece of ribbon to cover the ends of the headband to start.

Then, wrap the ribbon around the headband adding glue on the inside of the headband as you go.  Adding glue to the inside keeps any glue seepage from showing.  Finish by gluing the ends and trimming the ribbon.  I used about 6 feet of the ribbon.

To make the flower for the headband, cut teardrop shapes from the 1 1/2" ribbon.  These do not have to be perfect.  If you have a punch, you can use that, but freehand makes a more natural petal.

After you cut out your petals, use a candle flame to seal the edges.  Hold them carefully with tweezers and pass the edge of the petal just outside the flame.  The melted edge of the petal can be hot, so take care not to touch the edges before they have cooled.  You'll end up with very natural looking petals that curl into a cupped shape. (This should be done by an adult.)

For a base for the flower, cut a circle of stiff felt.  Then, starting on the outer edge, glue your petals around the circle.  I used hot glue for this.  Continue in for another row or more for a fuller flower.  

For the center, I used one of the fancy trims in Blush Pink.  I rolled up the trim, then flattened it and continued to add more in a twisted roll.  Tuck the end under and glue.  Since this trim is wired, you can continue to shape it.

Here is the finished flower:

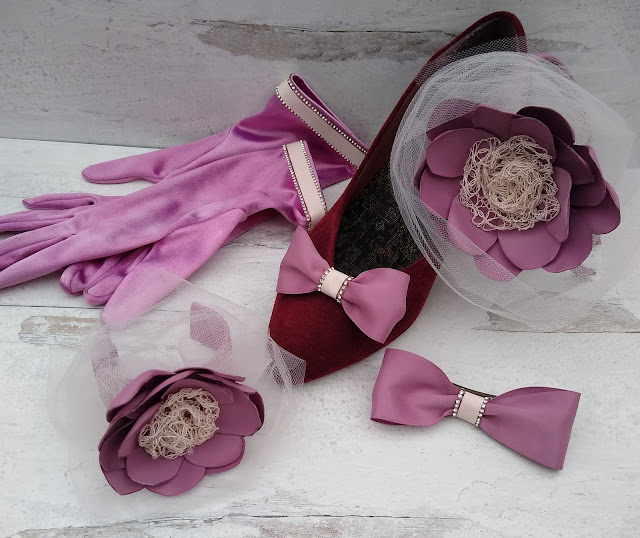
I used the same method to create another flower for a wrist corsage.  For the wrist corsage, wrap an aluminum cuff with ribbon.  For both the fascinator and the cuff, make a tulle nest for the flower and glue it over the cuff or headband.  Glue the flower into the center of the tulle.


And, here's the cuff on my wrist.


These ribbons and trims are perfect to add bits of glam to every part of the bridal party's wardrobe.  

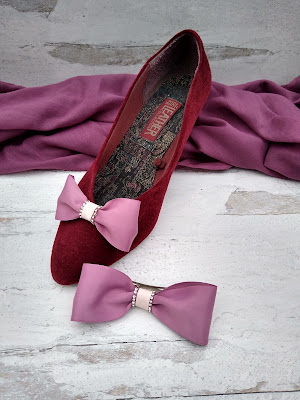
Here's an easy shoe clip.  Cut 7" of the 1/12" ribbon.  Overlap ends 1/2" and glue into a circle. I used Beacon's Felt Glue. Center overlap at the back. Let dry and wrap with a piece of trim and glue.  I used the blush pink ribbon with a rhinestone edging.  Glue onto a shoe clip finding or a clip-on earring finding.  Create a hair bow with a longer piece of ribbon (9") using the same process.  

And, for one more easy addition to the wedding attire, decorate a pair of gloves.  It's so easy to do and adds a finishing touch to your wardrobe. These gloves were purchased at JoAnn's and were white satin.  I dyed them with some Rit(R) Mauve dye and glued the same trim to the edge of the gloves.


Here's the entire set:


To find these items go to Walmart.com.  
For the Plum Satin Ribbon: www.walmart.com/ip/931106493

Follow our blog hop on the Designer Crafts Connection blog.