Pages

Saturday, December 21, 2013

Jewelry Stringing - Winter 2014


Brass Botanicals
 by
Terry Ricioli
Hi Crafty Friends!

I'm delighted once again to have a couple of my jewelry designs in the Winter 2014 issue of Jewelry Stringing.  Here's the necklace as it appears in the photo I took on my deck.  I'm pretty happy with my photography here, but I love what the Stringing staff did with my necklace in the magazine.  You can see it on page 38 of the magazine.  I am enjoying adding more fiber to my jewelry diet with some recycled sari ribbon!

I also have a pair of earrings on the earrings page.
One of the themes in the magazine this time was royalty and these earrings were created with that theme in mind.  There are some wonderful necklaces inspired by this popular trend in the magazine this time.

I've also decided to become an affiliate of Interweave, so you'll see links to their website and special offers from them.  If you click on them and decide to purchase a pattern, kits, books or magazine from them, I get a percentage of the sale.  They've got some great offers right now.  Here's one below and there are a couple of others on my sidebar.


Happy Crafting!
Terry


Sunday, December 15, 2013

French Knit Ornaments

Hi Crafty Friends!

Here are some quick and easy ornaments to make.  And, who doesn't need quick and easy this time of year!  They are made on the French Knitter and were featured in the weekly online magazine from Crafts 'n things earlier this month.  You can find the instructions on their website.  Here's the photo from their website showing them on a tree.


This is a great project for kids of all ages and, of course, can be made with any color or type of yarn you happen to have on hand.  Another plus!


Happy crafting, decorating, baking and shopping!

Terry


Here's a larger photo that I took so that you can see them more easily!
French Knit Christmas Ornaments
by Terry Ricioli


Thursday, December 12, 2013

Crafts n' things Weekly - blue & silver bib necklace

Hi Crafters!

Looking for something elegant to wear to your next party?  I have just the design! It's a Blue and Silver Bib Necklace.

Blue and Silver Bib Necklace

It can be found in the weekly at Crafts 'n things here.  Yes, you have to have a subscription, but I think it is well worth it.  Not only do you get the print magazine, but you also get a weekly online magazine with lots of great ideas!  (No, I don't work for them, but I've been a fan for years, and they occasionally print and pay me for my designs.)

Here it is on a stand:

Happy Crafting!
Terry

Tuesday, December 3, 2013

Cameo and Filigree Ornament

Hi Friends!

This month is jam-packed with holiday crafting! Here's an ornament I created for the Smoothfoam blog

Cameo and Filigree Ornament
My design is one of twelve different ornaments created with Smoothfoam balls, so stop by the blog often to see all the easy ornament ideas! 

Happy Decorating!

Terry

Monday, December 2, 2013

Designer Crafts Connnection - Lollipop Ornament

Hi Crafty Friends,

Can you use more holiday decorations?  It's the first Monday of the month and the designers in the Designer Craft Connection are all about decorating for the holidays.  This month, I have a French knitter ornament that so quick and easy to do.  You and the kids can make them together, and that makes it even more fun!

Lollipop Ornament 
You can make a whole bunch of lollipops and make a bouquet or string them in a garland! Or, add a loop or hook and hang it in your tree.

Here's how to make one:
You'll need a French Knitter, some cord or yarn, a bamboo skewer, ribbon, paint and hot glue/glue gun.  Tools needed are scissors and a paintbrush.

Knit a cord with your French Knitter to about 14 inches.  Coil it up gluing it together as you go.  Cut a bamboo skewer to the size you like and paint it.  Glue the skewer into the coiled lollipop.  Tie a bow on the stem.  That's it!

If you need a French Knitter, you can get one here at Clover's website or in your favorite craft store.  The cord I used in this ornament is Needloft Craft Cord in Iridescent Pink. 

Happy Handmade Holiday Decorating!
Terry

Monday, November 18, 2013

Little Pilgrims


Little Pilgrims
by
Terry Ricioli
 Hi Crafters!

Here are a couple of little Pilgrims that I created for Thanksgiving.  They are quick and easy, so you have time to make them for your decorations for your table, a wreath or the mantle.  The kids can join in on the fun!  The instructions are over on the Smoothfoam blog.

And, while we're on the subject of Thanksgiving, I want to tell you how thankful I am that you have stopped by.  Thank you also for all the lovely comments and for following my blog!  I appreciate it so much!

Happy Thanksgiving to everyone!
Terry

Thursday, November 14, 2013

Ornament Blog Hop - Glitter Birds


Hi Everyone!

I love to get new ornaments for the house and the tree.  Over the years I have collected quite an assortment of different types and styles from clothespin reindeer the kids made to beautiful Murano glass globes.  

This month is the perfect time to create a new ornament to give as a gift or decorate the house.  Smoothfoam and The Robin's Nest have sponsored this blog hop and sent us designers some great material with which to create.  We started with the Smoothfoam shapes and added beautiful cardstock and Dew Drops from The Robin's Nest.  

I created sparkly little birds that reminds me of the vintage bird ornaments from the 40's and 50's.  I don't usually work with glitter, but I may have to use it more in the future because I love the look of it with the glittery swirls on the paper and the sparkly Dew Drops.  I'd can see a whole flock of these on my tree or added to a pot of poinsettias!


Glitter Birds by Terry Ricioli


I started with a Smoothfoam 2 1/4" egg and a 1" ball.  Besides the cardstock and Dew Drops from the Robin's Nest, you'll need paint, tacky glue, fine glitter, wood teardrop shapes for patterns and a bamboo skewer or wire loop.  Tools needed are scissors, a paintbrush and a serrated craft knife.


Instructions:

On the ball on the side opposite the hole, trim off the side to create a flat spot.  With the hole in the egg down on your work table, slice off a spot on the top of the egg near the large end.  Slice off a small amount on the pointed end of the egg.  The ball is the head and the egg is the body of the bird.


Glue the head (ball) on the body (egg).  Sand the seams to make a smooth surface.


For the red bird:

Paint the bird with two coats of acrylic paint.  For the red bird, I used Tomato Red from Deco Art Americana.  I painted the skewer Sour Apple.

Thin tacky glue with water and paint the bird with it.  Sprinkle glitter over the bird and let dry.

Use wood teardrops to trace and cut shapes for the wings and tail.  Use a marker to color the edge of the paper if you like.  Glue the tail pieces into a fan.  Glue gems to the wings and tail and glue to the bird.

Cut thin strips of paper and wrap around the skewer to curl.  Glue into the hole on top of the head.  Glue gold Dew Drops on the head for the eyes.  Glue two diamond-shaped Dew Drops together for the beak.  Make a hole in the front of the head for the beak and glue the beak into the hole.  Glue diamond-shaped Dew Drops to the front of the body and glue the skewer into the hole on the bottom of the body. 

Poke the skewer into a flower arrangement or wreath.  If you want to hang the bird, push a wire loop or eye pin into the top of the bird between the wings and add a hanger.

For the green bird:
Paint the bird Sour Apple.  I used smaller teardrop shapes for the wings on this one and cut strips of paper for the tail which I curled around a pencil.  I also punched a paper dot and glued it under the eye.
Green Glitter Bird Ornament

Hop around and see the other fun ornaments that the designers have created.  You're sure to find a new ornament you'll want to make!  Leave a comment and become a follower on the blogs to be entered in the prize drawing!  Start by going to the Robin's Nest blog to see all the ornaments!


Hop Here!


Happy Holiday Crafting!
Terry 

Monday, November 4, 2013

Thankful Heart - Designer Crafts Connection Blog Hop

Hi Everyone!

Welcome to another first Monday of the month Designer Crafts Connection Blog Hop!  This month we're creating thank you gifts.  I've created a Thankful Heart plaque that you can give as a gift or use to decorate the house for Thanksgiving or all through the year.  You can make this as a family or with a group.
 
Thankful Heart 


I've made it a reminder of a few of the people and things for which I am thankful.  You'll have your own things for which you are thankful so you can individualize the heart with names of loved ones or other words you like.

For this project, you'll need:

8x10 canvas
DecoArt Americana acrylic paint in Jack-O'-Lantern Orange and Milk Chocolate
Off-white cardstock and a word processing program/computer
Raffia-covered wire, about 1 foot
Small dry sticks
Tacky glue
Paintbrush, pliers, sponge

Instructions:

1.  Mix some orange and brown paint and paint the canvas.  Leave the paint streaky and uneven.  While the paint is still wet, press the sponge on the paint using different angles to create more texture.

2.  Using a word processing program and your computer, make a sheet of words describing things or people for which you are thankful.  Space them so that you can tear them apart.  Change the fonts and sizes on some of the words for interest.  Print them out on cardstock and tear the words apart into different shapes.  Thin the brown paint and randomly paint the words.  Let dry.

3.  Break the sticks into pieces to make the letters for the word "Thank".

4.  Using the pliers and your fingers, shape the wire into "ful".  For kids and seniors, use yarn instead of the wire.  Write the "ful" in glue, then follow it with yarn. 

5.  Glue the word "Thankful" as shown or as you like.

6.  Glue the paper words into a heart shape.

That's the basics, but as usual, you can change the project around to make it as individual as you are! 

Thanks for stopping by!  
Terry


Saturday, October 26, 2013

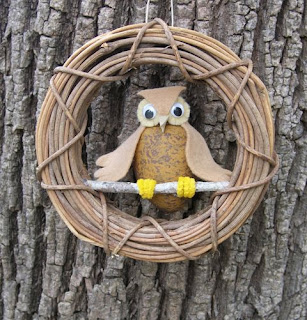
Little Owl

Hi Crafters!

Here's a cute little owl that you can make for your fall decorating whether it's for harvest or Halloween.  You can put him in a wreath like I did or perched in a flower arrangement.  He's easy and quick to make and WHO wouldn't like him hanging around the house!

You can find the instructions over on the Smoothfoam blog.

Happy Autumn crafting!
Terry

Tuesday, October 15, 2013

Angel for Sticky Sticks™ Challenge

Hi Crafters!

Welcome to the Sticky Sticks™ blog hop! 

Sticky Sticks™ is our manufacturer challenge for this month in which we create a design using their products.  Sticky Sticks™ are self-adhesive jumbo craft sticks.  You peel off the tab and stick them together!  No glue is needed!

This challenge was a fun one for me.  I wanted to create a craft without using any extra glue, but I wanted it to be a complex design.  It took a bit of puzzle-working!  But, I love puzzles and, with a little patience, I was able to construct this angel with no glue using only the Sticky Sticks™! It all depends on how you place them!

Sticky Sticks Angel
Design by Terry Ricioli

Here's the easy step-by-step instructions so you can do it, too!  

You'll need 29 Sticky Sticks and two wood circles (2" and 2 1/2").

1.  Lay 3 sticks down with tabs up and remove the tabs.  Lay 2 more sticks on top with tabs up as in this picture:
Step 1

Make two of those.  These will be the bottom sections of the body.

2.  Lay one stick with the tab down.  Remove the tabs on two more and lay them on top of the first. Add two more one on each edge. 
Step 2

3.  Remove the center tab and place the two sections from Step 1 overlapping each other.  Place the section from Step 2 on top overlapping the other two.
Step 3
4.  For the wings, lay three sticks with tabs up on your work surface.  Remove the tabs.
Step 4

5.  Lay three more sticks on top of those with tabs up as shown.
Step 5
6.  Make another wing in the same way facing in the opposite direction.
7.  Remove the tabs and press the wings to the back of the body overlapping in the center.  Slide the arms between the wings and the body with one tab facing up and one facing down as shown.
 8.  Remove the tabs and adhere the small circle to the front-facing tab and the large circle to the back-facing tab covering the ends of the arms.
Now your angel is ready to decorate.  You can paint it all one color as I did or add a face, hair with paints, trims or anything you choose.  I painted mine with Decoart acrylic paint in Buttermilk, then sanded it for a worn look.

Sticky Sticks™ can be found at retail stores or on their website.  Don't forget to take a look at all the other projects using the blue Designer Crafts Connection button for more great ideas.

Happy Crafting!
Terry

If you like angels, you might like this other angel craft that I have created:


Monday, October 7, 2013

Scarecrow - Designer Crafts Connection Blog Hop

Hi Everyone!

Welcome to the Designer Crafts Connection blog hop!  This month we're creating projects for fall, harvest or Halloween.  I've been wanting to make a scarecrow for years.  We always have the materials around the house - worn out jeans, an old shirt, boots, and old hat and work gloves.  So it was easy to collect a pile of scarecrow makin's.

Scarecrow makin's

For the head, I used a burlap sack that I've been saving for just this purpose.  I also had some fabric scraps with sticky backing left over from a previous project.  I cut the eyes, nose and cheeks from the fabric and stitched a mouth with embroidery floss.  Then, I stuffed him using a pillow for the main part of the body and newspaper for the rest.  I stuck a few pieces of grass here and there and found a rusty garden rake for him to hold.

I'm glad I finally took the time to put him together.  He's a fine addition to the back porch!  He looks happy there, don't you think?
Happy Fall Crafting!
Terry
Scarecrow
by
Terry Ricioli


Wednesday, October 2, 2013

Bat Mobile

Hi Crafters!
No, it's not Batman's car!  It's a mobile with not-so-scary little bats made from Smoothfoam!  They are so easy, you'll have them fluttering all over the house.  The wings and ears are re-used plastic lids!  Here's the link to the instructions on the Smoothfoam blog

Bat Mobile
for
Smoothfoam
You'll find lots of fun Halloween designs on the blog this month from pumpkins to spiders to googly-eyed topiaries and so much more!   

The Creativity Team at Smoothfoam (of which, I am thrilled to be a part!) is having great fun with this theme and you will too as you decorate your house for Halloween!

Happy Crafting!
Terry

Saturday, September 7, 2013

Ball Toss Game

Hi Crafters!

Looking for an easy and fun game to make and play with the kids?  Here's one that I created for Smoothfoam

Ball Toss Game
by
Terry Ricioli
You can find all the materials and instructions over on the Smoothfoam(TM) blog.  This is a great game for learning counting and adding.  Change the colors to suit your likes or what you have available.  How about a party game for Halloween in orange and black!

Have fun with it!
Terry

Thursday, September 5, 2013

Carnelian Tassel Necklace

Hi Crafters!

I love fall and I love designing with fall colors.  Here's a necklace that I designed for Crafts 'n things for their Fall 2013 issue.   It's a perfect addition to your fall wardrobe!

This necklace is a combination of carnelian, poppy jasper and yellow jasper along with antique copper findings from TierraCast.  There are some stones that I keep returning to in my designing.  Jasper and carnelian always seem to call to me!  Which stones call to you in your designing?
Carnelian Tassel Necklace

Happy crafting with warm, rich fall colors!
Terry

Monday, September 2, 2013

Designer Crafts Connection - Vacation Memories


Hi Crafty Friends,

There will be no craft on my blog today, but I hope you will hop around the other Designer Crafts Connection blogs and see what all the other designers are doing with the Vacation Memories theme.  Just click forward or back on the DCC button to the left of this post.

We all need time to recharge our creative batteries and make memories, and today was a day for that for me.  My hubby and I visited Ft. Ross, a restored Russian fort on the coast of California and read about the history, explored the fort and had a picnic lunch.  We walked down to the cove where I splashed in the clear Pacific, gazed into tide pools and watched a seal swim close by in a kelp bed.  It was wonderfully refreshing with the sun peaking out of the fog and the wind sweeping in from the ocean.  I feel renewed as I always do after a trip to the ocean and ready to start again with fresh inspiration.

I hope you had some refreshing and relaxing times during your vacation this year whether it was a long trip or just a day away!  

Happy Crafting!
Terry


Wednesday, August 21, 2013

Tuscan Grapes Plaque

Tuscan Grapes Plaque
by
Terry Ricioli
Hi Crafty Friends!

As you might have guessed, I love crafting with paper bags.  I also love creating crafts with Smoothfoam.  Here, I combined the two to create this grapes plaque in a aged style that has the look of a plaster plaque.  It reminds me of something you might see on a stucco wall in Tuscany.

To make this plaque, I cut the foam balls in half and arranged them on a board.  Then I dampened the wrinkled paper bag and wrapped it over the balls and board pushing it around the balls and wrinkling it up around the bunch of grapes.  I added a couple of paper bag leaves and a stem.  I found the kids' watercolor box and added some color.  

I can't wait to try more in this style.  I'm so happy with the way it turned out that I'm making another one.  And, that never happens with me.  Usually I make one of something, then I'm on to the next idea!

I hope you'll try it, too.  For further instructions on how to make this easy plaque, go here:
http://www.smoothfoam.com/blog/add-texture-to-smoothfoam-with-a-paper-grocery-bag/

What should I try next?  Maybe apples or strawberries!

Happy Crafting!
Terry

Monday, August 5, 2013

Designer Crafts Connection - Crafting with School Supplies

Hi Crafters!

This month on the Designer Crafts Connection, we're crafting with school supplies.  I decided to make a craft with a paper bag.  After all, you can carry your lunch to school in them or cover your books with one, so I think they are definitely a school supply.  And, they are such a fun material with which to craft!  I like to layer the paper bags with glue and then shape them.  My project this month is a Leaf Bowl.

For this project, you'll need one large paper bag, tacky glue and paint. 

Cut the two sides from the bag. 


Draw a large leaf on one side and cut out the leaf shape.  Trace this leaf on the other side and cut out the second shape.


Place one leaf down on your work surface and add a blob of glue. Spread the glue out to the edges with your fingers or the side of a craft stick.   Place the second leaf on top of the glue.  Press the layers together.  The glue may ooze out the edges.  Just wipe it off with a damp paper towel.  Now, wrinkle up the layered leaf.  This will give it some texture. 


Curve the edges of the leaf upward to create a bowl in the middle of the leaf.  You may have to do this more than once to get the edges to stay in place.  You'll be able to play with the shape for awhile as the glue dries.  To help, you can lay the leaf over a bowl.


Now let the leaf bowl dry.  Once it is dry, you can paint it in colors of your choice using a brush or small piece of sponge. Then, you can use it to hold some fall items like nuts or other small items.


Paper Bag Leaf Bowl
If you don't want to use it as a bowl, you can hang it on your wall.  Or, make several and hang them from a branch for a fall mobile!

Happy Crafting!

Terry

Saturday, August 3, 2013

Easy Angel Craft

Hi Crafters!

I love to make angels!  I've made them out of a few different materials - wire, hemp cord, cloth and plastic canvas to name a few.  

Here's a little baby angel that I made from Smoothfoam with added texture from Decoart Dimensional Effects texture medium.  I think she's sweet in pink, but you could make your angel in any color.  I added a strip of muslin for her wings, but a small print would look cute, too. 

Angel
for Smoothfoam
by Terry Ricioli


This craft is easy enough for most to make, so get a group together and make a whole host of angels! Make one for Christmas decorating or just everyday!  You can find further instructions on the Smoothfoam blog.

Happy crafting!
Terry

Wednesday, July 24, 2013

French Knit Scarf and Beaded Pin

Hi Crafters!

I know it's the middle of summer and we've got a lot of warm days to go, but if you are planning fall projects, now is a good time to start.  When you knit during the summer, you don't want something hot covering your lap on a warm day, so I have the perfect project for you:  a skinny scarf made with a French knitter!

Clover's French Knitter makes this very easy to make, and it only takes one ball of yarn.  You can make it 22 feet like this one or shorter if you like.  Make the quick layered felt pin to accent the scarf or add it to a hat or purse.  The leaf pattern would also make a great napkin ring or add a few to a wreath!

You can find the instructions for these projects in the Fall 2013 issue of Crafts n' things.  If you can't find a French Knitter at your local craft store, you can buy one here.  (Disclosure:  I received the French Knitter as a free gift to use in my design work.  I haven't stopped using it since!)

Happy Crafting!
Terry

Monday, July 22, 2013

Twilight Garden Necklace


Hi Crafty Friends!

Have you ever wandered into the garden just as the light was dimming at twilight?  It's that moment when the sunset is gone but light still lingers touching the garden with shimmers of subtle color.  The moon highlights pale flowers of lavender and pink with a luminescent glow.  That's what I had in mind when I designed this necklace with its palette of mauves, iridescent glass flowers and gunmetal filigree. 
Twilight Garden Necklace
by
Terry Ricioli
This necklace was chosen for the Dusty Purples section of the new special issue magazine, 101 Bracelets, Necklaces and Earrings. 


As usual, this magazine is packed with loads of inspiration and projects in all the colors of the rainbow.  You're sure to find a design in your style and color that you can't wait to make  - or, have someone make for you!

Happy Crafting!
Terry

Monday, July 15, 2013

Rowlux® Illusion Film Blog Hop - Colorful Mobile

Hi Crafty Friends!

One of the things I like best about being a professional designer is the opportunity to try new materials fresh from the manufacturer.  It's fun to be able to help introduce a new product to the crafting public and design new ways to use it.

On this hop, some of the Designer Crafts Connection designers will be presenting projects made with Rowlux® Illusion Film.  This fascinating plastic film has been in use in many areas and is now being introduced as a craft material.

Here's a Colorful Mobile that I designed using the film.  The colors are vibrant and the plastic sheets are very sturdy.  It has wonderful 3-D patterns that dazzle the eye and reflect light in all directions.  


Colorful Mobile
with
Rowlux® Illusion Film

Here are the beautiful colored sheets.


Here's some information about this product from the manufacturer:

Rowlux® Illusion Film is made in the USA and comes in a diverse range of spectacular eye-catching colors and patterns.  These durable, translucent, 12" x 12" polycarbonate sheets add instant pizzazz to craft projects, seasonal accents, party decorations, scrapbooks, greeting cards, jewelry, furniture, frames, gifts, favors, accessories, art and DIY home decor projects. Easily cut with scissors, Rowlux® is also the perfect material for scoring, folding, embossing and die cutting. The creative possibilities are endless. This innovative and inspiring new craft material manipulates light to create dazzling visual effects. The illusion of depth and motion is the result of thousands of tiny parabolic lenses that are molded into the surface of both sides of the material. These lenses create a pattern of light reflection and refraction resulting in stunningly brilliant optical effects.


I cut strips of the film using a metal ruler and a craft knife.  To do this, score the film with the knife and bend along the scoring line to snap the strip from the sheet.  Then, I used a 1" punch to cut circles.  You may have to squeeze a few times to punch through the film.  Just keep squeezing in the same position and it will pop out cleanly.


After I punched out the circles, I was left with strips with holes in them.  Well, I couldn't waste those, so I decided to cut them into squares and use them also!


I connected the pieces with 8mm silver jump rings after punching small holes for connecting.


I wrapped a 5" metal ring with bright yellow acrylic beads using 28 gauge silver wire. 


Here's the finished bead-wrapped ring.  Wrapping took about 50 beads and 2 yards of wire.  Then, I connected the strands of circles and squares to the ring with jump rings.  I also connected four pieces of chain to the top of the circle and connected it to a wire hook for hanging.
Here's my Colorful Mobile hanging out in my garden!


Rowlux® Illusion Film

is available on Amazon at:  http://www.amazon.com/Rowlux-Illusion-Film-Polycarbonate-12-Inch/dp/B00CW7940Q/ref=sr_1_1?s=arts-crafts&ie=UTF8&qid=1372292244&sr=1-1&keywords=rowlux

To see more amazing craft designs with this wonderful new material, hop forward on the big blue Designer Crafts Connection button or visit this link:
http://blog.modernsurrealist.com/2013/06/26/Rowlux-Illusion-Film-Designer-Blog-Hop.aspx

I can't wait to see what the other designers have created!  Come back soon and see what I did with my extra circles and squares...I'm thinking a pair of bright, fluttery earrings!  What would you create?  Leave a comment and let me know!

Happy Crafting!

Terry