Pages

Wednesday, November 25, 2015

Pretty Palettes::November

Hi all,

This month, Erin has given us a beautiful pointillist painting as inspiration.  I love impressionist painting and I am fascinated by how one can create an image with thousands of tiny dots!  I hadn't heard of the Iles d'Or, so I did a little research and now it's on my bucket list of places to visit!  Take a look at the islands here


From sand to sky, this pointillist painting of the Islands of Gold will carry you away!
20151104084951271-2

Erin picked some lovely beads to go with this painting.  I picked up some of these - the citrine chips, the gold luster hematite chips, the turquoise-dyed howlite chips and the aqua blue shell nuggets.  Then, I found more chip-sized beads to fill in the other colors on the palette - blue-dyed quartzite and amethyst.  My thought was to reproduce the painting in miniature in a pendant of some kind.  I couldn't decide - should I work with some resin, resin clay or wire. 

Well, I started this post two weeks ago and as I was drinking my coffee and catching up on facebook this morning, much to my surprise, the date of the reveal was here!  I had thought I had a couple more days.  So, my big ideas were reduced to something simpler!

First, here are the beads I used:
 And, here is the necklace I created:
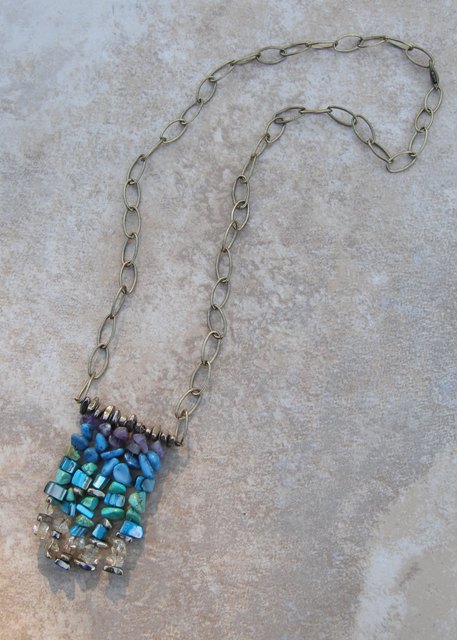
Distant Island Necklace

I tried to capture the look of the painting with the sand in the foreground, the sparkling ocean and the land in the distance.  It's a very simple pendant to make with the chips strung on head pins, then strung on a bar with more chips.  Attach a chain and you're ready to go!  Earrings and a bracelet will have to wait for more time - maybe tomorrow while the pies and casseroles are baking.

Well, I'm off to check the turkey to see if it's defrosting fast enough to go into the oven in the morning.  

Wishing you all a very Happy Thanksgiving!
Terry


Tuesday, November 24, 2015

Etched Snow Dome

Hi Everyone!

Here I am with another etchall® project for you.  I wanted to create a glass-enclosed snow scene.  I've seen so many cute ones with canning jars, wine glasses and fish bowls.  So, I went in search of glass at my local Goodwill store and found the perfect thing.  It's a dome originally intended for cheese and probably fit into a cutting board.  There's a lot of space underneath to create a little scene with ornaments or your favorite holiday decorations.


To start, I punched two different sizes of snowflakes with my Fiskars punches.  I used some adhesive shelf liner for the stencils because it punched easily.  I stuck these to the top of the dome and smoothed them down with my fingernail.

I applied the etchall® etching creme with the tip of a bamboo skewer and let it work for 15 minutes.  Then, I carefully scraped the excess off the stencils and put it back in the jar.  I rinsed the dome under running water and then removed the stencils.


I etched more snowflakes below these on the sides of the dome also, so I have the effect of snowflakes falling down from the top.  You can see them in the photo below.  I also wanted some snow banks around the bottom edge so I added creme randomly around the bottom with the end of a spoon.  You don't have to be exact with this.  As on the previous step, I scraped the excess back into the jar after it was done etching - it's re-usable! 


Now, find some of your favorite decorations - a group of ball ornaments, some little snowmen or a manger scene will fit under the dome and create the perfect focal on your holiday table.  Or, change the scene from week to week as you go through the winter season.

Here's my Snow Dome with a cardinal figurine under it.
Snow Dome

And, here it is with a little snow scene with a snowman and brush trees.

Snow Dome

Ready to try etchall® etching creme?  Head to etchall® and use my code TERRYR for 10% off your purchase!

Thanks for stopping by,
Terry


Friday, November 20, 2015

We're All Ears:: November Inspiration

Papilionaceae seed pods
This months inspiration on the Earrings Everyday blog is seed pods.  I couldn't resist trying to make some earrings for this challenge.  As a student of biology and botany, I love these old illustrations, and nature has such a variety to choose from that the possibilities are just about endless as to fascinating shapes to try.

The only problem I had was deciding on which media to make them in.  I've seen some great ideas with wire and paper that look great.  Polymer clay is a possibility, though I can't say I have a great deal of experience with it (but when has that ever stopped me!)  I like using paper bags to make jewelry and I have used that quite a bit, so I could use that.  I've been wanting to try some metal working though, so maybe I should try that.  Hmmm....so many ideas, so little time!

Well, time ran out and I went with something simpler.  I took a antiqued gold fluted metal bead and added some Ranger Patina in Cinnabar, then sanded it a bit to bring out some highlights.  I decided the bead was still too much one color, so I added splotches of tan acrylic paint over the patina.  Then I strung a small fluted bead cap and the bead onto a head pin and capped it with a matte terra cotta E bead.  I added brass metal rounds and more E beads on the ear wire. 

Seed Pod Earrings
Seed Pod Earrings

Now, I've really got to try some of those other ideas this inspiration generated!  Stop by the Earrings Everyday blog to see all the great designs from Erin Prais-Hintz and a host of others!

Happy Creating!
Terry

Wednesday, November 18, 2015

Beading on a Shoestring

Hi Friends!

The Winter 2016 issue of Stringing is out!  Look for my necklace in the Beading on a Shoestring page!  It's the first time I've been featured on that page, so I'm pretty excited!
STR_Win16Cover2
Jewelry Stringing Magazine

Here's my necklace-
Water Lily Necklace
 

I really like combining metal beads, gemstones and ceramic like this and hope to do more.  What do you think?

Be sure to check out the new issue of Stringing; as usual, it's packed with lots of great ideas!  And, if you like to bead, the new submission guidelines are out for Summer 2016 plus a couple of other design calls for special issues.

Happy beading!
Terry

Monday, November 16, 2015

Cut Out and Keep Jewelry Superstar

Hi Crafty Friends!

I'm so excited to let you know that I am featured on Cut Out and Keep as a Jewelry Superstar!  Here's the link: http://www.cutoutandkeep.net/superstars/jewelry 

And, here's the link to my first project:  Chevron Fringe Earrings 
You can find all the materials and step-by-step instructions on the Cut Out and Keep website! I'm featured all week with seven projects so be sure to stop by and check them out.  They are a mix of new to the web projects and old favorites!
Chevron Fringe Earrings
I hope you'll try these fun and easy earrings.  There are lots of color ways to try - it's up to you!

Happy Crafting!
Terry


Sunday, November 15, 2015

Leaf Place Card

Hi Friends!

It's fun to decorate the table for harvest, Thanksgiving or other fall celebrations.  Here's the perfect easy place card to add that touch of fall to your table.
Leaf Place Card with JOY iron-on letters
You can place these on the plate as shown here, or attach them to a pumpkin or other holder.  Scatter a few more leaves around the centerpiece for a lovely fall accent.

Close-Up of Leaf Place Card


I used JOY Iron-on letters to add a name to the leaf.  Short names work best for this or you can use initials.  You can iron on the letters or use tacky glue.  You can find all the details on how I made this Leaf Place Card on the Creating with Joy blog.

Wishing you family gatherings filled with joy and warmth!
Terry

Saturday, November 7, 2015

Candlesticks

Hi Crafty Friends!

Here's one of my latest projects on the Smoothfoam™ blog.  It's a pair of candlesticks!  Don't they look like a turned wood spindle?  But they are mostly Smoothfoam™ with a wood plaque base, a wood circle on top and bamboo rings in between the balls!

Candlesticks
I painted them in white with some gray for shading, but you could paint them any color.  I think they would be great for holiday decor in a metallic color or bright red with gold accents or medallions around the base.

And, you don't have to top them with battery-powered candles.  Add a small pumpkin, an ornament or an angel on top.  Of course, they aren't sturdy or fireproof enough for real candles, so just battery-operated candles please!

There's so much you can do with these.  Have fun creating your own version!  You can find Smoothfoam™ in most large craft stores.  For all the instructions, go to the Smoothfoam blog

Happy Crafting!

Monday, November 2, 2015

Leather Leaf Earrings

Hi everyone,

It's the first Monday of November and we're heading toward the holidays.  We designers on the Designer Crafts Connection are offering ideas for handmade gifts this month, so that you can get a head start!

Earrings are always a welcome gift, and these incorporate one of the most popular items in jewelry now - leather.


Leather Leaf Earrings

The leaf portion is suede leather cut on a Big Shot Sizzix die cutter, and that makes it easy to make them in multiples for all your friends!

Die Cut Leaves

Trim off the stem and punch holes in the top of the leaves with a leather punch.
Punched Leaves

Add beads to a length of chain about 1 inch long.
Beaded chains
Connect them to the leaves with jump rings adding the earring wire.
There you go - a quick and easy gift!  Personalize them with different colors and styles of leather, different kinds of beads or add charms.

Enjoy creating your own version of this style of earrings.  And, be sure to take a look at the Designer Crafts Connection blog to find more great gift ideas!


Happy Crafting!
Terry