Pages

Saturday, October 26, 2013

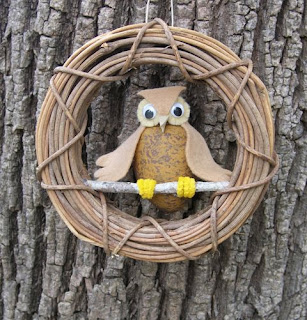
Little Owl

Hi Crafters!

Here's a cute little owl that you can make for your fall decorating whether it's for harvest or Halloween.  You can put him in a wreath like I did or perched in a flower arrangement.  He's easy and quick to make and WHO wouldn't like him hanging around the house!

You can find the instructions over on the Smoothfoam blog.

Happy Autumn crafting!
Terry

Tuesday, October 15, 2013

Angel for Sticky Sticks™ Challenge

Hi Crafters!

Welcome to the Sticky Sticks™ blog hop! 

Sticky Sticks™ is our manufacturer challenge for this month in which we create a design using their products.  Sticky Sticks™ are self-adhesive jumbo craft sticks.  You peel off the tab and stick them together!  No glue is needed!

This challenge was a fun one for me.  I wanted to create a craft without using any extra glue, but I wanted it to be a complex design.  It took a bit of puzzle-working!  But, I love puzzles and, with a little patience, I was able to construct this angel with no glue using only the Sticky Sticks™! It all depends on how you place them!

Sticky Sticks Angel
Design by Terry Ricioli

Here's the easy step-by-step instructions so you can do it, too!  

You'll need 29 Sticky Sticks and two wood circles (2" and 2 1/2").

1.  Lay 3 sticks down with tabs up and remove the tabs.  Lay 2 more sticks on top with tabs up as in this picture:
Step 1

Make two of those.  These will be the bottom sections of the body.

2.  Lay one stick with the tab down.  Remove the tabs on two more and lay them on top of the first. Add two more one on each edge. 
Step 2

3.  Remove the center tab and place the two sections from Step 1 overlapping each other.  Place the section from Step 2 on top overlapping the other two.
Step 3
4.  For the wings, lay three sticks with tabs up on your work surface.  Remove the tabs.
Step 4

5.  Lay three more sticks on top of those with tabs up as shown.
Step 5
6.  Make another wing in the same way facing in the opposite direction.
7.  Remove the tabs and press the wings to the back of the body overlapping in the center.  Slide the arms between the wings and the body with one tab facing up and one facing down as shown.
 8.  Remove the tabs and adhere the small circle to the front-facing tab and the large circle to the back-facing tab covering the ends of the arms.
Now your angel is ready to decorate.  You can paint it all one color as I did or add a face, hair with paints, trims or anything you choose.  I painted mine with Decoart acrylic paint in Buttermilk, then sanded it for a worn look.

Sticky Sticks™ can be found at retail stores or on their website.  Don't forget to take a look at all the other projects using the blue Designer Crafts Connection button for more great ideas.

Happy Crafting!
Terry

If you like angels, you might like this other angel craft that I have created:


Monday, October 7, 2013

Scarecrow - Designer Crafts Connection Blog Hop

Hi Everyone!

Welcome to the Designer Crafts Connection blog hop!  This month we're creating projects for fall, harvest or Halloween.  I've been wanting to make a scarecrow for years.  We always have the materials around the house - worn out jeans, an old shirt, boots, and old hat and work gloves.  So it was easy to collect a pile of scarecrow makin's.

Scarecrow makin's

For the head, I used a burlap sack that I've been saving for just this purpose.  I also had some fabric scraps with sticky backing left over from a previous project.  I cut the eyes, nose and cheeks from the fabric and stitched a mouth with embroidery floss.  Then, I stuffed him using a pillow for the main part of the body and newspaper for the rest.  I stuck a few pieces of grass here and there and found a rusty garden rake for him to hold.

I'm glad I finally took the time to put him together.  He's a fine addition to the back porch!  He looks happy there, don't you think?
Happy Fall Crafting!
Terry
Scarecrow
by
Terry Ricioli


Wednesday, October 2, 2013

Bat Mobile

Hi Crafters!
No, it's not Batman's car!  It's a mobile with not-so-scary little bats made from Smoothfoam!  They are so easy, you'll have them fluttering all over the house.  The wings and ears are re-used plastic lids!  Here's the link to the instructions on the Smoothfoam blog

Bat Mobile
for
Smoothfoam
You'll find lots of fun Halloween designs on the blog this month from pumpkins to spiders to googly-eyed topiaries and so much more!   

The Creativity Team at Smoothfoam (of which, I am thrilled to be a part!) is having great fun with this theme and you will too as you decorate your house for Halloween!

Happy Crafting!
Terry