Pages

Friday, November 25, 2022

Ribbon Angel


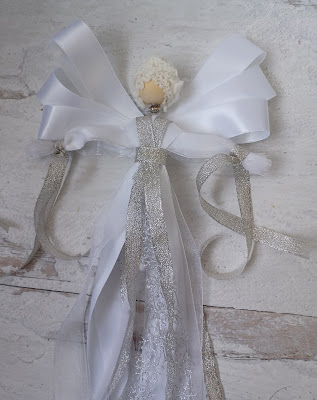
 This month I have created an angel with the beautiful ribbons from Gwen Studios


For this angel, you'll need:

White chenille stems, 1 and 1/2

Wooden bead, 3/4"

White yarn or other for hair

Silver spacer bead

Thin wire, 22 gauge

Silver beads, 2mm, about 20

Ribbon from Gwen Studios (available at Walmart):

Satin ribbon

Snowflake ribbon

Silver ribbon

Sheer ribbon

Or Michaels:

Silver and Blue Holiday Pack

Sheer ribbon

Metallic Holiday Ribbon Pack

Tools: scissors, round nose pliers, tacky glue or hot glue and glue gun

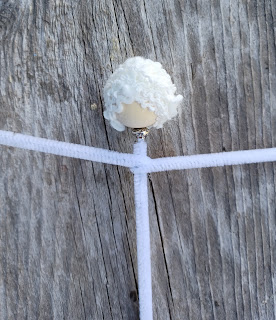
To begin, fold the end and glue the full chenille stem into the wooden ball.  Slide a silver bead up under the head.  Wrap half a chenille stem around the long one for the arms. Wrap and glue yarn around head.

Lay 6-8 ribbons across the front and back of the arms covering the chenille stem.  These ribbons are about 8" long. Use a short length of wire to hold the ribbons near the end on each side. Layer 6-8 ribbons on each side of the head across the center. These ribbons are about 20" long.  Choose a variety of ribbons in any colors you wish.  Wrap a short length of wire under the arms at the waist.

Tie ribbons over the wires on the wrists and wrap a short length around the waist and glue at the back.

For the wings, make three loops and glue. Make a matching set for the other side leaving a ribbon tail.  Fold under end a glue the wings together. The back is shown.


Glue wings to back of angel.  Glue a hanging loop in back of the head with the ends under the wings.

To make the halo, use about 2" of wire and make a loop in one end. String small silver beads on it and make another loop.  Slide the loops under the hair and glue.


This angel is very versatile, and you can make in any colors and with any ribbons you like.  Gwen Studios has so many beautiful ribbons, I feel sure that you will be able to find some that you like.


As a designer for Gwen Studios, I receive samples of their beautiful ribbons to use in my designs.

For more designs using these ribbons, head to the Designer Crafts Connection site.


Thursday, October 27, 2022

Turkey with Gwen Studios Ribbon


Here's a fun and easy turkey to make for your Thanksgiving decorations using the wonderful ribbons from Gwen Studios.  All ages can have fun making this together!

Gwen Studios


You'll need:

2" foam ball

6" circle of brown print fabric

Grosgrain ribbon, 3/8" from Gwen Studios:  red (30"), orange (30"), brown (6")

Wood pieces: spoon, two stars, wood tips from stars or toothpicks

Paint: red, yellow, brown

Two small wiggle eyes

Small piece of red thread or yarn

Sewing thread and needle, hot glue, tacky glue, paintbrush, scissors, sandpaper, toothpick


1.  Sew a running stitch around the circle of fabric.  Place ball in the center and gather the fabric around it. Tie threads and trim.  Place the gathering at the bottom of the turkey body and press down to flatten the ball. If you don't have a foam ball, use a ball of stuffing or even a crumpled paper ball.


2.  Cut ribbon into 3" sections.  Glue on a row of 7 orange loops to back of turkey body.  Glue a row of 8 red loops over the orange loops.  To give the red loops a clean edge, fold the cut ends under when gluing to the ball.  

On the front, glue three loops on either side of the center. I used red, orange and brown.

3.  Cut the spoon down as shown and sand the edges.  You can cut wood pieces with a good pair of scissors like Fiskars.

Paint the spoon red.  Add dots to the bottom of the spoon with brown paint using a toothpick. Paint the stars and the wood tips yellow.  The wood tips will be the mouth.

4.  Use tacky glue to adhere the eyes mouth and red wattle to the spoon. Hot glue the feet under the front. Hot glue the spoon to the front over the ribbon wings.

As always, use your own style and imagination in creating.  Make it bigger or smaller, use different colors and materials you have available.  Have fun creating a turkey that is uniquely yours!

You can find Gwen Studios ribbon at Walmart or Michaels.

Gwen Studios 3/8" Grosgrain Ribbon, 6 Rainbow Colors, 600 Yards - Walmart.com

Gwen Studios 3/8" x 3yd. Brights Grosgrain Ribbon Pack, 12ct. | Michaels


Stop by the Designer Crafts Connection blog to see more fun ideas for Thanksgiving.

Friday, September 23, 2022

Shabby Sunflowers with Gwen Studios Ribbon

 Happy Fall!

Besides pumpkins, sunflowers are my favorite fall decoration.  Here are some Shabby Sunflowers made with Gwen Studios ribbon.  

Shabby Sunflowers

I like the look of raveled edges, so I thought I'd try that with the Gwen Studios grosgrain ribbon.  It worked!

To make a sunflower, you'll need:

Print cotton fabric for the center (5"square)

Sewing thread and needle

Small amount of stuffing

12" of 1 1/2" grosgrain ribbon in yellow or orange; 9" of 3/8" ribbon to match from Gwen Studios

Bamboo skewer

Green paint

2 1/2" terra cotta pot

Moss

Twine for bow

Buttons (your choice)

Felt in green or brown to cover back of flower

Hot glue and glue gun, scissors, paintbrush


Instructions:

Trace and cut a 4 1/2" circle from print fabric.  Sew a running stitch around the edge and gather.  Add a small amount of stuffing, pull up your threads and tie them in a knot.  Trim.


From 1 1/2" wide grosgrain ribbon, cut twelve 1" pieces.  Trim to a petal shape and fray the edges with your fingernail.  Make 12.

Paint the bamboo skewer green. Trim the skewers to the height you like.  I like to make them different heights.

Glue petals around back edge of fabric center.  Glue stick to back of flower.  Layer and glue buttons to center of flower.  Glue a circle of felt to cover back.  

Here are the sunflowers without the buttons, which I also like. Other options:  sew a button in the center to give it more dimension; add small buttons in a ring or randomly.

Glue narrow ribbon around top of pot.  Add stuffing to pot.  Push stick into the center and glue.  Glue moss over the stuffing.  

Tie a twine bow to the stem.

You can find Gwen Studios ribbon at Michaels and Walmart.


Friday, September 16, 2022

Fall Gingham Set in Plastic Canvas

 Hi everyone,

I'm ready for fall.  The weather has cooled and it might rain next week!  That will be very welcome here in dry California.

Here's a set that has just come out on the Herrschners website.  It's perfect to decorate your home for fall.


 Happy (almost) fall!

Tuesday, September 13, 2022

Floral Birdhouse with Gina K. Designs

 Hi everyone!

Today the designers on the Designer Crafts Connection are sharing their creations made with Gina K. Designs stamps and ephemera packs.  Each of us designers received these with which to design. Here's what I received:

I immediately fell in love with the Watercolor Floral Ephemera Pack, but I'm not much of a card maker, so I debated as to what to do.  
Then, I realized that they are the colors of my living room and I decided to make an accessory for that room.

I found a birdhouse in my stash, 

which I painted in pink and green.

I added some dark pink accents to this.  Then I decoupaged the ephemera to the birdhouse. I added a few Dew Drops for accents.


The ephemera worked very well for decoupage.  When adhering a motif around a corner, be sure to make a good crease before gluing.


I hope you like this idea for using ephemera.  For more Gina K projects at the Designer Crafts Connection blog.


Thursday, August 25, 2022

Easy Fabric-Wrapped Pumpkins

 Happy Harvest!

Harvest is starting here in our neck of the woods.  For us in this county that means apples, grapes and vegetables.  I love this time of year and it's always fun to decorate for fall with its bright, warm colors.  One of my favorite decorations is pumpkins.

This year, I'm making fabric covered pumpkins decorated with Gwen Studios ribbon.  These were such fun to make, and they are so easy, that I made a bunch!

I started out making large ones (4-6") and made three in different fabrics.


Then, I found the cutest tin pickup truck perfect for fall decorating, so I had to make pumpkins to fit it.


Here's how I made them:

You'll need:  foam balls, fabric, hot glue or thick tacky glue, grosgrain ribbon, pieces of sticks, ball-head pins, sequin pins (optional), scissors

1.  Flatten the foam ball on opposite sides.


2.  On one side, scoop out a cone-shaped piece with a kitchen knife.  This will be the top.
3.  Place the ball bottom down in the center of a circle of fabric (wrong side up). Your circle needs to be big enough to wrap the sides to the center.  (The diameter of your fabric circle is the circumference of your ball.)

4. Bring one side of the fabric to the center of the ball.  Then, pick up the edge close to the center and overlap in a pleat.


Use a pin to hold the fabric in place.  Trim away the center fabric if you have too much.  Lift up the fabric and add glue to the center hole.  Press in and around the hole using the end of a paint brush or other implement.

5.  Make a ribbon leaf using grosgrain ribbon like I did or another type of ribbon you like.  Cut a length of ribbon (3-4") and cross the ends.  Stitch or glue to hold.  

Glue the cut end of the ribbon leaf into the center pressing it into the hole.  Glue a short stick in for a stem.
Here are the larger pumpkins before I added the leaves. After doing it this way, I decided that it's easier to glue the leaves on first, but it works either way.

Here are the finished pumpkins.  Add one, two or three leaves in the color you like.

For the smaller pumpkins, I used sequin pins to hold the fabric and pushed them into the center to hold.  Then, I glued in the leaf and stem.

For the grosgrain ribbon, I used Gwen Studios ribbon available at Walmart and Michaels. I am a Design Team member for Gwen Studios and receive ribbon samples with which to design.  

Happy Harvest!

Need more ideas?  Check out these fall decorating ideas:

Saturday, August 6, 2022

Back to School with Gwen Studios

 Hi Everyone!

It's Back to School time!  I can never get used to an August start for school, but I know many of you are already back.

There are so many ways to use ribbon for Back to School.  You could make a bookmark, a tassel for your backpack, a new ribbon for your hair or decorate a pencil holder.  That's just a few ideas.  With Gwen Studios ribbons, you'll be able to find colors of every hue!

I decided to show some school spirit and make a decorative ribbon medallion.  It can be used to decorate a bulletin board or hang on your backpack.  Put a pin back on it and wear it or attach a ribbon and wear it around your neck.  Attach a magnet and it will go on your refrigerator to highlight schoolwork or photos.

First, paint a circle.  I chose a wooden one, but you could use cardboard or heavy cardstock and cut your own by hand or with a die cutter or punch. This one is a bit over 3" in diameter.


Next, cut lengths of two different colors of ribbon. I used 4" lengths of a blue satin and a yellow grosgrain.  Lay them together, fold them and staple the ends.  You could also use double-sided tape. For my medallion, I cut 12 of each.  It will depend on the size of the circle and the width of ribbon you use.  


Starting at the compass points, glue the ribbon petals on the back of the disc.  I used hot glue.


Cut two more lengths of ribbon to hang below the circle and glue to the back.  Color a letter with pen or paint and stick to the center of the circle. Cover the back with felt and adhere a pin, loop or magnet.

 Here's a quick tip.  If you fold the ribbon in half and cut the end at a diagonal, you get even points!

 Make it your own:  add another row of ribbons, add more hanging ribbons, write a message in the center instead of a letter or......

You can now find Gwen Studios at Walmart and Michaels!  As a member of the design team for Gwen Studios, I receive samples of ribbon to create these designs.  Check out the Gwen Studios blog for more ideas with ribbon and trims.

Stop by the Designer Crafts Connection blog for more great ribbon ideas!


Saturday, July 16, 2022

Santa and Reindeer Ornaments

 Merry Christmas in July!

It's a great time to start making decorations or gifts for Christmas!  Here's a little set of ornaments that I designed for Herrschners.  It was fun creating all these different characters!  I hope you enjoy them.


Wednesday, June 29, 2022

Party Headband

Hi Everyone!

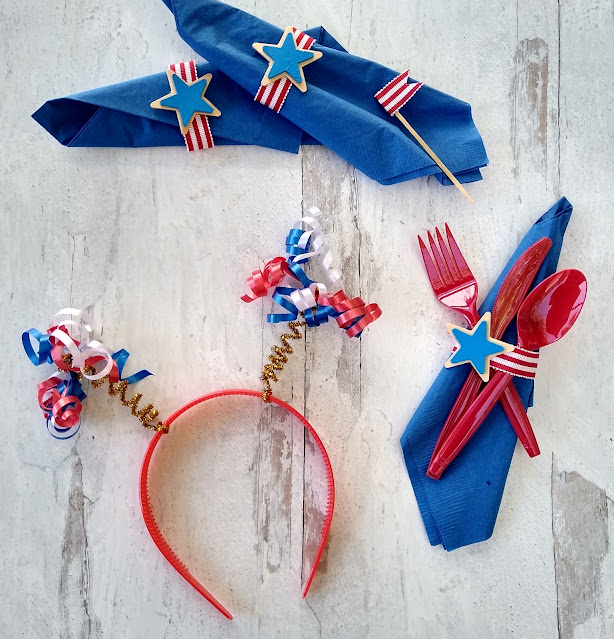
Getting ready for the Fourth of July or a birthday party?  I have the perfect craft for the kids.  It's a fun headband that's super easy to make and fun to wear.

It's made with curling ribbon from Gwen Studios.  It comes in so many colors and it's so fun to curl ribbon.  This ribbon curls right up with the first stroke of the scissors, which is great. (I received these ribbons to use in my designing since I am part of the design team.)

I decided to make a fun headband for my granddaughters to wear for the Fourth of July.  Here's what I used:  red, white and blue curling ribbon, a plastic headband and two glitter stems.  

To start, wrap the glitter stems around a pencil to curl.  Leave about 1 1/2" at the beginning to wrap and glue around the headband.


Cut 12" lengths of ribbon.  I used two of each color.  Line them up and make an overhand knot in the center of all of them.

Curl all the ends.


Wrap and glue the glitter stem around the headband.

Tuck the ribbon knot under the wire end, press the wire together and add a little glue.


These have a lot of movement since they are on a curled wire stem.  The kids will love them.  And, they can help make them, so it's a crafty way to start your party! And, in other colors, what a fun birthday party craft!


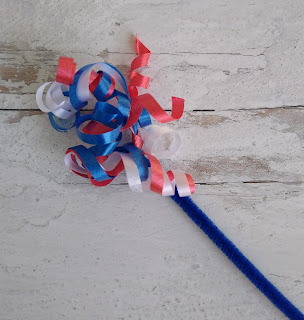
For an even quicker craft, add some curled ribbon to the end of a stem.  They wobble back and forth delightfully! It's great for the younger ones!

Happy Fourth of July!