Pages

Showing posts with label Kids' crafts. Show all posts

Monday, September 25, 2023

Woven Ribbon Coasters

 Happy Fall!

Today I have a fun fall craft for you using Gwen Studios ribbons.  They have a great assortment of types, colors and sizes from which to choose at all the major craft chains. These woven ribbon coasters or mug mats are quick to make and you can choose the colors you like.  I love designing with fall colors, so I chose a selection of those. They'll add bright color to your morning cup of coffee.

Woven Ribbon Coasters

For this coaster I used the burlap ribbon as a base and wove the colored grosgrain ribbon through the burlap ribbon.  

To create the base, I laid five 5" pieces of burlap ribbon next to each other.  To hold these in place while weaving, I cut two strips of adhesive-backed felt and laid them across the ends of the burlap ribbons.


Lengths of grosgrain ribbon were woven through the burlap base ribbons.  Go around the coaster and lift and glue all the free ends of ribbon, front and back.  Then you can remove the sticky felt.  You can also back the coaster with felt.

You can also use masking tape to hold the base ribbons in place. In the photo below, the tops of the base ribbons are taped down making it easier to lift and weave.


Trim the ends as you like.  I left mine long, but you could also trim them close to the burlap ribbon. To make the fringe on the burlap ribbon, clip with scissors and pull out some strands.

Here's another version of the coaster:


I like this one for all the bright fall colors, but one problem is noticeable if you look closely. On this one, the glue I used was too liquid and I used too much which caused it to bleed through the ribbon.  So, a note on the glue you use - use a heavy tacky glue and don't use too much to avoid this problem.  You can also use glue dots or small squares of double-sided tape.

On this coaster, I cut the ends closer and straight across.  Add a no-fray liquid to the ends of the ribbon if you wish.  

And, here's one last version.  It's a little smaller and the ends are trimmed diagonally at different lengths.


Find these great ribbons at Walmart.com. Joann.com or Michaels.com. Here are some links to get you started.

Burlap ribbon

5/8" grosgrain

3/8" grosgrain

For more fall ribbon fun, head to the Designer Crafts Connection blog. Have fun creating with Gwen Studios ribbon!


(As a member of the Gwen Studios design team, I receive samples of their fine ribbon for use in my designs.  I find it to be of excellent quality.)


Friday, April 10, 2020

Kids' Crafts Book

Hi Everyone!

Looking for kids' crafts to occupy the little ones?  Bella Crafts to the rescue!  This is a digital download book filled with 75 different ideas. There are games and activities as well as crafts of all sorts.  And, it's free!
Bella's Crafty Kids
Each craft in the digital book will link you directly to the designer's page that donated the craft.  I contributed an easy beaded cross and an angel made from coffee filters.  There's a wide range of crafts and something for all ages to enjoy.  Enjoy crafting with your little ones and treasure this special time with them.

Looking for more crafts?  Sign up for Bella Crafts free magazine.

Thursday, June 6, 2019

Joy-ful ideas

Hi Everyone!

Thanks for stopping by!

Over on the Creating with Joy blog, there are always great ideas on how to embellish your projects with Joy letters and embroideries.

Here's a few that I have created recently as a member of the design team.  (I receive compensation for these projects and a lot of letters!)

I like to create games for the grandkids.  Here's a Bowling Game that I designed using chocolate milk bottles.  I love when you can reuse things.  This uses some multi-surface paint from Plaid.


And, for the graduate, I made a Mortarboard Gift Box, which can hold a gift card, or your graduate's favorite gift - cash!


Here I've use some Kunin stiff felt and a recycled box.  Add your favorite saying and personalize it with the school colors of your grad.

And, back in April, I created a sign for the yard to point the way to the Easter egg hunt!  Joy letters make it so easy to create a sign!

There are so many ways to use JOY letters - games, signs, gifts.  Stop by the Creating with Joy blog and see more ideas from the design team!


Sunday, August 23, 2015

Smoothfoam™ Projects

Hi Crafters!

What have I been designing for Smoothfoam™ lately you ask?  Well, let me show you!

I made this Bracelet Stand - 
Bracelet Stand
This stand is so easy that I think I'll make a couple more for my jewelry displays.  If you don't like burlap, you can cover it with paper or other cloth.  Next time, I think I'll make it a double stand with a lower and higher rod and a bigger base.  You can find all the instructions on the Smoothfoam™ blog here.

And, here's my latest design as a member of Smoothfoam's design team.  This is a bookend made with Smoothfoam™.  The kids can make one of these for their bookshelf and personalize it to suit their room.  I used wood pieces and stone tiles to decorate my cottage, but you can use whatever you have on hand - buttons, craft foam or paper.
Charming Cottage Bookends
It's so easy to create with Smoothfoam™!  What will you create?

Happy Crafting!
Terry

Monday, June 8, 2015

Mobiles, Sun Catchers and Wind Socks

Hi Crafty Friends!

Sometimes it's only in looking back at your work that you discover a theme or a direction in your creative journey.  I realized lately when trying to find a place to hang one more mobile that I create a lot of wind chimes, sun catchers, mobiles and the like.  I like the light catching bright colors floating in a breeze and the sounds of wood or metals resonating in the airAnd, I have a lot of fun creating them.  So, here are a few of the many I have created for your inspiration.

Here's my latest mobile. I created it with Smoothfoam™ hollow half balls so it's nice and light and perfect for a child's room or a party decoration.  You could use this for lots of different parties such as retirement, a baby shower or a wedding. 

Hot Air Balloon


Here's another mobile that I created for Smoothfoam™.  Here I used a disc as a base and added bright Rowlux® Illusion Film flowers on the base and hanging from it.  You can't beat Rowlux® film for vibrant color!  And, the Smoothfoam™ base holds the pins without glue.
Flower Mobile
Links under the photos take you to the Smoothfoam™ blog where you can find the instructions for these projects and many other wonderful projects created by the Smoothfoam™ design team.

Some of the other materials that I've used to create wind chimes, sun catchers, wind socks and mobiles are plastic canvas, bamboo, old felt pens and beaded wire.  Here's just a few! 
April Showers Mobile


Felt Pen Wind Chime
Here's an easy plastic canvas windsock that I did with a kids' group.  It's plastic canvas, twine and plastic beads. Just roll a rectangle of colored canvas into a tube and use twine to lace it together.  To hold it into a tube while you stitch, use clothespins or binder clips.  Cut out butterflies and use more twine and beads to stitch them to the canvas.  Add twine fringe and twine strands to hang.  This is great for the kids because you don't even need a needle!
Plastic Canvas Wind Sock
In fact, I've got so many different hanging designs that I decided to collect them all on a Pinterest page! 
Have fun creating! 
Terry

Wednesday, April 22, 2015

Recycled Crafts

Hi Crafters!

I've long been an advocate or re-using and recycling materials in crafts.  I especially like doing that for kids' crafts, but recycled materials are also great for re-use in art collages, paper projects, decoupage, general crafts and even jewelry.

Here's a craft that I did recently for the Smoothfoam blog.  This Primitive Bunny Jar uses paper bags, old buttons and a jelly jar. You can find the instructions at the link.

Primitive Bunny Jar for Smoothfoam

Here's another of my favorite projects that I made using paper bags - Scrunched Paper Bangles.
All the instructions are on my blog at the link.  It's a fun gift for the kids to make for Mother's Day.
Scrunched Paper Bangles

Here's another craft that I made using recycled materials:  a Decoupaged Flower Pot. It's a great craft for everyone from kids to seniors!

Decoupaged Flower Pot
To make a pot like this, sponge on some acrylic paint, then glue on a selection of pieces from seed catalogs, gardening magazines and seed packets.  I also added some fabric leaves and flowers.  Stamp a message and decoupage that on top.  Add coats of decoupage medium.  This also makes a nice gift.  You can add a plant or fill it up with seed packets, a trowel and a pair of gardening gloves! 

Have fun with these and don't forget to look at your recyclables for crafting material!

Thursday, January 29, 2015

Crafts in my Kitchen: Yarn-Wrapped Snowman

Hi Crafters!

There's a decided lack of snow (and rain) here in California, so I created a little snowman that doesn't need snow. Its the craft that the kids (and moms!) and I crafted in my kitchen this month - a yarn-wrapped snowman.  If you're stuck inside waiting for a snowstorm to stop or don't have any snow to work with, why not craft along! It's easy and the materials are readily available.

Yarn-wrapped Snowman
To start, make balls with scrap paper.  I used old computer printer paper.  Make a ball for a head and one or two for the body.  Shape them by rolling or pushing against your work surface.


Next, wrap the balls with yarn until the paper is covered. Add a little glue to hold the ends down.


Glue the balls together.  You can use a toothpick to connect the balls together more securely if you like.


Now, it's time to decorate.  You can use felt, buttons, chenille stems, pom poms, wiggle eyes or whatever you like and have around the house.


Here's a cute snowman that one of the kids created:
Happy Crafting!
Terry


Sunday, November 23, 2014

Craft Foam Turkey

Hi Everyone!

Almost every month, a group of kids come over to craft with me in my kitchen.  I'm lucky I have a big kitchen/dining room!  Sometimes there are over fifteen of us and sometimes a smaller group but we always have a great time crafting.

Here's what we made this month:
Craft Foam Turkey
Here's what you need to make the turkey:
The brown craft foam is half a regular-sized sheet and the other pieces are a quarter of a sheet.  The chenille stems are one stem cut in half.

Here's the pattern for the back of the turkey:
This is half a sheet of computer paper folded in half.  Draw your pattern on the fold.  Cut it out and unfold it.  Lay it on the brown foam along one edge.  You'll use the extra for the body, head and wings.


If you don't want to draw a pattern, use a bowl or lid to draw a half-circle on your foam like this:
For the red and orange layers, trim down the pattern and trace onto the foam.  Cut these layers with deeper feathers.  If you are using a bowl for a pattern, try cutting the foam with edging scissors.

These are all the parts of the turkey.  Cut the head, body and wings from the scraps of the brown foam.  Cut the wattle from a scrap of red and the beak from the scrap of yellow.  Cut notches in the tan for the sign and write your message on it with a permanent marker.  Bend the chenille stems back and forth for the feet, then bend it up.  Then, you are ready to stack the layers and glue it together.  Glue the legs between the feathers and the body.

You can bend the legs up into a sitting position, or with longer legs (use a whole stem for each leg), you can bend the legs at the knees.  Glue a craft stick onto the back and it makes a cute puppet or you can put it into the centerpiece on your Thanksgiving table!

Hope you have fun making these!  
Happy Thanksgiving to you and yours!  
Terry


Friday, November 14, 2014

Burlap Turkey Decoration

Hi Everyone!

It's time to talk turkey!  So, here's a cute little turkey that you can use to decorate your Thanksgiving table. 

Here's the link for the instructions on the Smoothfoam blog.  (The foam balls were provided by Smoothfoam, where I am a member of the Creativity Team.)


Burlap Turkey Decoration for Smoothfoam
Get the whole family involved making these, because they are easy enough for all to create.  Personalize him with name tags and put one at each place setting.  Or, give him a little sign that reminds all to give thanks. 

And, don't be afraid to add your own creative touches and substitutions!  Use felt for the wings and feet, chenille stems for the legs or make this little turkey into a bigger version with larger Smoothfoam balls.  That's what crafting is all about!


Happy Crafting!
And, a very Happy Thanksgiving!
Terry


Monday, October 27, 2014

Poppet Puppets

Hi Crafters!
This week I'm working with Totem Poppets that I received from Eye Connect Crafts.  These animal totems are so versatile.  You can use them in mixed media, cards or scrapbooking.  Here I'm using them in one more way - as puppets.

This is the Totem Rabbit and the Totem Turtle.  At the links, you can read about the totem animal and see what they look like unpainted.

Here are my Poppet Puppets.  They are painted with acrylics and detail is added with pens.  Then, I glued thin wood sticks to the back.  What fun it would be to create a whole menagerie of these and make a puppet theater for them!  Create them to tell and act out your favorite story.

Poppet Puppets

I'll be working with Eye Connect Crafts at the Craft and Hobby Show.  If you are in the craft industry, stop by and see all the amazing Totem Poppets and Lace-Ups that creator and owner, Erin Sparler, has designed!  We'll be in Booth #1902!

Happy Crafting!
Terry


Monday, September 29, 2014

Scarecrow

Hi Crafty Friends!

Fall leaves, bright pumpkins, garden harvests...there are so many reasons to enjoy this time of year.  And, it's so much fun to use all these things to decorate your porch or table.  

I created this little scarecrow to go with my fall decorations this year.  He was created for Smoothfoam™ and the instructions are on their blog.                                          


Scarecrow Decoration for Smoothfoam

He's very easy to make with Smoothfoam™ and upcycled fabric.  I used an old shirt and a pair of jeans.  Add some burlap and a few buttons and you'll have a decoration you'll set out every fall! 

I'd like to make more of these since I really like scarecrows.  I think a few in different sizes and fabric would be fun!  Maybe a whole scarecrow family!


Happy crafting and fall decorating!
Terry

Thursday, September 4, 2014

Bookworm

Hi Crafty Friends!

Bookworm
Are you looking for a fun project for the kids or your classroom that will promote reading?  How about a cute bookworm?  Imagine all the colorful versions they'll have fun creating!  Have them discuss their favorite book and add a line in the book that the bookworm holds.  My bookworm is reading fairy tales and the line in the book says "Once upon a time...".  He seems to be enjoying it, don't you think?

Find out all the details on how to make this cute critter on the Smoothfoam blog!

Happy Crafting (and Reading)!
Terry

Sunday, August 3, 2014

Designer Crafts Connection: Crafting with School Supplies

Hi Crafty Friends!

This month on the Designer Crafts Connection we're crafting in a Back to School mode.  You'll find crafts either using that theme or creating a craft with the actual supplies.  

I'm crafting with school supplies. I had some old felt pens that didn't work anymore.  I just couldn't throw them away!  Not only do I hate to create more garbage, these pens were bright and colorful  There must be something I can do with them!  After some thought, I found I could remove the felt wick leaving a colorful tube.  And when you have a tube, you have possibilities!

I decided to string the tubes on twine and make a wind chime.  I recycled a couple of plastic lids, too.  This craft is great for kids, especially if you have an adult remove the wick from the pen.  With the use of recyclable materials, it's inexpensive to make.

Felt Pen Wind Chime

You'll need: 

8 dried-up felt pens
2 plastic lids
Assorted acrylic beads
Twine
Scissors, tweezers, bead reamer or other tool to punch small holes in the lid


1.  Remove the felt wick in the center of the felt pen with tweezers or a pair of pliers.

2.  Punch eight evenly-spaced holes around the edge of a plastic lid and one in the center.  Cut a triangular piece from the other lid and punch a hole in one corner.

3.  Cut five pieces of twine about a yard long. 

4.  Tie a knot in a piece of twine, string a bead, a felt pen tube and one or two beads.  Tie a knot and go through a hole from the bottom of the lid and down from the top in an adjacent hole.  Knot the twine and repeat for the second set of beads and felt pen tube.  Repeat three more times.

5.  For the center, tie on the triangle and knot, add a bead and knot again.  Knot the twine and add a few larger beads; knot above the beads.  Four inches or so up, make a knot, add a bead and go through the center hole of the plastic lid.  Add a couple of beads on the other side to hold the lid in place, knot again and tie a loop for hanging.


Hang your wind chime outside in the garden or in a window for a colorful decoration!  

Don't forget to click on the big blue Designer Craft Connection button and see what the other designers have created this month!

Happy Crafting!

Sunday, December 15, 2013

French Knit Ornaments

Hi Crafty Friends!

Here are some quick and easy ornaments to make.  And, who doesn't need quick and easy this time of year!  They are made on the French Knitter and were featured in the weekly online magazine from Crafts 'n things earlier this month.  You can find the instructions on their website.  Here's the photo from their website showing them on a tree.


This is a great project for kids of all ages and, of course, can be made with any color or type of yarn you happen to have on hand.  Another plus!


Happy crafting, decorating, baking and shopping!

Terry


Here's a larger photo that I took so that you can see them more easily!
French Knit Christmas Ornaments
by Terry Ricioli


Monday, November 18, 2013

Little Pilgrims


Little Pilgrims
by
Terry Ricioli
 Hi Crafters!

Here are a couple of little Pilgrims that I created for Thanksgiving.  They are quick and easy, so you have time to make them for your decorations for your table, a wreath or the mantle.  The kids can join in on the fun!  The instructions are over on the Smoothfoam blog.

And, while we're on the subject of Thanksgiving, I want to tell you how thankful I am that you have stopped by.  Thank you also for all the lovely comments and for following my blog!  I appreciate it so much!

Happy Thanksgiving to everyone!
Terry

Monday, November 4, 2013

Thankful Heart - Designer Crafts Connection Blog Hop

Hi Everyone!

Welcome to another first Monday of the month Designer Crafts Connection Blog Hop!  This month we're creating thank you gifts.  I've created a Thankful Heart plaque that you can give as a gift or use to decorate the house for Thanksgiving or all through the year.  You can make this as a family or with a group.
 
Thankful Heart 


I've made it a reminder of a few of the people and things for which I am thankful.  You'll have your own things for which you are thankful so you can individualize the heart with names of loved ones or other words you like.

For this project, you'll need:

8x10 canvas
DecoArt Americana acrylic paint in Jack-O'-Lantern Orange and Milk Chocolate
Off-white cardstock and a word processing program/computer
Raffia-covered wire, about 1 foot
Small dry sticks
Tacky glue
Paintbrush, pliers, sponge

Instructions:

1.  Mix some orange and brown paint and paint the canvas.  Leave the paint streaky and uneven.  While the paint is still wet, press the sponge on the paint using different angles to create more texture.

2.  Using a word processing program and your computer, make a sheet of words describing things or people for which you are thankful.  Space them so that you can tear them apart.  Change the fonts and sizes on some of the words for interest.  Print them out on cardstock and tear the words apart into different shapes.  Thin the brown paint and randomly paint the words.  Let dry.

3.  Break the sticks into pieces to make the letters for the word "Thank".

4.  Using the pliers and your fingers, shape the wire into "ful".  For kids and seniors, use yarn instead of the wire.  Write the "ful" in glue, then follow it with yarn. 

5.  Glue the word "Thankful" as shown or as you like.

6.  Glue the paper words into a heart shape.

That's the basics, but as usual, you can change the project around to make it as individual as you are! 

Thanks for stopping by!  
Terry


Saturday, October 26, 2013

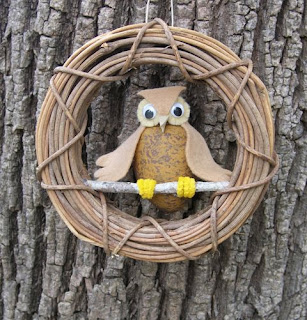
Little Owl

Hi Crafters!

Here's a cute little owl that you can make for your fall decorating whether it's for harvest or Halloween.  You can put him in a wreath like I did or perched in a flower arrangement.  He's easy and quick to make and WHO wouldn't like him hanging around the house!

You can find the instructions over on the Smoothfoam blog.

Happy Autumn crafting!
Terry

Tuesday, October 15, 2013

Angel for Sticky Sticks™ Challenge

Hi Crafters!

Welcome to the Sticky Sticks™ blog hop! 

Sticky Sticks™ is our manufacturer challenge for this month in which we create a design using their products.  Sticky Sticks™ are self-adhesive jumbo craft sticks.  You peel off the tab and stick them together!  No glue is needed!

This challenge was a fun one for me.  I wanted to create a craft without using any extra glue, but I wanted it to be a complex design.  It took a bit of puzzle-working!  But, I love puzzles and, with a little patience, I was able to construct this angel with no glue using only the Sticky Sticks™! It all depends on how you place them!

Sticky Sticks Angel
Design by Terry Ricioli

Here's the easy step-by-step instructions so you can do it, too!  

You'll need 29 Sticky Sticks and two wood circles (2" and 2 1/2").

1.  Lay 3 sticks down with tabs up and remove the tabs.  Lay 2 more sticks on top with tabs up as in this picture:
Step 1

Make two of those.  These will be the bottom sections of the body.

2.  Lay one stick with the tab down.  Remove the tabs on two more and lay them on top of the first. Add two more one on each edge. 
Step 2

3.  Remove the center tab and place the two sections from Step 1 overlapping each other.  Place the section from Step 2 on top overlapping the other two.
Step 3
4.  For the wings, lay three sticks with tabs up on your work surface.  Remove the tabs.
Step 4

5.  Lay three more sticks on top of those with tabs up as shown.
Step 5
6.  Make another wing in the same way facing in the opposite direction.
7.  Remove the tabs and press the wings to the back of the body overlapping in the center.  Slide the arms between the wings and the body with one tab facing up and one facing down as shown.
 8.  Remove the tabs and adhere the small circle to the front-facing tab and the large circle to the back-facing tab covering the ends of the arms.
Now your angel is ready to decorate.  You can paint it all one color as I did or add a face, hair with paints, trims or anything you choose.  I painted mine with Decoart acrylic paint in Buttermilk, then sanded it for a worn look.

Sticky Sticks™ can be found at retail stores or on their website.  Don't forget to take a look at all the other projects using the blue Designer Crafts Connection button for more great ideas.

Happy Crafting!
Terry

If you like angels, you might like this other angel craft that I have created: