Pages

Showing posts with label Angel craft. Show all posts

Friday, December 29, 2017

Coffee Filter Angel

Hello and Happy New Year!

I love angels and every once in awhile, I just have to create one.  (See my Pinterest board for some of the other angels I've created.)

Now is the perfect season to create one - or a bunch - and I've had this idea "brewing" in my mind for awhile!  (I know, it's a bad pun!)

For this craft, you will need a foam cone (9"), a foam ball (2") and fluted coffee filters.  You can use unbleached filters like I did or white ones if you like.
Materials for Angel
You will also need some craft basics - craft or paper glue, toothpicks and scissors.  You can also use sequin pins or straight pins to attach the coffee filters.  And, of course, add embellishments of your choice.

To start, cut into a coffee filter and cut around the center. 
Wrap the ruffle around the base of the cone.

Continue to wrap the ruffled filters around the cone overlapping as you go.  Pin or glue at the back and trim any extra.  You can also use tape.
Here is the base of the angel.  Press any extra filter down on the top of the cone.

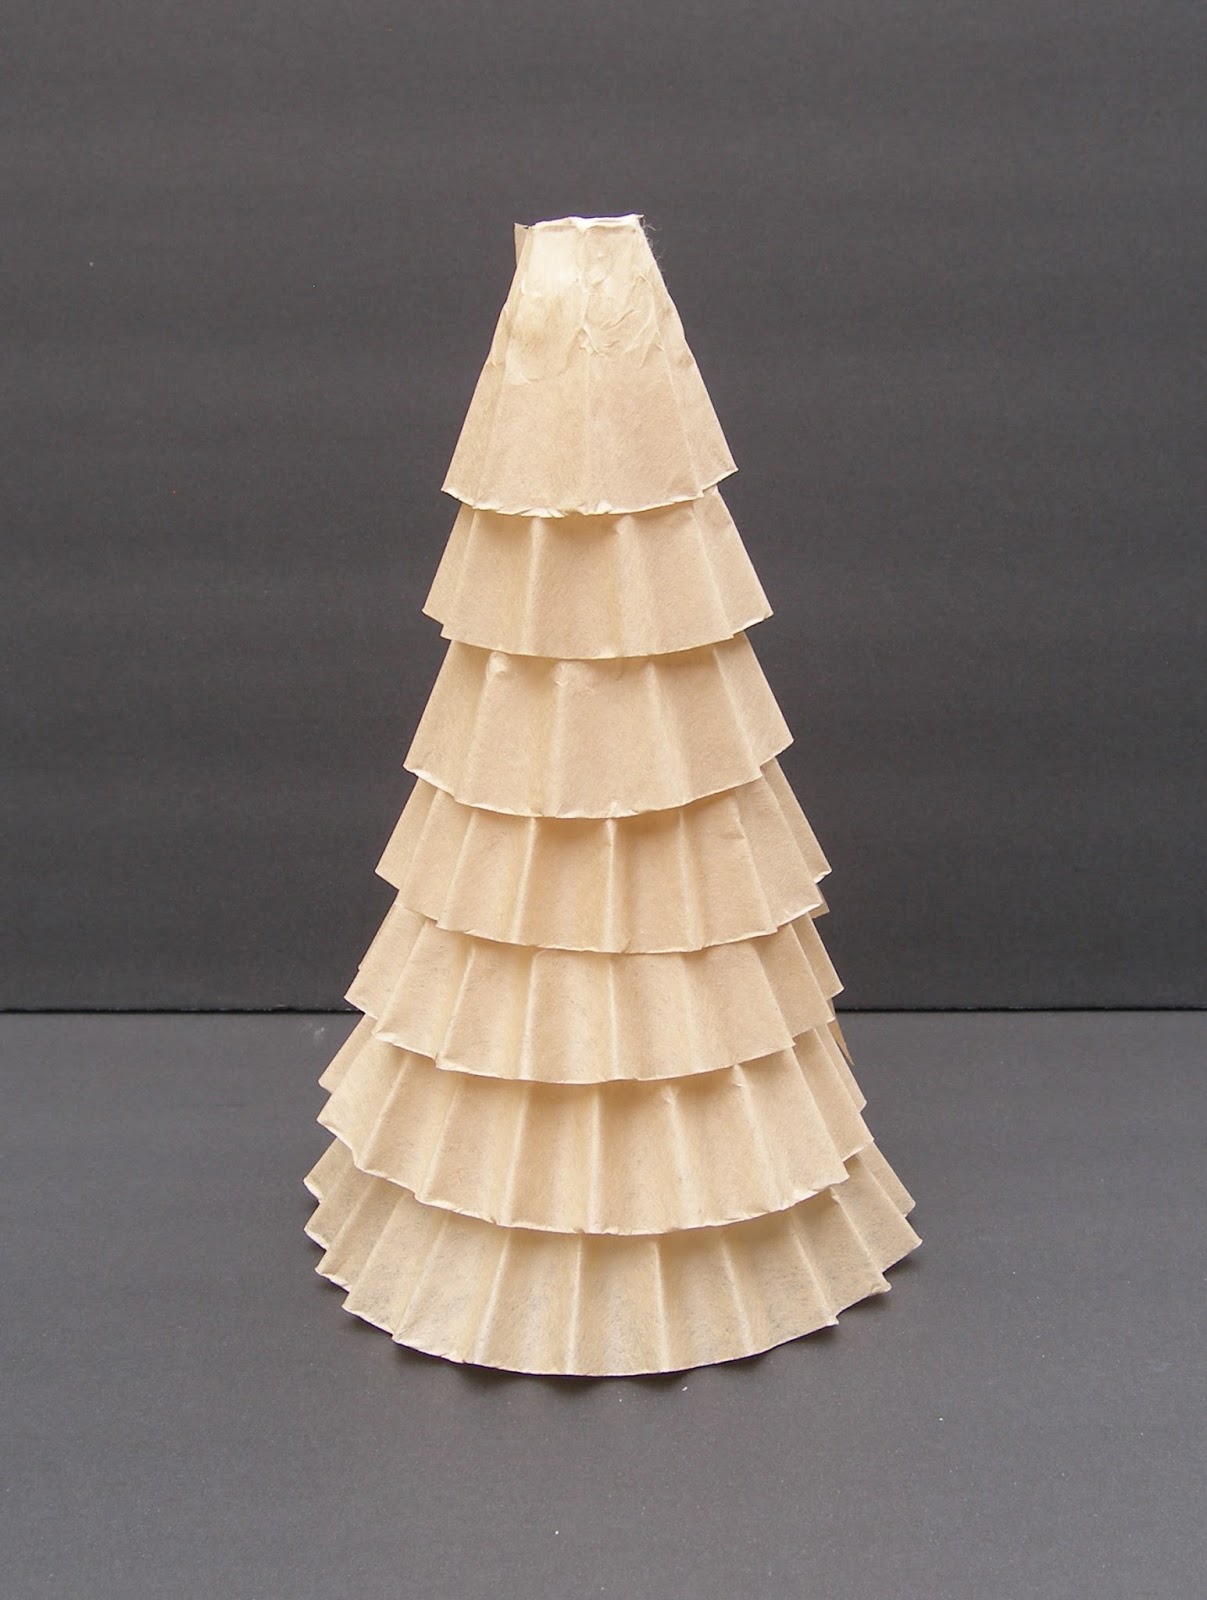
(Or, you could make a cute tree with this.  The fun thing about coffee filters is that they are so easy to color with things like paint or dyes, even food coloring.)  (See my Coffee Filter Turkey for more ideas on dying with food coloring.)

For the head, place the foam ball in the center and wrap to the back.  The smooth center will be the face.

Adhere the filter to the ball as you wish and trim the excess.  It doesn't have to be neat because hair will cover the back.  Now, push a toothpick into the ball and push the other end into the top of the cone.

For the arm, fold a filter in half and roll it up.  Do the same for the other side.  Glue the edges and attach to the angel on either side.  If you want a less bulky sleeve, cut the coffee filter in half.

There are any number of ways that you could make the wings, but here's a simple way.  You'll need two filters for each wing.  Fold one filter almost in half; fold the other a third of the way.
Slide the bottom one shown into the top one.  This will give you multiple layers on the edges.

Adjust your folds if necessary, then fold in half.

Make your second one and add glue in between the layers before gluing each wing assembly to the center of the back.

To make the hair, I cut thin strips of the fluted portion of the filters and glued them to the head.  You can curl them up or smooth them to make any hairstyle you like.  Then I added a small piece of filter for a collar.

Here is the angel:
Coffee Filter Angel
Happy New Year!


Wednesday, July 22, 2015

Snow Angel: Robin's Nest and Smoothfoam Blog Hop

Hi Crafty Friends!
Welcome to the Christmas in July Blog Hop featuring The Robin's Nest and Smoothfoam!


This month on Designer Crafts Connection we're highlighting two manufacturers:  The Robin's Nest and Smoothfoam.  For the manufacturer's challenges, participating designers received free product to use in our designs.

I received some lovely paper, Dew Drops, ribbon and glittery snowflakes from The Robin's Nest among which was some wonderful iridescent card stock.  It looked like perfect angel material to me!  So, I created this Snow Angel.
Snow Angel


Here's how I made this angel:

To make the body of the  angel, draw an arc on the back of the card stock using a curved edge or a protractor with the corner of the paper as the center of the arc.  Draw a smaller arc around the point.  For my angel, I drew a larger cone, but this shows what the pattern should look like.


Cut out and roll up into a cone.  Add glue under the edge of the cone and hold the cone with rubber bands and binder clips while it dries.

From the rest of the glitter card stock, cut a two strips for the arms and two wings in a shape your like. 

For the head of the angel, paint a 1" Smoothfoam ball with paint in your choice of color.  Glue the head to the cone body.  Let dry and add glue to the back half the ball.  Wrap the ball with yarn for the angel's hair.  I used a bumpy yarn that I had in my stash.  Add short pieces of yarn for bangs if you like.

Glue the arms to the back of the angel beneath the head.  Curve the strips to the front.  Add small hands from craft foam.  Glue velvet ribbon pieces over the ends of the sleeves

Glue the remaining velvet ribbon around the bottom of the skirt and glue Dew Drops around the skirt.

Glue silver glitter snowflakes to the back of the head for the halo.

Glue Dew Drops to the wing edges and glue the wings to the back of the angel.

Tie snowflake ribbon around the neck for a scarf.

Make a garland with blue snowflakes and embroidery floss and glue to the hands.

For all of the materials used, go to The Robin's Nest and Smoothfoam.  Smoothfoam™ shapes can also be found in local craft stores.

You can use this angel as a tree topper or standing.  And, since she's in winter colors, you can keep her around through January.  Or, if you're like me, just add her to your angel collection!

To get you started on your holiday decorating, enter to win $50 worth of Smoothfoam™ and $35 worth of The Robin's Nest products by posting comments on any of the blogs.  Go here to see all the designers' blogs:  DesignerCraftsConnection.blogspot.com
Go here to The Robin's Nest blog:  chatteringrobins.blogspot.com 
Go here to see the Smoothfoam blog:  smoothfoam.com/blog

Here's an idea of what you will receive if you win the prize! This blog hop runs from 7/23 until midnight 7/28.
 

Happy "Christmas in July" Crafting! 
Terry

Monday, March 2, 2015

Designer Crafts Connection: Inspired by Pinterest

Hi Crafty Friends!

Here it is another first Monday of the month and time for a round on the Designer Crafts Connection blog hop!  To see what everyone is up to this month, click on the links on the big blue DCC button to the left of this post.  This month we're creating crafts that are inspired by Pinterest.  As there are so many craft ideas on Pinterest, there will be a wide range of crafty ideas.  I'm sure you'll be inspired by the DCC crafts!

I love to create angels.  So, I took a look at the angel crafts category on Pinterest.  There are so many ideas that it can be overwhelming, but I decided to work with materials I have on hand and that I am comfortable with to create this Rustic Angel.  I used a blend of recycled materials and natural materials.
Rustic Angel by Terry Ricioli

Here are some of the materials that I collected:
A cardboard cone, cardboard coffee sleeves, burlap ribbon from Offray®, twine, a foam ball
Then, I added rusty wire and a paper lunch bag to the mix.  I was going to create wings from the cardboard sleeves, but I changed my mind!  You'll also need decoupage medium, tacky glue and scissors. 

Here's the basics if you want to create your own angel like this one:

1.  Add glue to the cone and wrap the cone with the burlap ribbon.  

2.  Cut a circle from the paper bag and decoupage it to the foam ball.  Glue the foam ball to the cone.

3.  Cut a strip the length of the paper bag about two inches wide.  Scrunch it up into a ball and unfold.  Tie a knot in the center and glue the ends at the back under the head.

4.  Glue and wrap twine around the head for hair.

5.  Cut a length of burlap ribbon and make a bow.  Glue it to the back over the arms.

6.  Make a halo with rusty wire and glue to the back of the hair.

I hope you'll try your version of this angel.  Use materials that you have around the house or you can gather outside.  Next, I want to create some angels for my garden.  I'm going to start collecting old rusty metal and furniture parts.

We on the Designer Crafts Connection circuit hope you will return later in the month when we create projects using Connie Crystal.  And, since this is National Craft Month, they'll be lot of ideas, so remember to #cre8time for extra crafting!


Tuesday, October 15, 2013

Angel for Sticky Sticks™ Challenge

Hi Crafters!

Welcome to the Sticky Sticks™ blog hop! 

Sticky Sticks™ is our manufacturer challenge for this month in which we create a design using their products.  Sticky Sticks™ are self-adhesive jumbo craft sticks.  You peel off the tab and stick them together!  No glue is needed!

This challenge was a fun one for me.  I wanted to create a craft without using any extra glue, but I wanted it to be a complex design.  It took a bit of puzzle-working!  But, I love puzzles and, with a little patience, I was able to construct this angel with no glue using only the Sticky Sticks™! It all depends on how you place them!

Sticky Sticks Angel
Design by Terry Ricioli

Here's the easy step-by-step instructions so you can do it, too!  

You'll need 29 Sticky Sticks and two wood circles (2" and 2 1/2").

1.  Lay 3 sticks down with tabs up and remove the tabs.  Lay 2 more sticks on top with tabs up as in this picture:
Step 1

Make two of those.  These will be the bottom sections of the body.

2.  Lay one stick with the tab down.  Remove the tabs on two more and lay them on top of the first. Add two more one on each edge. 
Step 2

3.  Remove the center tab and place the two sections from Step 1 overlapping each other.  Place the section from Step 2 on top overlapping the other two.
Step 3
4.  For the wings, lay three sticks with tabs up on your work surface.  Remove the tabs.
Step 4

5.  Lay three more sticks on top of those with tabs up as shown.
Step 5
6.  Make another wing in the same way facing in the opposite direction.
7.  Remove the tabs and press the wings to the back of the body overlapping in the center.  Slide the arms between the wings and the body with one tab facing up and one facing down as shown.
 8.  Remove the tabs and adhere the small circle to the front-facing tab and the large circle to the back-facing tab covering the ends of the arms.
Now your angel is ready to decorate.  You can paint it all one color as I did or add a face, hair with paints, trims or anything you choose.  I painted mine with Decoart acrylic paint in Buttermilk, then sanded it for a worn look.

Sticky Sticks™ can be found at retail stores or on their website.  Don't forget to take a look at all the other projects using the blue Designer Crafts Connection button for more great ideas.

Happy Crafting!
Terry

If you like angels, you might like this other angel craft that I have created:


Saturday, August 3, 2013

Easy Angel Craft

Hi Crafters!

I love to make angels!  I've made them out of a few different materials - wire, hemp cord, cloth and plastic canvas to name a few.  

Here's a little baby angel that I made from Smoothfoam with added texture from Decoart Dimensional Effects texture medium.  I think she's sweet in pink, but you could make your angel in any color.  I added a strip of muslin for her wings, but a small print would look cute, too. 

Angel
for Smoothfoam
by Terry Ricioli


This craft is easy enough for most to make, so get a group together and make a whole host of angels! Make one for Christmas decorating or just everyday!  You can find further instructions on the Smoothfoam blog.

Happy crafting!
Terry