Pages

Showing posts with label upcycling. Show all posts

Tuesday, September 26, 2017

Upcycled Mixed Media Wall Art

Hi all,

Today I'm sharing a piece I did for the Creating With Joy blog, where we use Joy iron-on letters in our artwork and crafts.  Take a look there for my materials and instructions on how to create your own canvas.

Upcycled Sunflowers
I collect and re-use materials like cardboard coffee sleeves and the foil that seals coffee cans.  (And, a lot of other stuff!)  I like the coffee sleeves as they come in a lot of different textures.  I used three different textures here.  And, the foil is really fun.  It usually has a texture, too; and, it can be cut and bent easily.  The Joy Iron-on letters can be painted or dyed as you like and add a nice dimension to the piece.  So, save some of these fun materials and create your own fall art.  These materials are easy enough for kids to use, too.

(I am a member of the design team for Joy iron-on letters and receive their product with which to create my art.  Check out the Creating with Joy blog for more great ideas from our design team.)


Monday, December 7, 2015

Designer Crafts Connection - Handmade Holiday Decorations

Hi folks!

It's the first Monday of the month of December and the designers on the DCC are bringing you some extra-crafty decorations for the holidays!

Here's a few of my holiday ideas to inspire your creativity!

Create a snowman ornament using etched beads:
Etched Snowman
 Or, etch a dome with snowflakes and snow and put your favorite ornaments underneath it:
Etched Snow Dome

 Or, create some country-style decor with burlap, fabric and buttons:
Country Style Christmas Set
 

And, here's an ornament for the kids to make:

Beaded Star Ornament
These ornaments are up-cycled from plastic lids.  To make them, trace a star on a large plastic lid (coffee can size).  I used a star cookie cutter for the pattern.  Punch holes in the points, mid-center at the star junctions and an inch toward center.  Then, thread craft wire through the points, twist the wire together, add beads and curl the ends.  In the center, pass the wire through the holes and add beads to make a star.  Twist the wire around itself at the back.  These are inexpensive and fun to make.  You can also use thread or cord instead of wire, or use other shapes instead of stars.

I can't wait to get my tree now and start decorating!  I hope you were inspired to begin yours with something new!  Take a look at all the other great ideas from my fellow craft designers here on the blog.

Happy Holidays!
Terry


Tuesday, June 30, 2015

Patriotic Banner

Hi Crafters!

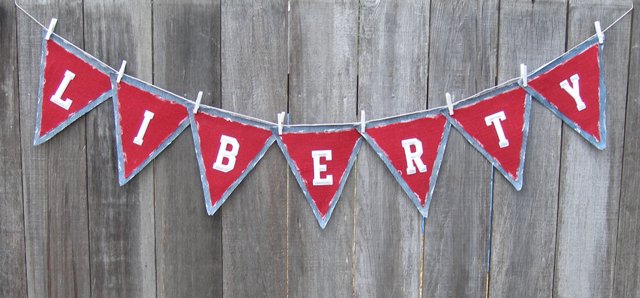
July is here and, with it, one of my favorite holidays - the Fourth of July!  Here's a quick and easy banner that you can make for decorating for the holiday.  It's a banner made with old jeans, red burlap and white iron-on letters from JOY SA Inc.  JOY makes all sorts of iron-on letters and appliques.  You can find them in Michaels now or order through the website.  I'm now on their Creativity Team, so you'll be seeing more projects using their letters.  They are so easy to add to any project.  Stop by the Creating with Joy blog to see more designs from the team.

Patriotic Pennant Banner
You can find all the instructions on the blog here.  You can personalize this banner with your favorite patriotic phrase or word.  This banner is no-sew and is only attached to the twine with clothespins, so it is super fast to make.  In the above photo, the pennants are spaced apart, but I like the way it looks overlapped also.
Patriotic Banner with pennants overlapped
The clothespins make it easy to change the spacing and fit the space you have to hang it.  You'll want to use this technique for other occasions and events, too - birthdays, baby showers, yard sales - wherever you need a quick and easy sign, create it with JOY!

Happy Fourth of July!
and, 
God Bless the USA!
Terry

Monday, September 29, 2014

Scarecrow

Hi Crafty Friends!

Fall leaves, bright pumpkins, garden harvests...there are so many reasons to enjoy this time of year.  And, it's so much fun to use all these things to decorate your porch or table.  

I created this little scarecrow to go with my fall decorations this year.  He was created for Smoothfoam™ and the instructions are on their blog.                                          


Scarecrow Decoration for Smoothfoam

He's very easy to make with Smoothfoam™ and upcycled fabric.  I used an old shirt and a pair of jeans.  Add some burlap and a few buttons and you'll have a decoration you'll set out every fall! 

I'd like to make more of these since I really like scarecrows.  I think a few in different sizes and fabric would be fun!  Maybe a whole scarecrow family!


Happy crafting and fall decorating!
Terry