Pages

Showing posts with label Totem Poppets. Show all posts

Saturday, January 24, 2015

Craft and Hobby Show Recap

Hi Crafters!

Earlier this month, I spent a week in Anaheim.  No, not at Disneyland - at the crafty version of Disneyland - the Craft and Hobby Show.  It's a great time to see the latest craft products, connect with colleagues, and learn some new techniques.

This year I worked with one of the new exhibitors, Eye Connect Crafts.  Erin, the owner and designer of the Totem Poppets and Lace-Ups, took photos of the booth from set-up to tear-down.  You can see those on her blog.

I wasn't able to walk the show as thoroughly as I have in previous years, but I caught a few booths in photos.  Here's the Beadalon booth for us jewelry makers.  They had displays featuring trends on each corner of their booth.
Beadalon - Animal Prints
Beadalon - Tassels
Beadalon - Shades of Gray
Beadalon - Geometry

One of the most popular was the booth created by Spinrite Yarns.  They created their version of Narnia in yarn - Yarnia!  You could walk through the wardrobe and into the snow scene with the battle scene along side.  It featured many different yarns used in everything from animal fur to chainmail!  My favorites were the animals! 
Through the Wardrobe

Beavers
A Wolf
An Owl
The Fox
Yarnia in the Snow
Ready for Battle
 
And, I was able to take one class on layering using mixed media.  I had a great time and actually finished the project!  Seth Apter was a great teacher and kept us moving along as we used paint, stamps, stencils and masking to create our artwork.  Since I had never worked in this way and didn't have a clue on how to start, this was a great introduction to layering one technique over the other.

Here's how mine turned out:
My Class Project from Mixed Media Layer Conveyer with Seth Apter
Hope you enjoyed this brief tour of the show.  If you want to see more of the CHA Show in photos, check out Julie McGuffee's blog:  Life in the Craft Lane.  You'll feel like you've been there!

Happy Crafting!
Terry


Monday, January 5, 2015

Designer Crafts Connection - Favorite Products

Hi Crafty Friends!
Welcome to the Designer Crafts Connection on the first Monday of 2015!  Today, we're sharing our favorite products.  

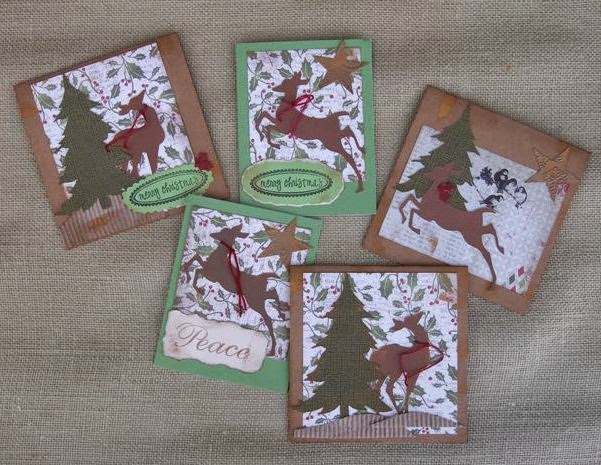
I had several that I worked with last year that I really enjoyed.  The first one is probably not new to a lot of you scrapbookers and card makers, but it is new to me and I am having a great time learning all the ins and outs of it.  I bought a Sizzix Big Kick and a few dies and embossing folders and, for the first time in many years, I made my own Christmas cards.  Here's a few I made:
  I added torn edges and some copper ink along with thread.  I'm excited to try this machine with embossing on metals of various kinds especially recycled pieces from packaging.

Another new product that I tried this year was the fun and innovative Totem Poppets and Lace-Ups from Eye Connect Crafts.  There are just so many ways to add these to your artwork!  Here's a wreath I made with the Owl Poppet this year:
I received the Totem Poppets from Eye Connect Crafts to use in my design work.  I'll also be working in the booth at the Craft and Hobby Show, so look for us in the New Vendor area if you attend the show!  As part of the Poppet package, I also received an eyelet setter from Fiskars.  It is the best tool for setting eyelets that I have ever used.  It sets eyelets consistently and easily.
I've got a few more things on my work table that I haven't tried yet and with all the new products at the Craft and Hobby Show in just a few days, I'll have a lot to share in the New Year! 


Happy New Year!  And, here's to a great year of crafting!
Terry

Monday, October 27, 2014

Poppet Puppets

Hi Crafters!
This week I'm working with Totem Poppets that I received from Eye Connect Crafts.  These animal totems are so versatile.  You can use them in mixed media, cards or scrapbooking.  Here I'm using them in one more way - as puppets.

This is the Totem Rabbit and the Totem Turtle.  At the links, you can read about the totem animal and see what they look like unpainted.

Here are my Poppet Puppets.  They are painted with acrylics and detail is added with pens.  Then, I glued thin wood sticks to the back.  What fun it would be to create a whole menagerie of these and make a puppet theater for them!  Create them to tell and act out your favorite story.

Poppet Puppets

I'll be working with Eye Connect Crafts at the Craft and Hobby Show.  If you are in the craft industry, stop by and see all the amazing Totem Poppets and Lace-Ups that creator and owner, Erin Sparler, has designed!  We'll be in Booth #1902!

Happy Crafting!
Terry


Wednesday, October 8, 2014

Sea Life Mobile

Hi All!

Today I want to show you another craft that I have designed using the Totem Poppets from Eye Connect Crafts.  I am having fun trying different ideas with these.  Today, I'm working with Starfish and Crab Poppets.

Here's the packaged Poppets:
Totem Poppets
These are made from recycled chipboard and are easily removed from the square of chipboard from which they are laser cut.  They were designed to be put together with 1/16" eyelets, but they can also be put together with brads, small screws or fibers.  Each Poppet comes with a statement on its totem representation, which you can incorporate into your artwork if you wish.  

For my version of these Poppets, I popped them out and painted them with acrylic paint.  I painted them with a main color, then dry brushed and dabbed other colors on top.  For the crab, I added bead eyes.  To hold them together, I used hemp twine.  I think it adds a nice natural feel.  It's very easy to work with also.

Here's the crab:
Crab Poppet
And, here's the starfish:
I arranged the poppets on a mobile constructed of driftwood, a piece of net and some shells that I had in my stash.
Ocean Life Mobile by Terry Ricioli
If you want to start playing with Poppets, head over to the website:  Eye Connect Crafts 
While you're there, check out the blog and see what Erin Sparler, the owner and creator or Eye Connect Crafts is up to with her amazing Poppets and with the other chipboard line, Lace-Ups.

Come back soon for more fun with Totem Poppets and Lace-ups!
Happy Crafting!
Terry

Monday, September 8, 2014

Owl Poppet


Hi Crafty Friends!

Recently I was introduced to a new craft product. You know how I like that!  And, it's a craft material just full of possibilities - even better!  The company is Eye Connect Crafts and they produce chipboard animal shapes called Totem Poppets that can be connected with eyelets or buttons or string.  Since the animal is jointed, you can position the limbs and head as you like. 

Below is what one looks like pulled from the package.  It is laser cut with the holes punched in the pieces.  This is the Totem Owl Poppet and it comes with a moon also.
Totem Owl Poppet
Totem Owl Poppet pieces
You carefully remove the pieces from the sheet and paint or stamp or collage them.  You can use whatever art style or medium you like.  I painted mine and added some pieces of burlap.  Then, I glued them into a wreath.  But, you could put them in a card, in a scrapbook or journal, or grouped with other fall or holiday decorations.  They are so versatile!

After you have added paint or other media, you connect them together.  These are connected with eyelets, but you could use any number of different connectors.  Or, you could glue the pieces together.

Owl Poppet
Here's how I created this owl.  He's a perfect addition for your fall decorating!

Materials:
Totem Owl Poppet, 1/16” eyelets and eyelet setter (www.eyeconnectcrafts.com)
Acrylic Paint:  Khaki Tan, Buttermilk, Jack-O’-Lantern Orange, Bright Yellow, Milk Chocolate (Americana® by DecoArt®)
Grapevine wreath, 6” (Darice®)
Two buttons, gold or yellow, 3/8”
Black embroidery floss
Small scraps of tan burlap
Tools:  paintbrush, scissors

1.  Basecoat body with Milk Chocolate, wings and head with Khaki Tan and feet and moon with Buttermilk.  Cut two small triangles for beak from extra board and basecoat with Buttermilk.
2.  Cut semicircle of burlap for breast of owl and shape to fit around neck and wing.  Dab and edge with Milk Chocolate and lightly with a mix of Khaki and Orange.  Cut two ½” circles of burlap for eyes.  Dab in center and around edges with Milk Chocolate.
3.  Use a scrap of burlap as a stamp and add Milk Chocolate to wings.  Layer other colors over this.  Do the same in a triangle on the head. 
4.  Layer Yellow and Orange over feet and beak.  Add Khaki and Yellow to moon.  Edge the moon with Milk Chocolate.
5.  Sew black embroidery thread on buttons.
6.  Use the eyelet setter and eyelets to construct the owl following the setter instructions.  Place the right wing under the body. 
7.  Glue the burlap pieces in place.  Glue the buttons over the burlap.
8.  Position the owl wings and head as desired.  Glue owl and moon onto the wreath.

I'm sure you'll want to add these Totem Poppets to your craft projects and I hope you'll take a look at the great variety of animals and shapes available at Eye Connect Crafts.

Happy Crafting!
Terry