Pages

Showing posts with label Rit Dye. Show all posts

Tuesday, October 5, 2021

Wedding Accessories for Gwen Studios

 Hi Everyone!

I'm excited to announce that I have joined the Gwen Studios Design Team.  Now, you'll see new designs with Gwen Studios here on a regular basis.  This month we're all designing wedding items, so you'll find wearables, table decorations, albums, jewelry and other items suitable for a wedding on the blog hop.

For my designing, I received lovely coordinated fabrics, ribbons and trims.  I have always loved the combination of plum and pink.  It has a lovely old-fashioned look.

You can create accessories for your entire bridal party with these fabrics, ribbons and trims.  I have a few ideas for you here, and my fellow designers will have many more ideas to share on the blog hop.

First, I'm going to create a fascinator that would be suitable for a bridesmaid or the flower girl. To begin, I'm wrapping a headband with the 3/8" ribbon from the satin ribbon pack. 


Cut a small piece of ribbon to cover the ends of the headband to start.

Then, wrap the ribbon around the headband adding glue on the inside of the headband as you go.  Adding glue to the inside keeps any glue seepage from showing.  Finish by gluing the ends and trimming the ribbon.  I used about 6 feet of the ribbon.

To make the flower for the headband, cut teardrop shapes from the 1 1/2" ribbon.  These do not have to be perfect.  If you have a punch, you can use that, but freehand makes a more natural petal.

After you cut out your petals, use a candle flame to seal the edges.  Hold them carefully with tweezers and pass the edge of the petal just outside the flame.  The melted edge of the petal can be hot, so take care not to touch the edges before they have cooled.  You'll end up with very natural looking petals that curl into a cupped shape. (This should be done by an adult.)

For a base for the flower, cut a circle of stiff felt.  Then, starting on the outer edge, glue your petals around the circle.  I used hot glue for this.  Continue in for another row or more for a fuller flower.  

For the center, I used one of the fancy trims in Blush Pink.  I rolled up the trim, then flattened it and continued to add more in a twisted roll.  Tuck the end under and glue.  Since this trim is wired, you can continue to shape it.

Here is the finished flower:

I used the same method to create another flower for a wrist corsage.  For the wrist corsage, wrap an aluminum cuff with ribbon.  For both the fascinator and the cuff, make a tulle nest for the flower and glue it over the cuff or headband.  Glue the flower into the center of the tulle.


And, here's the cuff on my wrist.


These ribbons and trims are perfect to add bits of glam to every part of the bridal party's wardrobe.  

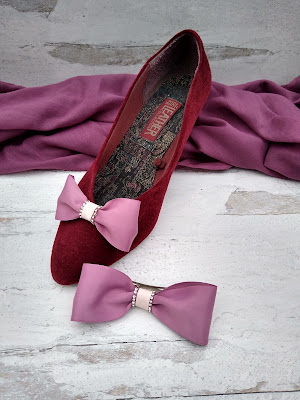
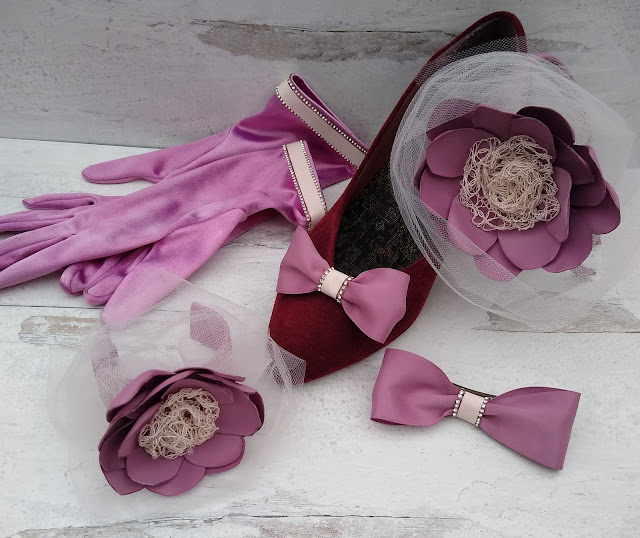
Here's an easy shoe clip.  Cut 7" of the 1/12" ribbon.  Overlap ends 1/2" and glue into a circle. I used Beacon's Felt Glue. Center overlap at the back. Let dry and wrap with a piece of trim and glue.  I used the blush pink ribbon with a rhinestone edging.  Glue onto a shoe clip finding or a clip-on earring finding.  Create a hair bow with a longer piece of ribbon (9") using the same process.  

And, for one more easy addition to the wedding attire, decorate a pair of gloves.  It's so easy to do and adds a finishing touch to your wardrobe. These gloves were purchased at JoAnn's and were white satin.  I dyed them with some Rit(R) Mauve dye and glued the same trim to the edge of the gloves.


Here's the entire set:


To find these items go to Walmart.com.  
For the Plum Satin Ribbon: www.walmart.com/ip/931106493

Follow our blog hop on the Designer Crafts Connection blog.


Saturday, September 17, 2016

Fall Doorhanger

Hi Crafty Friends!

It's almost fall, and one of my favorite seasons for decorating the house.  You can't beat the array of colors - rich reds, brilliant yellows and warm oranges along the comfy shades of brown.

Here's a project that I created for JOY using their iron-on letters.  For all the instructions, head on over to the Creating With Joy blog.  These particular letters come with an adhesive backing so that they stay in place when you iron them onto fabric.  But, for this craft, I used the adhesive without ironing.  It's really quick and easy!

Fall Doorhanger
I want to mention one of the techniques that I used for this sign.  I used a watercolor look, but the watercolors that I used are Rit dyes!  I painted the canvases with Rit® dye in Tan.  Then, I added some color in the middle and around the edges with Cocoa Brown.  I dipped the letters in Tangerine and dabbed some of the brown here and there on the letters.

This is a great way to color your JOY letters - just dip and dry.  And, Rit® dyes come in just about every color imaginable!  And, you can mix them to create more shades!

Have fun creating with fall colors, JOY letters and Rit® dye!


Tuesday, March 4, 2014

Designer Crafts Connection - New Techniques to Try


Hi Crafty Friends!

I am always doing that which I cannot do, in order that I may learn how to do it.  - Pablo Picasso 

I think this quote by Picasso sums up my philosophy toward art, design and crafting.  I love to try new techniques and what other way to learn is there than to jump in and try it!  Of course, there will be craft fails, do-overs, and dead ends, but that is the way I learn - trial and error! 

This month the designers in the Designer Crafts Connection are all about new techniques to try out and add to your arsenal of crafty skills.  I can hardly wait to try out some of them!  To cruise the blogs, click forward or back on the big blue button off to the left side of this post. 

My technique this month is one I've been dying to try - pun intended!  Yes, I'm going to use Rit dye on a few things.  I haven't played with this before, but I've admired what other designers have done with it.  So, we will see how it works. 

First, I selected some colors and made my solutions.  I made them up in canning jars.  They are easy to use for the warm water and dye solution and you can heat them up in the microwave if they cool off.  Plus, you can put a lid on them and store them for later.  Here I have purple, teal, peach, fuchsia and yellow dyes. I also had some liquid dye in Kelly green.


I chose wood pieces, a wood birdhouse, some pieces of hemp twine, burlap, cotton braid and plastic spacers.  The plastic spacers are the most unusual things I dyed.  You can find them in the hardware store.  They have large holes and can be strung on cord.  These pieces I either dipped in the solution or painted.


I really like the way the burlap picked up a rich color.  The wood pieces and birdhouse are a more subtle pastel which shows the wood grain.  The nylon plastic spacers need to be dyed more than once to pick up more color.  And, the twine will be great for matching bead colors in my jewelry designing.

Here's another piece I dyed which I really like.  It was white cotton braid and I dyed it in the peach.  It would make a nice bracelet.

I also tried ice dying with a canvas coaster.  In this process, you cover the coaster with ice cubes, dry dye and a sprinkle of salt.  Then, you let the ice melt and microwave it wrapped in plastic to set the dye. It has a very nice effect and you get a nice intense color.

The canvas coaster

After ice dying with fuchsia

(I received some Rit dye and the coaster at a blogger event at the Craft and Hobby Show.  All opinions (and craft fails) are completely my own.Thanks, Rit!)

All in all, it was a fun day devoted mostly to trying out some of the many ways you can use Rit dye.  The hardest part was waiting for things to dry!  I can definitely see using it more in my designing.  For more great ideas, go to their website.

Happy Crafting!
Terry

Monday, December 5, 2011

Sock Monkey Blog Hop

Hi Crafters!

This month we're monkey-ing around on the Designer Crafts Blog Connection!  When Creativity Knocks is our sponsor and kindly donated their fun video, Sock Monkeys Go BanAnas, that teaches how to make your very own sock monkey.  Ana and Megan Araujo are a great team and you'll be chuckling as you watch the video and learn new tips and tricks to construct a monkey and dress it in cute outfits.  I haven't made a soft sculpture animal since my kids were little, so I appreciated the tips. 

I decided to embroider the eyes instead of using buttons since this monkey will be going home with my almost two-year old granddaughter.  I made her a very simple dress (two squares gathered on ribbon) that ties at the shoulders and constructed a bow of the same fabric.  Later, I hope to make that cute little sweater that is found on the video.

Here she is:
I'm quite fond of her already and I'm having a hard time letting her go.  I hope my granddaughter will let me visit!
Our other sponsors for this hop are Fox River who donated the socks we used,


Judikins who donated a very cute Sock Money Rubber Stamp that some of us used,

and Rit who donated dye for us to use.

Thanks to all our sponsors, but especially


who is also sponsoring a contest on their website where you'll find instructions on how to enter their giveaway.
Happy Crafting and Happy Holidays!
All the best,
Terry