Pages

Showing posts with label Ann Butler Designs. Show all posts

Monday, October 24, 2016

Harvest Plaque

Hi friends!

Ready for some quick and easy fall decorating?  JOY Iron-on letters make it easy to create memorable designs for any occasion!
Harvest Plaque
Go to the Creating with Joy blog for all the details on what you'll need to create this plaque.

Basically, you paint a canvas with a wash of orange.  I went around the edges with full-strength orange paint (Jack-O'-Lantern Orange from DecoArt.)  Cut out a nice fall napkin and decoupage it to the canvas.  I tore the napkin edges and inked them (Ann Butler's ColorBox(R) Crafter's craft ink in Canyon).  Then, I glued burlap ribbon to the canvas.  I pulled threads from the edges of the burlap ribbon and inked the edges with Canyon.

I added JOY letters across the napkin.  To paint the letters easily, stretch a piece of tape across a box sticky side up.  Adhere the letters to the tape and paint!  It's so easy when they don't move around!  Here's another word that I thought about using.  You can use your favorite fall word or saying.


Here's how the plaque looks after the word and the ribbon.
Before adding the leaves
I die cut some leaves from scrapbook and amate papesr, inked the edges and added splotches here and there.  I also folded and wrinkled the leaves a bit.  I arranged them and glued them down, then added a twine bow.

So easy - you can make one for any season!

Happy Crafting!
Terry

(Disclaimer:  As a member of the design team for JOY letters, I received monetary compensation and iron-on letter samples to use in my designs.)



Wednesday, June 10, 2015

Stamped Scarf

Hi Crafters:

For this month's manufacturer's challenge, we're creating with ink pads and quilt-themed stamps from ColorBox™ Crafters by Ann Butler.

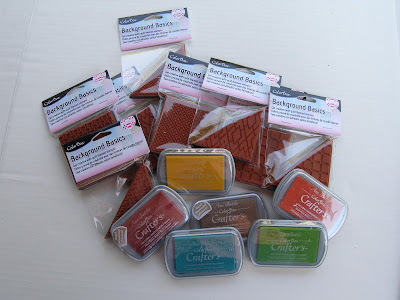
This is the generous sample that I received to create my design.  Thanks, Ann!


Ann Butler Designs

Stamps and Ink Pads
I've seen some wonderful designer scarves for summer, but I can't bring myself to pay those prices, so I decided to use the stamps and ink pads to create my own designer scarf!

I wanted a lightweight summer scarf so I used a white cotton gauze fabric. I cut the fabric about two yards long and 18" wide.  I straightened the edges and fringed the short edges to finish the scarf ends. The long edges curled under nicely so I didn't hem them, but you could hemstitch the edge.  Then, the stamping fun began!  I chose the Aquamarine stamp pad and the Picnic stamp.

I practiced on scraps of cotton gauze and found I had "problems" with stamping.  First, gauze fabric has wrinkles and nice, clean outlines that you get from stamping on paper or even a smoother fabric are not happening.  Second, lining up stamps takes time and precision and patience, and I was running short on all of those.  And, third, getting the stamp evenly covered with ink turned out also to be a problem.  So, I turned my "problems" into opportunities!  So, what I created here is a randomly stamped scarf with a watercolor edge.  


Stamped Scarf
Here's a couple of close-ups of the edge and the body of the scarf.

Personally, I like the look of the uneven blocks with faded spots and extra ink here and there; I think it suits the fabric and style of a casual summer scarf.  The watercolor edge was a lot of fun and adds to the uneven look.  To make this edge, stamp the edge with the ink pad and take a damp brush to the ink to spread it.

I learned a lot from this challenge and I'll definitely be trying these stamps and inks on on other surfaces in my crafting.  I'm looking forward to using it on some polymer clay for jewelry and on backgrounds in a mixed media piece I'm working on as well as more scarves!

Designer Crafts Connection
Join us on the blog hop and see the wonderful variety of projects that the designers have created.


Happy Crafting!
Terry