Hi Crafters!
It's the first Monday of the month again and time for our Designer Crafts Connection! How did that happen? October went by in a flash! Let's hope that November and December are a little slower!
Since it's November, my thoughts turn to turkey...and pumpkin pie and sweet pototoes and stuffing. But, back to that turkey. This Coffee Filter Turkey is the perfect craft for the little ones to make up for the table decorations. It's quick and adaptable. My kids' craft group tested it out and I modified the design, so I will show you a couple of ways to do it.

 For the tail, fold two of the painted filters in half and slide one inside the other, like this:
 Cut another painted filter in half. Fold each half in quarters and fold the tips down along the line of the ruffles of the filter. These will be the wings.
 Wrap the last painted filter around the small Styrofoam ball. This will be the head.
 Wrap the last coffee filter around the 3" Styrofoam(TM) ball and glue the edges down like this:

This will be the body of the turkey. The open area will be glued against the tail. Before you glue it to the tail, press the ball down on the table to give it a flat spot so that it will stand up. Now, glue the body to the tail. Press the head ruffles to one side and push half a toothpick into the bottom of the head. Add glue to the toothpick and press it into the body. Glue the flat part of the wings to the body behind the head ruffles.
Next cut the beak and wattle and glue the face onto the head. This is how mine looks:


It's the first Monday of the month again and time for our Designer Crafts Connection! How did that happen? October went by in a flash! Let's hope that November and December are a little slower!
Since it's November, my thoughts turn to turkey...and pumpkin pie and sweet pototoes and stuffing. But, back to that turkey. This Coffee Filter Turkey is the perfect craft for the little ones to make up for the table decorations. It's quick and adaptable. My kids' craft group tested it out and I modified the design, so I will show you a couple of ways to do it.
Gather your materials: Coffee filters (the natural brown type), two Styrofoam(TM) balls in 1" and 3" sizes, watercolor paints and a brush, a cup of water, glue, a bit of yellow or orange felt for the beak, red yarn or felt for the wattle, a toothpick and two wiggle eyes.

Paint the edges of four of the filters. I chose yellow, orange, red and brown, but, of course, you can work with any colors you like. Turkeys actually have lots of interesting colors in their feathers.


This will be the body of the turkey. The open area will be glued against the tail. Before you glue it to the tail, press the ball down on the table to give it a flat spot so that it will stand up. Now, glue the body to the tail. Press the head ruffles to one side and push half a toothpick into the bottom of the head. Add glue to the toothpick and press it into the body. Glue the flat part of the wings to the body behind the head ruffles.
Next cut the beak and wattle and glue the face onto the head. This is how mine looks:
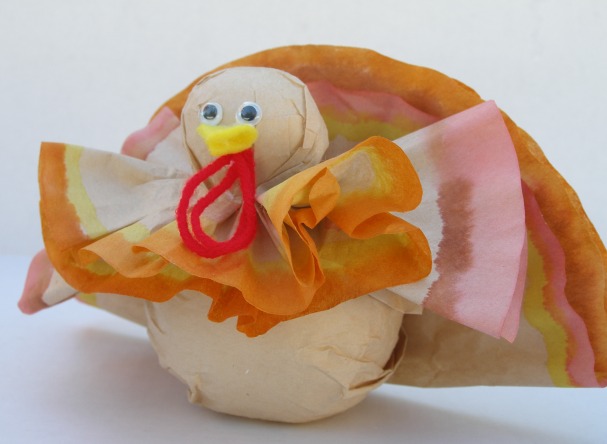
Of course, you can adapt this pattern to your ideas. Add more paint, trim or move the wings, add a little sign for a name tag or add some feet!

Here's one more variation that I made before I decided to use the Styrofoam balls. In this one, I used polyester stuffing. It is a little more difficult to handle. We ended up getting out the masking tape for the kids. It was so springy! But, other than that, it's a good alternative. You could also use balls of recycled paper for the body and head.
Happy crafting!
Terry
PS I'm blogging more than usual this month, so stop in again next Tuesday on the 15th and see my new gadget - the Flip-Pal(TM). And, of course, continue clicking though to see what other fun ideas on on the Designer Crafts Connection ring.
Such a cute turkey....
ReplyDeleteWhat an adorable idea! This would be a great way to have kids help decorate the holiday table. Thank you for sharing!
ReplyDelete-Suzann Sladcik Wilson
LOVE! These would be awesome dipped in Rit Dye's tangerine, cocoa brown and taupe.
ReplyDeleteGreat idea!
DeleteAdorable Terry! I don't drink coffee but now I have an excuse to buy those pretty filters!
ReplyDeleteLooking for another easy coffee filter project, check out my Coffee Filter Angel. https://terryriciolidesigns.blogspot.com/2017/12/coffee-filter-angel.html
ReplyDeleteSimply wanna tell that this is very beneficial, Thanks for taking
ReplyDeleteyour time to write this.