Pages

Thursday, July 26, 2012

101 Bracelets, Necklaces and Earrings

Hi Crafters!
Looking for oodles of delicious jewelry designs?  Here's one of the latest magazines from Interweave:  101 Bracelets, Necklaces and Earrings.  It's chock full of all new designs arranged according to color families like patina greens, lipstick reds and earthy browns.  I had a small part in the magazine with these Grape Bunch Earrings in the fruity purple (how appropriate!) section of the magazine.
So, if you are looking for loads of design inspiration, pick up a copy at your favorite store or order it from Interweave.

Happy Crafting!
Terry

Tuesday, July 17, 2012

One stitch at a time!

Hi Crafters!

What are you crafting this summer?  I am spending a lot of time stitching on my computer.  That's right - on my computer!  I create designs for needlepoint on plastic canvas and a lot of that designing is done with a computer program.  Here's one of my designs that is out in the new Herrschner's catalog right now.
I think plastic canvas is enjoying a resurgence in popularity if the design calls are an indication.  I hope so!
Hope you are enjoying your summer!
Happy crafting!
Terry


Sunday, July 1, 2012

Denim Wreath

Hi Everyone!
Welcome to another round of the Designer Crafts Connection blog hop.  This month we're designing vacation crafts.  Since the Fourth of July is only a couple of days away, I went for red, white and blue.

Around our house, ranching and farming generate a lot of worn out blue jeans.  They're great for recycling into interesting crafts.  This month I recycled a couple of pairs of jeans into a wreath.  It's quick, simple to make, and adds just the right touch of country to the inside or outside of your home.

First, take a couple of old pairs of jeans, well-worn, with holes, stains and a little tractor grease.
Cut strips from the worst parts of the jeans (save the rest for another project).  I cut them about two inches wide, but they are definitely not straight.  They don't need to be.

Use a straw wreath for your base or, if you prefer, use a foam wreath.

Wrap and scrunch your strips of denim around the wreath, adding pins as you go or tacking it down with a glue gun. 
Continue wrapping and twisting the strips until you have the wreath covered.
Designed by Terry Ricioli
Add a bow if you like.  I tied on a bandana.  A rope or twine bow would also work well with the denim or, perhaps, a rusty cow bell or two.
Happy summer crafting! Hop around the DCC blogs and see what the other designers have in store!  Just click on the big blue button on the left hand side of my post.
Terry

PS  For all you plastic canvas lovers, check out my previous post.  I'm giving away my new leaflet and a box of supplies!

Sunday, June 17, 2012

I'm back!

Hi Everyone!
I'm back from my travels and feeling revived and ready to craft my way through the rest of the year!  There are so many things I want to do!  I have a long list:  summer jewelry for myself, painting projects to finish, wirework, learning a new chain mail weave, more knitting, and of course, I can always clean up my studio/office!  Somehow, I never have time for that!  I'd rather craft than clean, but organization of some kind is necessary if you want to find those items that you've already purchased and not have to buy them again!

One of the long-time staples of my designing career has been plastic canvas needlepoint.  I've designed projects for numerous booklets, magazines, kits and hardback book compilations.  I still love it and I'm still actively designing new projects.  And, in celebration of the publication of a new booklet of mine, I'm going to give away a copy of it.  This booklet, Tea Lights in Plastic Canvas, has four designs with cut-outs to let the battery-operated tea lights shine through the openings
Tea Lights in Plastic Canvas


So, whether you are one of those crafters that still loves plastic canvas like I do, or you want to try something new, let me know by leaving a comment on my blog.  And, not only will I send you a copy of the booklet, I'll include some other goodie, like yarn or extra patterns.  It'll be a surprise!

So, how many plastic canvas enthusiasts are there out there?  Let me know.  I'll draw a name on July 13.  (Or, if you just can't wait to get your own copy, click on the link above, which will take you to the Annie's Attic website.)

Happy crafting!
Terry

Monday, June 4, 2012

French Knitting

Hi All,

This week I am away from my studio.  I am on grandma duty helping out with my two-year old granddaughter while her mom and dad await the birth of their second daughter. 

Of course, I packed up a few crafts to take along for the moments I have free.  I packed some knitting and, so far, I have finished a mini-blanket for the car seat.  And, I've also been knitting with something new to me - a type of spool knitter called a  French Knitter.  The nice people from Clover Needlecraft gave me one at the last Craft and Hobby Show, and I have been happily trying it out with all sorts of fibers and beads.  I can't believe that I have never used one of these.   And, soon, I hope to be able to show you some of the designs that I have developed with this great new gadget.  Actually, it's only new to me.  After doing a little research on the web, I discovered that spool knitting has been around a long time.  You can even make a spool knitter with a cardboard tube; I can't wait to try that with my children's group!

I hope you are trying some new craft this summer.  And, if you need some great ideas, click on the big blue blinkie at the left of this post and see what the other designers in the Designer Crafts Connection are crafting this month.  I know there will be lots of fun crafts for Father's Day and picnics. 

Happy Crafting,
Grammy Terry

Sunday, May 6, 2012

Scrunched Paper Bangles

Hi Crafters!

It's the first Monday of the month and time for the Designer Crafts Connection blog hop.  This month, we're featuring easy jewelry designs.  I can't wait to see the designs this month.  It was a tough choice for me to figure out what to present.  I love jewelry of all kinds and the easier the better.  I finally decided to show you one of the many paper jewelry designs I've made.  This one is a Scrunched Paper Bangle, and not only is it easy, it's very inexpensive to make.  The main ingredients are paper bags and tacky glue!  So, read along and see what I did.

First gather the materials:

Heavy paper bag cut into 4 strips

Tacky glue  - (I used Aleene's (R) Original Tacky Glue (R) and the kind folks there did provide me with   some samples.)

Acrylic Paint

Satin varnish

You'll need scissors and a paintbrush, too.


Measure around your fist and add two inches.  Cut four paper strips this length and three inches or 1 1/2 inches wide.

Glue the ends of one strip together with the print side out.


Glue a second strip around the first with the ends at a different point.  Add the third.  Glue the last one on with the unprinted side out.


While the glue is still wet, scrunch the bangle by pushing in on the edges.  Go all the way around the bangle until it looks the way you like.


Paint the bangles with acrylic paint.  You can use all one color, two colors like these or any way you like.  When the paint is dry, add a layer of sealer. You can also add embellishments like jewels or buttons.

I hope you enjoyed this easy paper bag jewelry idea and that you'll hop around and see what the other designers have for you this month! 

Happy Crafting!
Terry

Monday, April 2, 2012

Beaded Crosses

Hi Crafters!
Welcome to the first Monday of April and the Designer Crafts Connection Blog Hop.  I hope you'll take the time to hop around the blogs using the big blue button on the left of my entry.  After reading mine, of course!

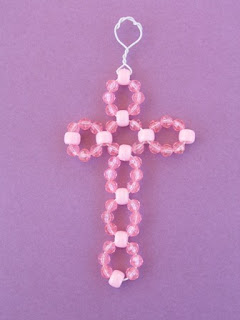
This time in honor of Easter Week, I have designed Beaded Crosses and a step-by-step tutorial for them. 

These crosses are made with pressed glass beads (4mm and 6mm) and 28-gauge wire.  They are about 3 inches long.

But, this is a versatile design.  You can also use heavier (22-gauge) craft wire and acrylic beads.  This one is about 4 1/2 inches long.

So, the whole family can participate!  You could go smaller and create one with seed beads on thread.  Or, you can go bigger and use larger acrylic beads or large wood beads with plastic lacing or yarn.  The smaller ones look nice tied onto a ribbon and used as a bookmark.  Or, you can hang them in the window for a suncatcher.

Here's how:

Cut about a yard of wire and string on three smaller beads, one large bead and three smaller beads.


String another large bead on one side and pass the other wire through in the opposite direction.


String three small beads on each wire and a large bead on one side.  Pass the other wire through the large bead in the opposite direction.


Repeat this step once more for three circles of beads.  Now we're going to make the arms of the cross.


String a small bead, a large bead, three small, one large, and three small beads on on side.


Bring the end of the wire down and around and through the large bead closest to the center.


Hold the cross in the center and pull the end of the wire to tighten. 


Repeat for the other side.


Add a small bead on each side and one large bead on one side.  Pass the other wire through the center of the large bead in the opposite direction. 

Add three small beads on each side and one large bead on one side.  Pass the other wire through the large bead in the opposite direction.  Bring both wires up and twist together above the last bead.  Separate the wires and make a loop for hanging.  Twist the wires around the loop and trim the extra off with pliers or heavy scissors.

I hope you enjoyed this tutorial.  I'd love to know how you used this craft.  Please feel free to show it to friends and family.  And, please link back to me when you do so. 

Have a blessed Holy Week and a Happy Easter!
Terry