Pages

Friday, April 28, 2023

Frosty Friend Door Hangers

 Hello!

Today I'm sharing a design from Herrschners.  It's a bit past the winter season, but it's a good time to get a headstart on stitching them for yourself or a gift for friends.

They are Frosty Friend Door Hangers:

Frosty Friend Door Hanger

Check back soon - I have a two more door hanger designs for kids' rooms coming up!  

Have fun stitching!

Saturday, April 22, 2023

Flower PIncushion for Gwen Studios

 Hi everyone!

Mother's Day is coming up and I have a cute flower pincushion bedecked with Gwen Studios ribbons. It's so simple, the kids can make this craft for their moms. Even if your Mom doesn't like to sew, this is a cheery decoration to hang on the wall or sit on a side table.

Flower Pincushion

This pincushion has a puffy fabric center made from a fabric circle.  I cut mine about 11" across. I used a lid to trace the circle. I used a bright yellow pin dot fabric but use whatever fabric you like or have.


Sew a running stitch around the circle about 1/4" from the edge. Be sure to put a knot in the end to start.


Pull up the running stitch to gather the circle.


Stuff with Fiber Fill and tie the ends of the thread closing up the opening.


The puffy center is about 5" across.  I cut a circle of felt for the back about 4 1/2" across.  This felt will back the center and the ribbons will be glued to it.

Cut ribbons for two rows of loops around the circle.  I made one row from ribbons about 5" and the next one 4 1/2".  I used white grosgrain for the first two circles and then an orange dotted grosgrain for the inner circle.  I used 24 of the smaller ribbon.

Here's a photo of the first round glued to the felt circle.  The next row is glued in between the first row of petals.


Here's the finished pincushion:


I sewed the button to the puffy center and pulled the thread through the felt to create and indentation.  You could glue it also.

Here's the details on this flower pincushion:

11" circle of cotton print

4 1/2" circle of stiff felt

7/8" white grosgrain (60")

5/8" white grosgrain (54")

3/8" orange dot grosgrain (96")

Button

Sewing thread and needle

Hot glue and glue gun 

Scissors


Gwen Studios ribbons can be found at Walmart, Michaels and Joann's. Click on the store links for starters,


Notes and ideas:  This pincushion is fairly large.  Smaller ones would look great, too.  

If making this with children, use a thick tacky glue or fabric glue instead of hot glue.  

Make it your own - a mix of bright colors would be a fun look.

Glue a paint stick or dowel to the back of the flower and put it in a pot. Use pebbles or glass marbles to hold it up. Add felt leaves.


Look for more fun ideas with ribbon for Mother's Day and Spring on the Designer Crafts Connection.

GwenStudios.com 

Since I am on the Design Team for Gwen Studios, I receive materials with which to design.  

Monday, March 20, 2023

Ribbon Tulips

Hi all!

California is getting a very wet winter this year and I am ready for spring.  But, if it's not spring yet outdoors, at least you can brighten your house with some spring-y ribbon flowers.

I'm working (again) with Gwen Studios 3/8" grosgrain in bright colors, but any of their ribbons would work as well.

Gwen Studios


You'll need (per flower):

a wood ball (3/4")

a bamboo skewer

green paint and your choice of bright colors like these from DecoArt

scraps of green stiff felt (Friendly Felt from Kunin)

Gwen Studios ribbon


hot glue and glue gun

scissors, paint brush

Optional:  bead caps, fabric scrap


To make a flower:

Paint the stick green.  Glue the ball onto the stick and paint the ball the bright color of your choice.  
Cut 12 - 3"-4" pieces of 3/8" wide grosgrain ribbon.  Form a loop and glue cut ends wrong sides together. Trim ends to a point.

Here's a flower in progress.  In this one, I wrapped the ball with a small circle of fabric instead of painting it.

Glue six loops around the ball and then glue the next six over the spaces in between the first row.

Die cut or freehand a small flower from green felt and punch a hole in the center.  Slide on the stick up under the flower and glue.

Cut leaves from felt and glue to the stick.

When you glue the stick into the ball, you can still see the stick.  To cover the end, I painted a bead cap and glued it over the hole in the ball. You can see that in the photo below along with the finished purple flower with the cloth-covered ball.


Happy Spring!

For more Spring inspired ribbon designs, check out the Designer Crafts Connection!


Monday, February 6, 2023

Ribbon Fairy

 Hi Everyone!

Today I'm sharing how to make a little fairy doll decorated with the beautiful ribbon from Gwen Studios.  


Here are the materials that you'll need:

3/4" wood ball bead

Small wood candle cup

Small oval or round beads

2 chenille stems (your choice of color)

Ribbon: sheer (7/8"), satin (3/8")

Yarn, floss, twine or wool roving for hair

Wings

Tools: wire cutters, scissors, hot glue and gun, tacky glue, bead reamer, paint and brush, colored pencils


To create the basic body, fold one chenille stem in half and cut the other one in half. Insert the folded one through the bead and the candle cup. Center and wrap the half stem between the ball and the candle cup. Save the other half stem for another fairy.


This is the basic body.

Remove the candle cup and paint if desired. Glue the ends of the ribbon around the candle cup at the waist.  I scrunched and glued the ends of the white sheer ribbon and added two layers. Then, I glued lengths of 3/8" pink satin over the sheer layers.

Trim the ribbons as desired.  The lengths can be varied, and more layers added if you like. Glue a ribbon waistband around the candle cup covering the ends of the ribbons.

To make the hair, thread 12 lengths of yarn, thread or wool roving through the loop and then pull the loop tight against the head.  I chose 12 lengths because you can easily braid that number of strands. Arrange the hair and glue to the head. 

I pulled some of the strands of yarn to the front and trimmed them for bangs.

Add facial features with paint or pencil.  Add accessories like a crown or wand.  I slid on oval wood beads for the hands and feet.  You could also just turn the chenille stems back on themselves to make the hands and feet.

Glue wings to the back. I found these pink plastic butterflies in the floral department at my local Joann's.  You could also cut out your own.

These fairies are fun to play with because they are poseable.  Here's mine sitting in a teacup.


She also enjoys the spring greenery.


This is a great group craft for a girls' birthday party or other occasion because they can be easily personalized.  And with all the wonderful ribbons available from Gwen Studios, it's easy to create one-of-a-kind fairies.


Since I am part of the Gwen Studios Design Team, I receive their ribbon with which to create.  Look for it at Michaels.com and Walmart.com. You won't be disappointed!

For more fun ribbon ideas, visit the Designer Crafts Connection blog.


Friday, January 6, 2023

Valentine Tree

Happy New Year!

It was so much fun to decorate the tree for Christmas that I thought a Valentine tree would be fun.  

I found a tiny tree at the Dollar Store for just fifty cents! Can't beat that!


I'm decorating the tree with a variety of Gwen Studios ribbons.  

Here's a heart that I made with cute red polka dot grosgrain ribbon. Cut two equal lengths of ribbon and glue the ends together with the dots on the outside. I used thick tacky glue for this process.


Line up the two halves with the ends even.


Cut a piece of thread to use for a hanging loop from embroidery thread or other thread. Add thick tacky glue along the inside edge of one half.  Place the thread loop on the glue and press the other half of the heart onto the glue sandwiching the thread loop in between the halves. Easy peasy!


Make more with different widths and colors of grosgrain ribbon.

Here's an idea using wood hearts. Paint and let dry. Drill a small hole in the angle of the heart and glue a hanging loop into the hole.  These wood hearts are 1/4" thick. If you don't have hearts of this thickness, paint two of the same size and glue together with the loop between.  Make a ribbon bow with 3/8" ribbon. For adhering the bow and button, I used hot glue.


Now to decorate!

For the heart at the top, I glued a ribbon across the back of the wood heart so that it would slide onto the tree. I used some 3/8" satin ribbon for the garland.


You can find the Gwen Studios ribbon that I used at Michaels or Walmart.


For more fun ribbon ideas, see the Designer Crafts Connection blog.


Tuesday, January 3, 2023

Window Wall Hangings

 Happy New Year!

Today I'm sharing a couple of panels that I designed for Herrschners plastic canvas kits.  

At the Cabin Window Wall Hanging

In My Garden Window Wall Hanging

There will be two more windows coming out later - one for Halloween and one for Christmas/Winter.  By the way, the frame comes as part of the kit.

Lots of fun new designs are out right now at Herrschners.

Enjoy!

Friday, November 25, 2022

Ribbon Angel


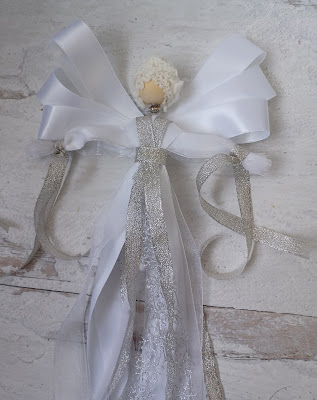
 This month I have created an angel with the beautiful ribbons from Gwen Studios


For this angel, you'll need:

White chenille stems, 1 and 1/2

Wooden bead, 3/4"

White yarn or other for hair

Silver spacer bead

Thin wire, 22 gauge

Silver beads, 2mm, about 20

Ribbon from Gwen Studios (available at Walmart):

Satin ribbon

Snowflake ribbon

Silver ribbon

Sheer ribbon

Or Michaels:

Silver and Blue Holiday Pack

Sheer ribbon

Metallic Holiday Ribbon Pack

Tools: scissors, round nose pliers, tacky glue or hot glue and glue gun

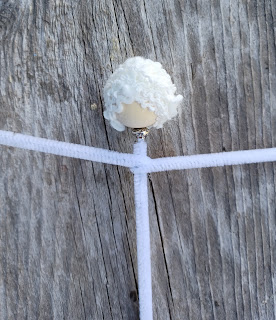
To begin, fold the end and glue the full chenille stem into the wooden ball.  Slide a silver bead up under the head.  Wrap half a chenille stem around the long one for the arms. Wrap and glue yarn around head.

Lay 6-8 ribbons across the front and back of the arms covering the chenille stem.  These ribbons are about 8" long. Use a short length of wire to hold the ribbons near the end on each side. Layer 6-8 ribbons on each side of the head across the center. These ribbons are about 20" long.  Choose a variety of ribbons in any colors you wish.  Wrap a short length of wire under the arms at the waist.

Tie ribbons over the wires on the wrists and wrap a short length around the waist and glue at the back.

For the wings, make three loops and glue. Make a matching set for the other side leaving a ribbon tail.  Fold under end a glue the wings together. The back is shown.


Glue wings to back of angel.  Glue a hanging loop in back of the head with the ends under the wings.

To make the halo, use about 2" of wire and make a loop in one end. String small silver beads on it and make another loop.  Slide the loops under the hair and glue.


This angel is very versatile, and you can make in any colors and with any ribbons you like.  Gwen Studios has so many beautiful ribbons, I feel sure that you will be able to find some that you like.


As a designer for Gwen Studios, I receive samples of their beautiful ribbons to use in my designs.

For more designs using these ribbons, head to the Designer Crafts Connection site.