Pages

Saturday, January 22, 2022

New Plastic Canvas Designs

 Hi Everyone!

There are a few new designs of mine available on the Herrschners site.  I hope you'll take a look!


These are farm animal masks that I'm sure the kids will enjoy.

Down at the Farm Animal Masks

And, for those who love cake - some coasters and a tissue box cover.

Cake Slice Tissue Cover and Coasters

And, finally, a little set of organizers for your purse with one of my favorite flowers - pansies.

Pansy Patch Purse Organizer

I hope you enjoy these designs.  There's something for everyone!  Happy Stitching!  Find them all at herrschners.com.

Monday, January 10, 2022

Heart Pillow with Ribbons

 Hello!

Today I'm working with the fabulous ribbons from Gwen Studios to create a ribbon embellished pillow in a shabby chic style.  This is an easy-sew project that anyone can make with a needle and thread and a little hot glue.


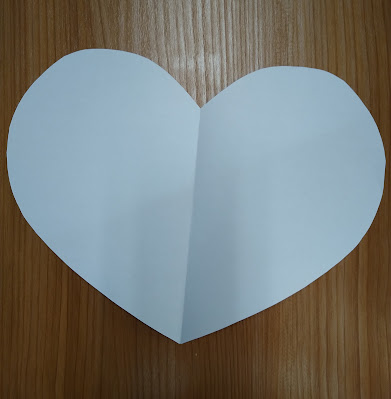
First, make your pattern by folding a piece of copy paper in half.  Draw a heart that fills the space.

Cut out the heart.  
If you're not happy with the shape, refold and trim.  Pin to your fabric and cut two hearts.  
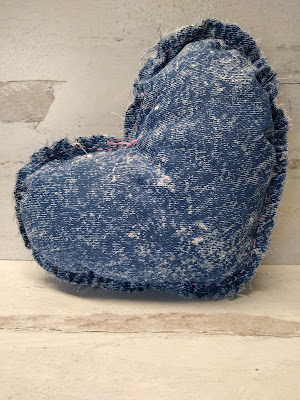
I used some scraps of a distressed denim fabric, but you can use any fabric.  Pin the two hearts wrong sides together and sew a running stitch with pink embroidery thread.
When stitching, leave the thread on the card.  Leave an opening and stuff with Fiber Fill.

Here's how it looks after stuffing.  I pulled up the stitching to gather before tying it off. Then, I pulled threads on the edges.

I added a ribbon bows in satin and sheer ribbons and made a rolled rose from 7/8" pink grosgrain ribbon.  To make a rolled rose, roll up the ribbon for the center, then start twisting the ribbon as you continue to wrap.  Then, I hot glued the ribbons to the center of the pillow.

Gwen Studios can be found at Walmart.com.  Search for Gwen Studios or use these links for the ribbon that I used here:


For more Romancing the Ribbon design ideas, go to the Designer Crafts Connection blog.


Friday, December 3, 2021

Girls Ribbon Jewelry with Gwen Studios

 Hi Everyone!

I had to create a couple more things with the beautiful ribbon and patches that I received from Gwen Studios.  I also tried out their Snap Setting Tool, which was super easy to learn to use.


Here's what you get in the Snap Setting Tool box:

This photo is from the Walmart site, where it is priced at $20.97.  It comes with snaps of different colors and shapes as well as different dies to fit the snaps.

I created a Unicorn Necklace and a Ribbon Bracelet:


They were so quick and easy to make.  Now, that I made one, I know I'll need more for the other little girls in my family. Or, we can have a craft party, because these are easy enough for the kids to do.

To make the unicorn necklace, I backed the unicorn patch with stiff felt using glue.  Since the felt is synthetic, I didn't want to use an iron.  Then, I glued two lengths of grosgrain ribbon to the back.  I applied the snaps to the ends of the ribbon, which I turned under to finish it.  The Snap Setting Tool is very easy to use and can be used with both plastic and metal snaps.

For the bracelet, I used a wider pink grosgrain ribbon under the polka dot ribbon.  I used heart-shaped plastic snaps for the fasteners.  I started with 9" of each ribbon and turned each end under 1".  It fits a 6 1/2" wrist. 


Here are all the links for the ribbons and patches from Gwen Studios


Sequin Rainbow Patch

Fox Patch

Star Patch

Unicorn Patch

Mermaid Patch

Solid and Polka Dot Ribbon Assortment

For more projects with these great patches and ribbon, go to the Designers Craft Connection blog.  


Monday, November 29, 2021

Rainbow Suncatcher for Gwen Studios

 Hi everyone!

Gwen Studios not only has some of the cutest ribbons available as you've seen from my past posts, it has spectacular patches.

Here's what I received for this month's designing:


With these, I created a sparkling rainbow suncatcher:


The colors are so bright and cheerful.  I love the polka dots!


To make my suncatcher, I cut 7" pieces of ribbons in rainbow colors and arranged them on the back of one of the rainbows overlapping the edges slightly.


This is the back of the polka dot ribbon.  I glued the ribbon on to hold it in place.  You can also carefully iron-on the ends of the ribbon.  Then, I added a second rainbow patch over the top.  Since they are symmetrical, the edges match.

Before adhering the patches to each other, I inserted a loop of thin white ribbon.  Follow the instructions on the package to iron the patches together.  Then, I trimmed the ends of the ribbons diagonally.

Here's the finished Rainbow Suncatcher.


What a great addition this would make to a child's room or any sunny window!

Here's where you can find these products from Gwen Studios at WalMart:

Sequin Rainbow Patch

Fox Patch

Star Patch

Unicorn Patch

Mermaid Patch

Solid and Polka Dot Ribbon Assortment


Thursday, October 28, 2021

Faux Tin Pumpkins

 Hi!

Thanks for stopping by.  

I love the times when I can just play in my craft room and try things that I've had on my list forever.  And, when those things go together easily without a lot of frustration - even better.

Here's a quick and easy project that is still on time for Halloween or harvest decorating.

First, grab some galvanized flashing.  We recently had some painting done, so there was some extra lying around my house. Yay, free craft material!

I used a dry erase marker to draw a pumpkin on a piece of the flashing.

Since it comes in a roll, it will be curved, but you can flatten it with your hands.  I cut it out with metal snips, then pounded it with a ball peen hammer to give it some texture.

Then, I used patinas to paint the large pumpkin and metal paint to paint the smaller one. I wanted to try a couple of paints to see what I liked.  Both worked well.  I punched holes in the top and added steel wire.


This was so much fun and very quick and easy (always a plus!).  I can't wait to try some autumn leaves and then primitive Christmas trees!  Maybe a garland of tin shapes... what about a snowman?  


Happy Fall, Happy Harvest, Happy Halloween, Happy All Hallows Eve, Happy All Saints Day, Happy All Souls Day.....that should cover it for awhile!

Monday, October 25, 2021

Gift Bags with Gwen Studios

 Hi Everyone!

Today I'm decorating gift bags and boxes with Gwen Studios new holiday trims and ribbons.  I've never seen anything like the new die cut trims that they produced and I think you will be excited to see them, too.

Here's some of what I received from Gwen Studios.  Since I am on their design team, I receive a generous supply of trims and ribbons to use in my designs.

When I saw these, I immediately wanted to create a little winter scene with them.  


I started with a silver gift bag and added some blue cardstock to fit the bag.  Then, I cut pieces of the trim to create a little scene and adhered them to the bag.  I used some metallic ribbon for the road.  To finish, I add some dimensional pearl paint for snow.

Winter Scene Gift Bag

Next, I upcycled a bag from my collection.  Here it is:

Not very pretty and a bit worse for wear.  And, I didn't like the handle at all!  But, no worries - we can transform this bag!  First I replaced the ugly handles with some beautiful new emerald ribbon.  Much better!


I cut a triangular tree to fit the bag from cardstock. The height of your tree will vary depending on the bag.  Mine is about 12" high by 6" wide.  I glued trims across the tree varying the angles and colors.  Then, I trimmed the edge of the trims even with the tree and glued it to the bag along with a trunk for the tree and some gold paper to cover the bottom edge of the bag.  With a snowflake trim, I snipped individual snowflakes for a tree topper and for the background snowflakes.


Trim the Tree Gift Bag

This is a fun and easy idea that you can do in any size.  Here are the trims that I used:

So much fun and so many possibilities!

For my last idea, I decorated the lid of a white gift box.  For this box, I used a turquoise grosgrain ribbon and a coordinating snowflake trim.  I attached the ribbon first with double-sided tape, then attached the trim over it.  Since the tape would show through the die cut ribbon, I attached it only on the ends on the inside of the box.  I created an easy bow with pieces of ribbon and trim, which I wrapped with a piece of wire in the center.  Then, I wrapped a short piece of ribbon around it.  Quick and easy and so pretty!
Snowflake Trim over Grosgrain Ribbon

Look for these ribbons and trims on WalMart.com under Gwen Studios.  Here are a few links for these and more!


Die Cut Ribbons are available now at your local WalMart and at walmart.com at the following links:
1.5" Red Die Cut Christmas Ribbon, Holiday Lights, 12 Yards
620926592
1.5" Die Cut Holiday Ribbon, Cute Green Christmas Trees, 12 Yards
516501896
1.5" Die Cut Winter Holiday Ribbon, Metallic Blue Snowflake, 12 Yards
473009021
1.5" Christmas Die cut Ribbon, Silver 'Fa La La' Words, 12 Yards
911048747
1.5" Christmas Die cut Ribbon, Red 'Ho Ho Ho' Words, 12 Yards
174030677
1.5" Die Cut Christmas Ribbon, Red 'Merry' Words, 12 Yards
894114735
1.5" Die Cut Winter Holiday Ribbon, Blue Snowman, 12 Yards
515833722
1.5" Die Cut Christmas Ribbon, Metallic Gold Reindeer, 12 Yards
368062383
1.5" Die Cut Holiday Ribbon, Traditional Green Christmas Trees, 12 Yards
325982460
1.5" Die Cut Cute Christmas Ribbon, Red Christmas Car, 12 Yards
354380797
1.5" Die Cut Cute Christmas Ribbon, Brown Gingerbread Man, 12 Yards
986089866
1.5" Die Cut Winter Holiday Ribbon, Navy Blue Snowflake, 12 Yards
573757228
1.5" Die Cut Holiday Ribbon, Metallic Silver Snowflakes, 12 Yards
Die Cut Winter Holiday Ribbon, Metallic Blue Snowflakes, 7/8" x 3 Yards
284835276
Die Cut Winter Holiday Ribbon, Navy Blue Snowflakes, 7/8" x 3 Yards
545655548
Die Cut Winter Holiday Ribbon, Silver Snowflakes, 7/8" x 3 Yards
423853873
Die Cut Christmas Ribbon, Red Holiday Lights, 7/8" x 3 Yards
235333178
Die Cut Holiday Ribbon, Cute Green Christmas Trees, 7/8" x 3 Yards
314244618
Silver Die Cut Christmas Ribbon, 'Fa La La' Words, 7/8" x 3 Yards
916081493
Red Die Cut Christmas Ribbon, 'Ho Ho Ho' Words, 7/8" x 3 Yards
189780053
Red Die Cut Christmas Ribbon, 'Merry' Words, 7/8" x 3 Yards
600422835
Metallic Gold Reindeer Die Cut Christmas Ribbon, 7/8" x 3 Yards
105639471
Die Cut Holiday Ribbon, Green Christmas Trees, 7/8" x 3 Yards
997963469
Red Die Cut Christmas Ribbon, Christmas Car, 7/8" x 3 Yards
466155057
Die Cut Christmas Ribbon, Brown Gingerbread Man, 7/8" x 3 Yards
520889865
Die Cut Winter Holiday Ribbon, Blue Snowman, 7/8" x 3 Yards


Stop by the Designer Crafts Connection blog for more holiday ideas using Gwen Studios.


Monday, October 11, 2021

Farmhouse Ornaments and Santa's Mailbox

 Hi everyone!

Thanks for stopping by!  You know it's less than 100 days to Christmas, so time for some stitching!  Here's some projects to get you started:

These are Farmhouse Charm Ornaments that I designed for Herrschners.


And, here's a cute mailbox to in which to put your letters for Santa!


You can find both of these kits on the Herrschners website under plastic canvas.

You can also find some of my designs for Herrschners on Walmart.com.  Here are the Farmhouse Charm Ornaments.

And, my Peppermint Train Set is there also.


Happy Stitching!